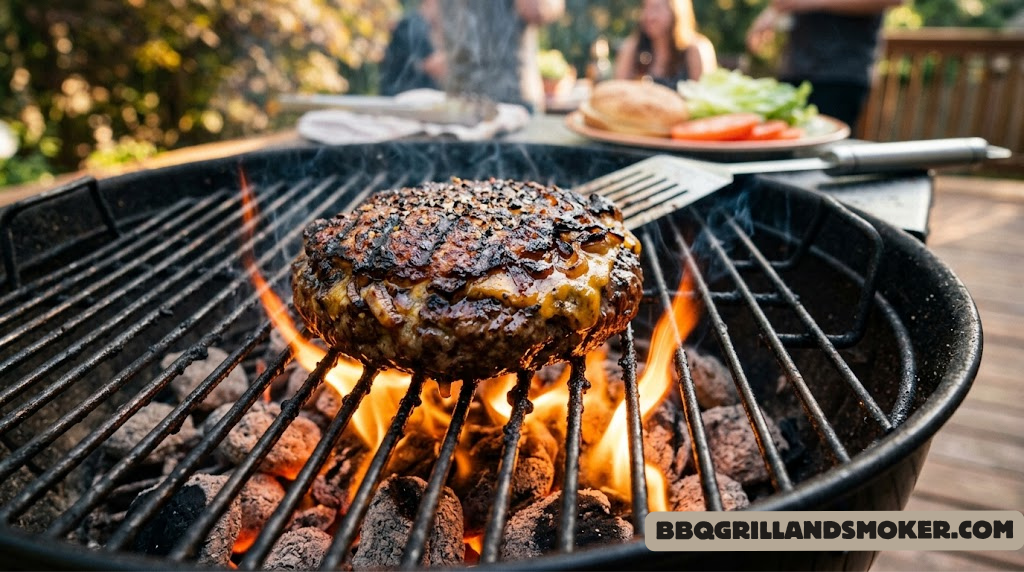
GRILLED
BURGER
RECIPE
The thick, charred, dripping-with-flavor backyard burger you’ve been chasing — built from first principles.
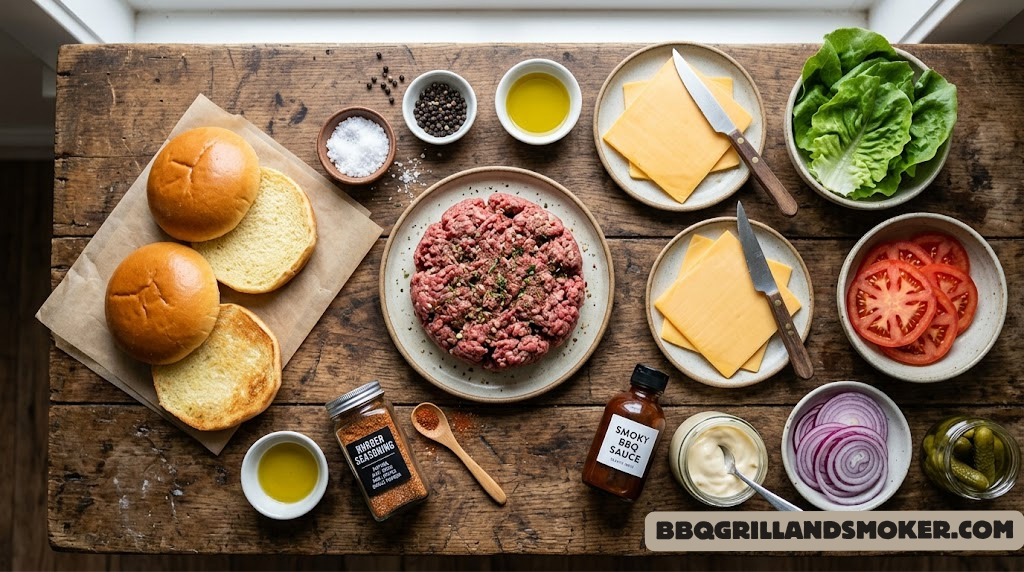
- 2 lb 80/20 ground beef (chuck preferred)
- 1½ tsp kosher salt (Diamond Crystal)
- 1 tsp freshly cracked black pepper
- ½ tsp garlic powder
- ½ tsp onion powder
- 4 slices American or sharp cheddar cheese
- 4 brioche buns, halved
- 1 tbsp neutral oil (for grate brushing)
- Toppings of choice (see Section 8)
- Divide beef into four 8-oz portions — don’t overwork.
- Form loosely into ¾-inch thick patties; dimple centers.
- Season both sides just before grilling.
- Preheat grill to 450–500°F, brush grates with oil.
- Grill 3–4 min per side, lid closed, no pressing.
- Cheese on last 60 seconds; close lid to melt.
- Toast buns 30–45 seconds cut-side down.
- Rest 2 min, build, devour.
🔥 For the full science, technique breakdowns, topping guides, and grill-type comparisons — keep reading. This recipe rewards the extra knowledge.
Why Your Burger Grilling Method Actually Matters
The backyard burger has a reputation for being easy. Slap some ground beef on the grill, flip it a couple of times, done. And sure — that approach will produce a cooked burger. But it will rarely produce a great burger, the kind that silences a table mid-bite, the kind guests ask about weeks later.
The difference between a forgettable patty and a transcendent one comes down to a handful of specific, learnable decisions: fat ratio, forming technique, heat zone management, timing, and the brief but critical rest. None of these require special equipment or culinary training. They just require knowing what you’re doing and why.
This guide covers every dimension of the grilled burger in the kind of depth that actually changes how you cook. By the end, you’ll understand not just what to do, but why each step matters — which means you’ll be able to adapt on the fly when your grill runs hot, your beef is leaner than expected, or you’re feeding a crowd with wildly different doneness preferences.
Along the way we’ll cover beef selection, the science of fat rendering, heat zone strategy, the dimple technique, seasoning timing, cheese melting, bun toasting, and a catalogue of builds that go way beyond “lettuce, tomato, onion.” We’ll also look at how different grill types — charcoal, gas, and pellet — affect the final flavor, and which one wins for the pure backyard burger experience.
If you want the deep-dive technical companion to this recipe, our article on making juicy grilled burgers — temp, fat ratio, and tips covers the biochemistry in even more detail. For now, let’s build the burger from the ground up.
Choosing the Right Beef: The Foundation of Everything
No technique in the world compensates for the wrong meat. The beef you choose determines the ceiling for what your burger can become. And the most important variable isn’t price, sourcing, or even cut — it’s fat content.
The Fat Ratio Explained
Ground beef is sold by lean-to-fat ratio, expressed as something like “80/20” (80% lean, 20% fat) or simply as a percentage of fat. Fat performs three critical functions in a grilled burger:
- Moisture: As the burger cooks, fat liquefies and bastes the meat from the inside, keeping it juicy even at medium or medium-well temperatures.
- Flavor: Fat carries the majority of a beef’s flavor compounds. A 95/5 patty tastes dramatically blander than an 80/20 one made from the same animal.
- Crust formation: Rendered fat hitting the hot grill grate creates the sizzle and char that produces the Maillard reaction crust — the brown, flavorful exterior everyone loves.
| Lean/Fat Ratio | Fat % | Juiciness | Flavor | Flare-Up Risk | Best For |
|---|---|---|---|---|---|
| 70/30 | 30% | Extremely Juicy | Rich | High | Specialty smash burgers |
| 80/20 ⭐ | 20% | Very Juicy | Excellent | Medium | Classic grilled burger — ideal |
| 85/15 | 15% | Good | Good | Low-Med | Everyday grilling |
| 90/10 | 10% | Acceptable | Mild | Low | Health-conscious; needs help |
| 95/5 | 5% | Lean/Dry risk | Bland | Very Low | Not recommended for grilling |
The Best Cuts for Grinding
If you’re grinding your own (the optimal path for serious burger nights), different cuts bring different flavor profiles:
| Cut | Fat Content | Flavor Profile | Notes |
|---|---|---|---|
| Chuck (80/20) | ~20% | Beefy, rich, well-rounded | The gold standard; use alone or as a base |
| Brisket | ~20–30% | Deep, complex, smoky notes | Blend 50/50 with chuck for magic |
| Short Rib | ~25–30% | Intensely beefy, luxurious | Add 30% to chuck blend for restaurant-style |
| Sirloin | ~10–15% | Clean beef flavor | Good but lean; blend with fattier cuts |
| Round | ~8–12% | Mild, lean | Too lean for great burgers alone |
For most backyard cooks, 80/20 ground chuck from the butcher counter or grocery store delivers excellent results without the effort of grinding. Ask for “coarse ground” if possible — a courser grind creates a better texture in the finished patty than fine-ground beef, which can become dense and meatloaf-like when formed.

Forming Perfect Burger Patties: The Technique That Changes Everything
How you form a burger patty has a direct and significant impact on its texture, juiciness, and how evenly it cooks. Most home cooks unknowingly make mistakes at this stage that no amount of grilling skill can recover from.
The Cardinal Rule: Handle Cold Beef Minimally
Heat is the enemy at the forming stage. Your hands are warmer than the beef, and every second you spend working the meat warms and softens the fat — which should stay solid until it hits the grill. Overworked ground beef becomes compact and dense, cooking up mealy and tough rather than loose and tender. The goal is to form the patty in as few motions as possible.
Ideal Patty Weight and Thickness
The sweet spot for a grilled burger is 6–8 ounces per patty at ¾ inch thickness. This provides enough mass to absorb grill heat without cooking through before the exterior develops a proper crust. Thinner patties (under ½ inch) cook through before they sear properly on charcoal; thicker patties (over 1 inch) require either finishing in indirect heat or risking a raw center.
📏 Patty Sizing Reference
- Slider / Kid’s burger: 2–3 oz, ½ inch thick — 2–2.5 min per side
- Classic single: 4–5 oz, ½–⅔ inch — 3 min per side
- Standard backyard: 6–8 oz, ¾ inch — 3.5–4 min per side
- Monster / steakhouse: 10–12 oz, 1 inch — direct then indirect, 5–6 min per side
The Dimple: The Most Important Step Nobody Does
Raw beef patties puff dramatically in the center as they cook. The proteins in the outer band contract, squeezing the center upward into a dome. If you don’t account for this, you end up with a thick, raw center surrounded by an overcooked edge — a common beginner mistake.
The solution is simple: once formed, use your thumb to press a ½-inch deep dimple in the exact center of the patty. As the proteins contract during cooking, the dimple fills in, producing a uniformly flat burger that cooks edge-to-edge at the same rate. This single step dramatically improves doneness consistency. For more on keeping burgers structurally sound on the grill, see how to keep burgers from falling apart.
- Remove beef from refrigerator 20–30 minutes before forming (slight tempering eases forming without warming the fat excessively).
- Divide into equal portions by weight — a kitchen scale is more accurate than eyeballing.
- Gently cup each portion in both hands and apply just enough pressure to hold it together — 4–6 light compressions maximum.
- Flatten to approximately ¾ inch thickness with open palms — not pressed between fingers.
- Press a ½-inch deep thumb dimple directly in the center.
- Place on a parchment-lined sheet pan and return to the refrigerator until ready to season and grill.

Seasoning Strategy: When, What, and How Much
Burger seasoning is simultaneously one of the most debated and most misunderstood aspects of the process. The debate usually centers around what seasonings to use. The misunderstanding is almost always about when to season.
The Timing Problem
Salt applied to raw beef 20+ minutes in advance draws moisture out of the meat via osmosis, changing the protein structure in ways that make the finished patty denser and more sausage-like in texture. This is desirable for meatloaf; it’s undesirable for a burger, where you want a loose, tender crumb structure.
Season your patties immediately before they go on the grill — 30 seconds to 2 minutes in advance, maximum. Apply salt and pepper generously to both sides, pressing it lightly to adhere. Then move directly to the grill. This preserves the ideal texture while still delivering well-seasoned flavor throughout.
The Essential Seasoning Formula
🧂 Classic Burger Seasoning (per patty)
- ¼–⅓ tsp kosher salt per side (be generous; underseasoned burgers are the most common mistake)
- ⅛–¼ tsp freshly cracked black pepper per side
- Optional: light dusting of garlic powder and onion powder
- Optional: pinch of smoked paprika for color enhancement
What to Avoid in the Seasoning Mix
Keep the seasoning on the outside of the patty, not mixed into the beef. When you mix seasoning into ground beef, the proteins and fat bind together tightly, again creating that dense, meatloaf-like texture. The exterior seasoning method — applied at the last moment — is what produces the loosely textured, juicy interior with a well-seasoned, crusty exterior that characterizes a great grilled burger.
For those who want to go deeper on seasoning dry rubs and spice profiles, our best barbecue rubs guide and our homemade BBQ rub recipe have a wealth of inspiration that adapts well to burgers.
Grill Setup and Heat Zones: The Framework for Success
How you configure your grill before the burgers touch it is as important as what you do while they’re on it. Most burger disasters — raw centers, burned exteriors, dried-out patties — are preventable with proper heat zone setup.
The Two-Zone Setup: Why You Need It
A two-zone fire divides your grill into a hot direct-heat zone and a cooler indirect-heat zone. This gives you options: you can sear aggressively on the direct zone, then move patties to the indirect zone to finish cooking gently without charring — an invaluable technique for thicker patties or when cooking for a crowd at multiple doneness levels.
It’s also your insurance policy against flare-ups. When burning fat causes a flare, you move the patties briefly to the indirect zone until the flames subside, then return them to the sear zone. This prevents the char-and-raw disaster that flare-ups cause when you have no refuge. Our guide to preventing flare-ups on a gas grill covers this in more depth.
🌡️ Two-Zone Grill Configuration
Grill Temperature: Getting It Right
Preheat your grill to 450–500°F at the grate level before any burgers touch it. This takes longer than most people allow — typically 12–15 minutes for gas, 20–25 minutes for charcoal (after the chimney coals are ashed over). A properly preheated grill:
- Sears the patty surface immediately on contact, preventing sticking
- Creates the Maillard reaction (the brown crust responsible for most of the flavor)
- Reduces total cook time, keeping the center moist
To test grill temperature without a thermometer: hold your palm 3 inches above the grate. At 450–500°F, you should be able to hold it there for no more than 2–3 seconds before the heat forces you to pull away. For proper charcoal heat management, our guide on charcoal grill temperature control covers everything from chimney loading to vent adjustment.
Oiling the Grates: Non-Negotiable
Even on a well-seasoned grill, a burger with significant fat content will stick momentarily during the first minute of cooking while the sear develops. The solution is to brush or wipe the grates with a neutral high-smoke-point oil (canola, grapeseed, avocado) using tongs and a folded paper towel right before the patties go on. This provides just enough lubrication to prevent sticking without creating flare-up conditions.
For everything you need to know about cleaning and maintaining your grates, our comprehensive guide on cleaning barbecue grates is the reference to bookmark.

The Grilling Process: Step by Step
You’ve chosen the right beef, formed your patties properly, seasoned at the right moment, and preheated the grill with a two-zone setup. Now it’s time to cook. Here’s exactly what happens from the moment the patty hits the grate to the moment it rests on the bun.
The Six Steps of Perfect Burger Grilling
- Season and move immediately. Apply salt and pepper to both sides of cold, refrigerated patties. Move to the hot zone within 60 seconds. Cold patties sear more aggressively and develop better crust than room-temperature ones.
- Place dimple-side up. The dimple faces up when the burger goes on. This keeps the thumb impression visible so you know where it is, and gravity helps the dimple flatten during cooking rather than deepening it.
- Close the lid. Many home cooks grill burgers with the lid up. Don’t. Closing the lid traps heat and creates a convection environment that cooks the top of the patty simultaneously with the bottom, dramatically reducing total cook time and the opportunity for the exterior to overcook before the center finishes.
- Resist the flip urge. Leave the patty alone for 3–4 minutes. It will release from the grate naturally when a proper crust has formed. If it sticks when you try to flip, it’s not ready yet — wait 30–60 more seconds. Forced early flipping tears the crust and loses juices. Flip only once.
- Cheese on in the last 60 seconds. With one minute left, place a cheese slice on the patty and close the lid. The trapped heat melts the cheese evenly across the surface without overcooking the patty.
- Rest before serving. Remove from heat, place on a clean plate or cutting board, and rest for 2–3 minutes. Resting allows the internal juices — which have been pushed to the center by heat — to redistribute throughout the patty. Cut into a rested burger versus a just-off-the-grill burger and the difference in juice retention is dramatic.
Bun Toasting: The Overlooked Step
While the burger is resting, toast your buns. Place them cut-side down on the hot grate for 30–45 seconds until they’re golden with light char marks. Toasted buns serve two functions: they add a pleasant texture contrast, and — critically — they create a barrier that prevents the bun from becoming saturated with burger juices and falling apart during eating. This is a two-minute step that dramatically elevates the overall burger experience.
Doneness Guide: Temperatures, Texture, and Food Safety
Burger doneness is a personal preference — but it’s also a food safety consideration, particularly for store-bought ground beef. Understanding both dimensions lets you make informed decisions rather than guessing by color (which is notoriously unreliable in ground beef).
Internal Temperature Guide
Food Safety Context
The USDA recommends cooking ground beef to a minimum internal temperature of 160°F — “well done” by the standards above. This is because grinding beef exposes previously interior surfaces (where bacteria from the outside of the animal can penetrate during processing) throughout the meat.
However: if you grind your own beef from whole muscle cuts immediately before cooking, the risk profile is dramatically lower, and cooking to 130–140°F is considered safe by many food science authorities. The key variable is the processing history of the meat.
Using a Thermometer
An instant-read thermometer eliminates all guesswork and is by far the most reliable way to achieve consistent doneness. Insert horizontally into the side of the patty to reach the center — the thickest point. Pull the burger off heat 5°F below your target; carryover cooking during resting will bring it the rest of the way. See our juicy burger temp and fat ratio guide for a more detailed scientific breakdown of what’s happening at each temperature threshold.
Toppings, Sauces & Burger Builds: From Classic to Creative
The burger build is where personality enters the picture. A great patty can carry a minimalist approach beautifully — some people genuinely prefer a thin smear of mustard and a pickle on a perfectly cooked burger over any elaborate construction. Others want a six-layer tower of contrasting flavors and textures. Both approaches are valid, but each benefits from intentional choice.
The Architecture of a Great Burger
Think of a burger as having four flavor/texture layers: the sauce (provides creaminess and seasoning), the crunch (textural contrast), the fresh element (cut through richness), and the cheese (binds and enriches). Not every burger needs all four, but the best ones hit at least three.
Signature Burger Builds
| Build Name | Sauce | Cheese | Crunch | Fresh | Special |
|---|---|---|---|---|---|
| The Classic | Yellow mustard + ketchup | American | Dill pickles | Iceberg, raw onion | Tomato |
| Smash Burger | Special sauce (see below) | American | Griddle onions | Shredded lettuce | — |
| Steakhouse | Creamy horseradish | Aged cheddar | Crispy onion | Arugula | Sautéed mushrooms |
| Smokehouse | BBQ sauce | Sharp cheddar | Crispy bacon | Coleslaw | Pickled jalapeños |
| Umami Bomb | Miso mayo | Gruyère | Crispy shallot | Micro greens | Soy-glazed mushrooms |
| The Spicy One | Sriracha mayo | Pepper Jack | Fried jalapeños | Shredded cabbage | Pickled red onion |
The Special Sauce (Smash Burger Style)
The most legendary burger sauce requires no more than four ingredients and takes two minutes to make:
🥄 Special Sauce Recipe
- 3 tbsp mayonnaise (Duke’s or Best Foods)
- 1 tbsp ketchup
- 1 tbsp yellow mustard
- 1 tbsp finely minced dill pickles + a splash of pickle brine
Mix, taste, adjust. Apply generously to both bun halves. Make ahead and refrigerate — it improves overnight.
Topping Showcase
If you want to explore what different BBQ sauces bring to a burger or any grilled protein, our selection of the best barbecue sauces is a great reference. And for those wondering whether barbecue sauce is gluten-free — we’ve got that covered too.

Bun Selection: The Underrated Half of the Equation
The bun is the first and last thing you taste in a burger. It’s also the structural container that determines whether you eat your burger in one hand or with a fork and knife. Yet most people give it approximately zero thought, grabbing whatever’s on the shelf at eye level. This is a mistake worth correcting.
Bun Comparison: What to Use When
| Bun Type | Structure | Sweetness | Best Match | Notes |
|---|---|---|---|---|
| Brioche ⭐ | Medium | Slightly sweet | Classic & gourmet builds | Rich, toasts beautifully; can fall apart when wet |
| Potato Roll | Very soft | Slightly sweet | Smash burgers; double patty | Martin’s style; beloved by serious burger fans |
| Sesame Kaiser | Firm | Neutral | Thick, juicy patties | Handles wet toppings best; old-school appeal |
| Pretzel | Firm | Savory | Bold toppings; pub style | Strong flavor — needs bold accompaniments |
| Ciabatta | Very firm | Neutral | Italian-style builds | Too much resistance for juicy patties; splits |
| Basic White | Soft | Neutral | Kids’ burgers; casual | Disintegrates when wet; avoid for thick patties |
Gas vs Charcoal vs Pellet Grill: Which Makes the Best Burger?
This is one of the most contentious debates in backyard BBQ, and the answer is more nuanced than camp loyalists on either side typically admit. Different grill types genuinely produce different burgers, and which is “best” depends on what you value.
🔥 Charcoal
- Highest sear temperature potential
- Adds authentic smoke flavor
- Better Maillard reaction at high heat
- Lump charcoal produces cleaner flavor
- Most expressive burger flavor profile
⛽ Gas (Drawbacks)
- Rarely achieves charcoal-level temperatures
- No smoke flavor contribution
- Flavorful drips incinerate rather than smoke
- Some find the result less “grill-flavored”
⛽ Gas
- Fast preheat (10–12 min)
- Precise, instant temperature control
- Perfect for weeknight cooking
- Easy two-zone setup via burner control
- Consistent results with minimal management
🪵 Pellet
- Adds real wood smoke to the patty
- Excellent for smoked/slow-cooked thick burgers
- PID temp control = set and forget
- Best for “smoked smash burger” style cooking
- Easy at 375°F for a unique wood-fired taste
The honest verdict: charcoal produces the most flavorful classic grilled burger; gas produces the most consistent, convenient everyday burger; pellet produces the most interesting wood-smoked burger with the least effort. All three are excellent — the question is what you value most in any given cook.
For detailed performance comparisons, see our analyses of pellet grill vs charcoal, pellet grill vs gas grill, and the broader flavor discussion in our comparison of flavor outcomes across grill types. The deeper mechanics of grilling vs smoking heat and flavor mechanics is also worth reading for context.
| Factor | Charcoal | Gas | Pellet |
|---|---|---|---|
| Preheat Time | 20–25 min | 10–12 min | 15–20 min |
| Max Temp (grate) | 600–700°F | 500–550°F | 500°F |
| Smoke Flavor | Excellent | None | Good–Excellent |
| Temp Consistency | Variable | Excellent | Excellent |
| Char Quality | Best | Good | Good |
| Running Cost | Medium | Low | Medium |
| Clean-Up | Moderate | Easy | Moderate |
| Best For | Weekend cooks | Every day | Wood-fired taste |
If you’re shopping for your next grill, our comprehensive best barbecue grills guide covers the full landscape, or our lump charcoal vs briquettes comparison if charcoal is your path.

Burger Variations: Beyond the Classic Backyard Build
Once you’ve mastered the foundational technique, the burger becomes a canvas. Here are some variations that reward the technique investment you’ve made.
The Smoked Burger
Run your patties on a pellet grill or offset smoker at 225°F for 35–45 minutes before a final sear on a ripping-hot zone or cast iron skillet. The low-and-slow smoke phase builds extraordinary wood-smoke flavor through the entire patty — a completely different product from a standard grilled burger. Use hickory or pecan pellets for the best results. Finish with the Sear Box or a screaming-hot cast iron pan for the crust.
The Stuffed Burger
Form two thin patties and sandwich your filling between them, pinching the edges to seal. Classic fillings: sharp cheddar + jalapeño, caramelized onion + blue cheese, bacon + cream cheese. The key is sealing the edges completely — any gap becomes a drip point that causes flare-ups and filling loss. Cook stuffed burgers at slightly lower heat (400–425°F) and use indirect heat to finish, as the extra mass requires more internal temperature time.
The Dry-Aged Blend
Mix 60% chuck with 20% dry-aged beef trim and 20% brisket. The dry-aged component adds concentrated umami depth and a funky complexity that transforms the burger from everyday to special-occasion. Ask a butcher who dry-ages in-house for trim — it’s usually far cheaper than buying steaks and produces extraordinary burger results.
The Crispy Onion Smash
Loosely ball 3 oz of cold 80/20 beef and place on a ripping-hot cast iron pan or flat griddle section. Top with a thin layer of raw white onion slices, then smash hard with a burger press or large metal spatula. The onion caramelizes directly into the sear crust, creating a flavor bond that’s impossible to replicate any other way. Two-patty double stacks optional (strongly encouraged). This style works beautifully on the Sidekick of a Camp Chef Woodwind or any flat griddle setup.
For more inspiration on what else you can grill alongside your burgers, check our BBQ grilled corn on the cob recipe, grilling vegetables like a pro, and our BBQ grilled shrimp skewers for the ultimate cookout spread.
The 10 Most Common Grilled Burger Mistakes (and the Fixes)
This section alone could save your next cookout. These are the most common, most impactful errors — the ones that separate a great backyard burger from a disappointing one.
| # | Mistake | Result | The Fix |
|---|---|---|---|
| 1 | Over-handling the beef | Dense, mealy texture | Handle once to form; max 6 light compressions |
| 2 | Seasoning too early | Dense, sausage-like texture | Season within 60 seconds of grilling |
| 3 | Skipping the dimple | Puffy dome, uneven cooking | Press a ½-inch thumb depression in the center |
| 4 | Grill not hot enough | Sticking, no crust, steamed texture | Preheat 12–15 min minimum; target 450–500°F |
| 5 | Pressing with the spatula | Dry, juice-depleted burger | Never press — ever |
| 6 | Flipping too early/often | Torn crust, lost juice | Flip once, after 3–4 min, when it releases cleanly |
| 7 | Cooking lean beef (93/7) | Dry, flavorless, crumbly | Use 80/20; lean beef needs added fat or fillers |
| 8 | Skipping the rest | Juice floods the bun immediately | Rest 2–3 minutes before serving, every time |
| 9 | Not toasting the bun | Soggy bun, structural collapse | 30–45 seconds cut-side down on a hot grate |
| 10 | Cold plates / assembled too early | Temperature drop, congealed fat | Warm plates; assemble and serve immediately |
Frequently Asked Questions: Grilled Burger
What is the best beef blend for grilled burgers?
80/20 ground chuck is the gold standard for backyard grilled burgers. The 20% fat content keeps the patty moist and juicy throughout cooking while providing the fat-rendered flavor compounds that make a great burger. For a restaurant-level upgrade, blend 60% chuck with 20% brisket and 20% short rib — this is what most high-end burger joints use.
How long should I grill burgers on each side?
At 450–500°F, plan on 3–4 minutes per side for a ¾-inch-thick, 8-oz patty. This produces medium to medium-well doneness. For medium-rare at the same thickness, aim for 3 minutes per side and use a thermometer to confirm 130–135°F. Always use a thermometer rather than timing alone — grill heat varies significantly by setup, weather, and coal or burner state.
Why do my burgers fall apart on the grill?
Burger patties fall apart for one of three reasons: the beef is too lean (under 80% fat), the patty was overhandled and the proteins over-bound, or the patty is being flipped before a proper crust has formed. The crust acts as structural reinforcement — forcing an early flip tears the patty. Wait until the patty releases cleanly from the grate before flipping. See our dedicated guide on keeping burgers from falling apart for more.
Should I cook burgers with the grill lid open or closed?
Closed. Cooking burgers with the lid closed creates a convection environment that cooks the top of the patty simultaneously with the bottom, reducing total cook time and — critically — preventing the exterior from overcooking before the center finishes. The exception: super-thin smash patties (under ¼ inch) cook through so quickly that lid position doesn’t significantly matter.
What temp should burgers be cooked to?
The USDA recommends ground beef be cooked to a minimum of 160°F for food safety. For those comfortable with the risk profile, medium (140–145°F) is where the best balance of juiciness and food safety typically lies with quality fresh ground beef. Medium-rare (130–135°F) is safe only with high-quality, freshly ground beef from a trusted source. Always use a calibrated instant-read thermometer — color is not a reliable indicator of doneness in ground beef.
Can I use frozen burgers on the grill?
Yes, though fresh is significantly better. Frozen patties can be grilled from frozen with a longer cook time (add 3–4 minutes per side) and slightly lower initial heat to prevent the exterior from charring before the center thaws and cooks. The texture of frozen-then-cooked burgers is noticeably inferior to fresh — the ice crystals rupture cell walls during freezing, releasing moisture and resulting in a drier patty. Our article on grilling frozen meat safely covers the details.
What’s the secret to a juicy burger?
Fat content is the primary driver — use 80/20 beef, minimum. Beyond that: don’t overwork the meat when forming, season at the last moment, cook at high heat quickly rather than low and slow, never press with a spatula, and always rest for 2–3 minutes after removing from the grill. These five habits produce a dramatically juicier burger than standard technique. Our juicy burger deep-dive goes into the science in more detail.
How do I prevent flare-ups when grilling burgers?
Fat dripping onto hot coals or burners causes flare-ups. Preventive measures: trim excessive fat hanging off the patty edge, keep a cool zone on your grill to move patties to during flares, don’t use extra oil on a very hot grate, and keep the lid closed (which starves flares of oxygen). If a flare occurs, simply move the patties to the cool zone for 30–60 seconds until it subsides, then return. Our guide to preventing flare-ups has more detail on managing this.
How do I get great grill marks on a burger?
Great grill marks require: a ripping hot grate (450°F minimum), properly oiled grate surface, and not moving the patty for the first 3–4 minutes. Place the patty at a 45-degree angle to the grate bars, don’t move it. At the flip, rotate 45 degrees in the other direction for crosshatch marks. Note that perfect grill marks and maximum crust coverage are at odds with each other — the highest-flavor approach produces an even brown sear over the whole surface, which requires the same “don’t touch it” discipline.
Should I put oil directly on the burger patties?
Generally no — an 80/20 patty has plenty of fat for self-basting and crust formation. Adding oil to the patty itself can cause excessive flare-ups. Instead, lightly oil the grill grates using tongs and a paper towel dampened with neutral oil just before the patties go on. This provides just enough anti-stick lubrication without contributing to flare-ups.
What is the best grill for making burgers?
For pure charcoal flavor, the Weber 22-inch Kettle is the gold standard at the price — see our Weber 22 charcoal grill review. For gas convenience, the Weber Spirit II E-310 and Genesis line deliver consistent results — our Weber Spirit II E-310 review and Weber Genesis EX-335 review cover those in detail. For pellet-smoked burgers, any quality pellet grill works well — our best barbecue grills roundup has options across all budgets.