🥩 The Complete Grill Master’s Manual
How to Grill the Perfect Steak: A Comprehensive Guide
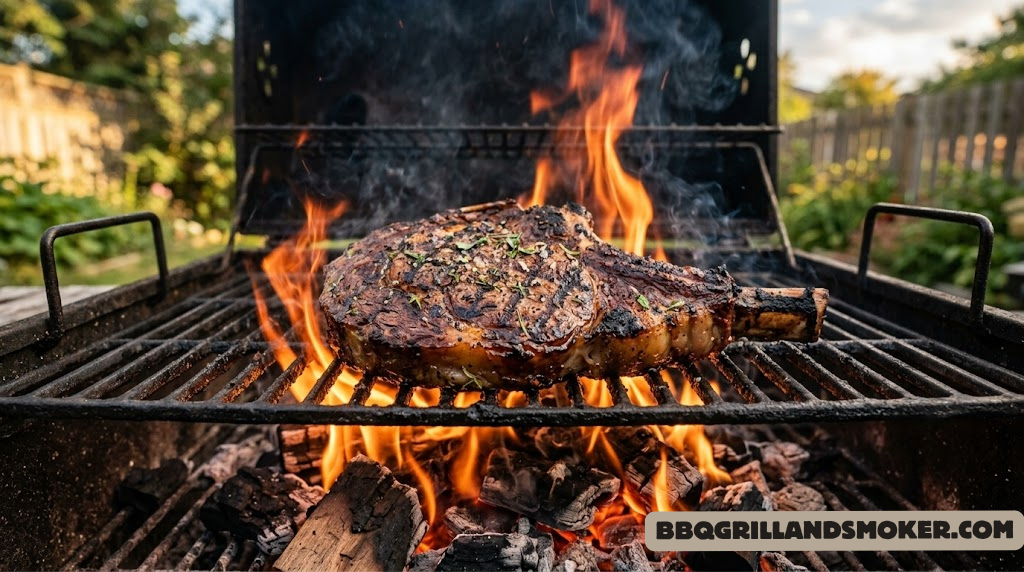
A properly grilled ribeye — seared crust, blushing pink interior, and glistening fat. That’s the goal. This guide shows you exactly how to get there.
There are few things in the culinary world that carry the visceral satisfaction of a perfectly grilled steak — that char-crusted exterior giving way to a buttery, blush-pink interior that practically melts against your tongue. Yet for millions of backyard cooks, that ideal steak remains frustratingly elusive. Overcooked edges, underwhelming sear marks, chewy texture, lost juices — these aren’t signs of bad luck. They’re signs of missing knowledge. This guide closes every gap, from choosing the right cut and understanding your heat source, all the way through slicing and serving like a steakhouse veteran.
Step 1: Choosing the Right Cut of Steak
Walk into any butcher shop or grocery meat counter and the selection can be genuinely overwhelming — strip steaks, ribeyes, T-bones, tenderloins, flat irons, skirt steaks, hanger steaks, and a dozen others. Not all cuts are created equal for the grill, and choosing the wrong one is perhaps the single biggest mistake most home cooks make before the fire is even lit.
Grilling is a high-heat, fast-cooking method. That means you want cuts that have enough intramuscular fat (marbling) to stay moist and flavorful under that intense heat, and ideally a thickness of at least 1 to 1.5 inches so you have enough time to develop a deep crust before the interior overcooks. Thin, lean cuts punish mistakes mercilessly.
Match the Cut to the Grill Method
Before anything else, decide which category of steak you’re working with. This determines everything from prep time to target temperature to how aggressively you can sear it.
The Best Cuts for Grilling, Ranked
Here’s the honest truth about the most popular grill-ready steaks, and when to use each one:
| Cut | Tenderness | Marbling | Best Method | Ideal Thickness | Target Temp |
|---|---|---|---|---|---|
| Ribeye | ⭐⭐⭐⭐⭐ | High | Direct sear | 1.5″ | 130°F (M-Rare) |
| NY Strip | ⭐⭐⭐⭐ | Med–High | Direct sear | 1.25″ | 130–135°F |
| T-Bone / Porterhouse | ⭐⭐⭐⭐ | Med | Direct + indirect | 1.5″ | 125–130°F |
| Filet Mignon | ⭐⭐⭐⭐⭐ | Low | Sear + indirect | 2″ | 125°F (Rare) |
| Sirloin | ⭐⭐⭐ | Med | Direct sear | 1″ | 135–140°F |
| Flat Iron | ⭐⭐⭐⭐ | Med | Direct sear | 0.75″ | 130–135°F |
| Skirt / Flank | ⭐⭐ | Low | Hot direct + marinate | 0.5″ | 135°F |
| Hanger | ⭐⭐⭐ | Med | Direct, quick | 1″ | 130–135°F |
Why Ribeye Wins for Most Grillers
The ribeye is the undisputed champion of backyard grilling for good reason. The fat distributed throughout the muscle (intramuscular fat, or marbling) renders during the high-heat cook, basting the meat from within and producing extraordinary flavor. The slightly fatty cap on the outer edge crisps up to something almost candy-like under the right conditions. It’s forgiving, flavorful, and deeply satisfying. When in doubt, grill a ribeye — but this guide covers every cut in depth, so you’ll be prepared for any choice.

Amazon Pick — Essential Tool
ThermoPro Instant-Read Digital Thermometer
No guesswork, no sliced steaks to “check”. Hit the exact doneness every time with a 2-second read thermometer. The #1 grill tool upgrade.
🛒 Check Price on AmazonStep 2: Understanding Beef Grade and Marbling
The USDA grades beef by evaluating two factors: the amount of marbling within the ribeye muscle, and the maturity of the animal. For grillers, marbling is everything. That white web of intramuscular fat is what separates an extraordinary steak from a merely decent one, and it profoundly influences how the steak behaves on a hot grill.
Read the Grade Before You Buy
USDA grading provides a reliable shortcut when you can’t see the exact marbling distribution yourself. Here’s what each tier means in practical terms:
If you can only find USDA Select or ungraded beef at your local store, all is not lost. A dry brine (covered in the next section) will concentrate flavors, and using a compound butter finish can compensate for some of what’s missing in fat content. But whenever the budget allows, upgrade to USDA Choice or better — the difference on the grill is immediately noticeable.
Wet-Aged vs. Dry-Aged Steak
Age matters almost as much as grade. The vast majority of supermarket beef is wet-aged — vacuum-sealed in plastic and aged in its own juices for 7 to 28 days. This process is efficient, but it yields a mildly metallic, bloody flavor that some find off-putting on fine cuts.
Dry-aged beef is hung in temperature-controlled air flow for anywhere from 21 to 120+ days. Moisture evaporates (concentrating flavor), enzymes break down muscle fibers (improving tenderness), and the exterior develops a flavorful pellicle that is trimmed away before sale. Dry-aged ribeyes and strips have a deep, nutty, almost cheese-like umami richness that is genuinely unlike anything else you’ll put on a grill. If your local butcher offers dry-aged options, the premium is worth it for a special occasion steak.
Step 3: Steak Preparation — The Foundation of Everything
Great grilling begins hours — sometimes days — before the fire is lit. Preparation is where amateurs and experts diverge most dramatically. The steps below aren’t optional refinements; they’re the reason restaurant steaks taste better than home-cooked ones.
The Dry Brine: Your Single Greatest Steak Upgrade
A dry brine is simply kosher salt applied generously to both cut surfaces of the steak and left uncovered in the refrigerator. The salt draws out a small amount of moisture, dissolves in it, then gets reabsorbed back into the meat over time — carrying salt deep into the tissue and reorganizing muscle proteins in a way that locks moisture in during cooking. The surface also dries out, which is exactly what you want for a hard sear.
Timing Your Dry Brine
- 45 minutes: The minimum if you brine the day-of. Apply salt, set on a wire rack over a pan in the fridge, and leave uncovered for 45+ minutes.
- 24–48 hours: The gold standard. This is when the reabsorption is complete, the surface has dried thoroughly, and the proteins have had time to loosen and tenderize. Plan ahead for thick cuts.
- Avoid 15–30 minutes: This is the “danger zone” — moisture has been drawn out but not yet reabsorbed, meaning you’re grilling with a wet surface that will steam rather than sear.
Bring the Steak to Room Temperature
Grilling a cold steak straight from the fridge creates an uneven internal temperature gradient — the exterior overcooks while the center struggles to come up to temperature. Remove your steak from the refrigerator 30–45 minutes before grilling. For very thick cuts (2″+), 60 minutes is appropriate. This isn’t about food safety (the exterior temperature barely moves in this window); it’s about giving the interior a head start so the entire steak cooks evenly.
What About Marinades and Rubs?
For high-quality, well-marbled steaks, less is almost always more. A simple dry brine plus a light brush of neutral high-smoke-point oil before hitting the grates is perfect for ribeyes, strips, and filets. You want to taste the beef.
Marinades are more appropriate for leaner, tougher cuts — skirt steak, flank, hanger — where the acid component helps break down the tougher muscle fibers. An acid-based marinade (citrus, vinegar) does almost nothing for a prime ribeye except risk creating a mushy exterior. If you love seasoned complexity, explore our curated selection of barbecue rubs — a good rub can add a bark-like crust to a sirloin that elevates it several price tiers.

Amazon Pick — Prep Upgrade
Himalayan Salt Block for Dry Brining & Serving
Season and present your steaks on a naturally mineral-rich salt block. It imparts subtle, complex saltiness while providing an incredible serving vessel.
🛒 Check Price on AmazonStep 4: Choosing Your Grill — Which Heat Source Is Best?
The grill you use has a direct, undeniable impact on the final steak. This isn’t about brand loyalty or budget constraints — different grill types produce measurably different results, and understanding why helps you get the most out of whatever you own.
Gas vs. Charcoal vs. Pellet — The Flavor Equation
Each heat source creates a different flame composition, radiant heat pattern, and combustion byproduct, all of which influence flavor and crust formation.
Gas Grill Steak Performance
Gas grills are the most popular choice in America for good reason — they heat up in 10 minutes, temperature adjustment is instant and precise, and cleanup is minimal. They’re excellent for steak if you know their limitations. The main one: most gas grills plateau around 550–650°F on the grate surface, which is hot enough for good sear marks but slightly short of the 700–900°F level where the deepest, most complex Maillard crust develops. You can compensate by preheating longer (15+ minutes, lid closed) and by using a cast iron grate attachment. Explore our comparisons of top-rated barbecue grills to find the gas grill with the best searing output.
Charcoal Grill Steak Performance
A well-managed charcoal fire — particularly with lump hardwood charcoal in a chimney starter — can reach surface temperatures exceeding 900°F. That’s in a different class of sear entirely. The crust you get on a charcoal-seared steak has a depth of flavor no gas grill can exactly replicate. The challenge is managing the heat so you can move from direct high heat (sear) to a cooler indirect zone (finish). Our guide on direct vs. indirect grilling methods walks through this in detail.
If you’re considering upgrading your charcoal setup, the difference between lump charcoal and briquettes is more significant than most people realize — worth understanding before your next grocery run.
Pellet Grill Steak Performance
Pellet grills shine for reverse-sear technique (explained in Section 8) and for adding a genuine wood smoke dimension to the steak. The wood pellet combustion produces a clean, aromatic smoke that gas can’t produce and charcoal only partially mimics. If you use a pellet grill for steak, the most effective strategy is smoking the steak low at 225°F until it reaches 15–20°F below your target, then cranking the grill as high as it goes (most reach 500°F) and searing hard on both sides for the last few minutes.
✅ Charcoal Advantages for Steak
- Highest achievable sear temperature
- Natural smoke flavor without accessories
- The “two-zone fire” is easily set up
- Best crust formation and caramelization
- Lower operating cost per cook
❌ Charcoal Disadvantages
- 30–45 minute setup/preheat time
- Temperature less precise mid-cook
- More ash cleanup required
- Flare-ups require active management
- Learning curve for heat control

Amazon Pick — Charcoal Essential
Weber Rapidfire Chimney Starter
Light your charcoal in 15 minutes with no lighter fluid. Charcoal lit in a chimney burns hotter, more evenly, and without the chemical off-flavors lighter fluid imparts.
🛒 Check Price on AmazonStep 5: Fire and Heat Management — Building the Perfect Cooking Environment
The two most underappreciated words in steak grilling are “two-zone.” Whether you’re cooking over gas or charcoal, setting up two distinct heat zones — a blazing hot direct zone and a cooler indirect zone — gives you complete control over the steak’s cooking trajectory and is the single most important structural element of any steak cook.
Setting Up the Two-Zone Fire
For Charcoal: Build the Asymmetric Fire
After lighting your charcoal in a chimney starter and letting it ash over (about 15–20 minutes), pour all the coals onto one half of the charcoal grate. The coals should fill from the bottom grate to about 2 inches below the cooking grate. This creates a raging direct zone on one side and a cooler, radiant-heat indirect zone on the other. You now have a steak kitchen with two ovens — one for searing, one for finishing.
For Gas: Zone Control with Burners
On a three-burner gas grill, turn the two left burners to maximum and leave the right burner off. Preheat with all burners on high for 15 minutes, then turn the right burner off. You now have your two-zone setup. On a two-burner grill, run one burner on high and one on medium-low. This gap between zones is your most powerful cooking variable.
Grill Grates: Cast Iron vs. Stainless Steel
The choice between cast iron and stainless steel grill grates significantly impacts your sear quality. Cast iron retains heat better and provides more surface area contact, producing wider, more consistent grill marks (and more Maillard reaction area). Stainless is easier to clean and heats more quickly but transfers heat less efficiently to the steak. For the best sear, either upgrade to a cast-iron grate or use a cast-iron skillet directly on the grill — restaurant steakhouses often use this exact method.
Step 6: The Art of the Sear — Creating the Maillard Crust
The sear is the most dramatic and most satisfying moment of the entire cook. It’s where chemistry, heat, and timing converge to create that deeply caramelized, flavor-complex crust that separates a grilled steak from mere cooked beef. Understanding what actually happens during searing makes you dramatically better at controlling it.
The Maillard Reaction — Why the Crust Tastes So Good
The Maillard reaction is a chemical process between amino acids and reducing sugars that occurs above 280°F (140°C). It’s responsible for the thousands of flavor compounds in a seared crust — a complexity no amount of seasoning can replicate without heat. It is not the same as caramelization (sugar browning), though both happen simultaneously on a steak’s surface.
For maximum Maillard reaction, you need three things: high surface temperature (600°F+), a dry surface (moisture inhibits browning), and patience (the crust needs contact time — not constant movement). This is why the dry brine matters so much.
The Searing Sequence
- Oil the steak, not the grates. Brush both sides lightly with a high-smoke-point oil (avocado, refined grapeseed, or clarified butter). This ensures even contact and helps carry heat to every surface micro-valley. Do not oil the grates — it burns off quickly and contributes to flare-ups.
- Place on the hottest part of the direct zone. You should hear an immediate, aggressive sizzle. If you don’t, the grill isn’t hot enough.
- Do not move it. Resist the urge to check, press, or adjust. Let the Maillard reaction do its work for 60–90 seconds (thin cuts) or up to 2–2.5 minutes (thick cuts).
- The steak tells you when it’s ready to flip. Properly seared steak releases cleanly from the grates when the crust has formed. If you’re fighting it, it’s not ready.
- Rotate 45° for the crosshatch pattern (optional). After 45 seconds, rotate the steak 45° without flipping to create the crosshatch diamond grill mark pattern. Then flip after another 45 seconds.
- Sear the second side. Same process — same time — same patience.
- Sear the edges. For thick ribeyes, hold the steak on its edge with tongs against the grates for 30 seconds per edge. This renders the fat cap and creates a complete crust all the way around.
Step 7: Doneness, Temperature, and the Science of Timing
There is only one reliable method for hitting a specific doneness level: a digital instant-read thermometer. The “finger test,” the color test, and timing alone all introduce variables that lead to inconsistency. A good thermometer costs $20–$40 and pays for itself the first time it saves an expensive steak from becoming overcooked.
Internal Temperature Targets — Remove the Guesswork
These are pull-off temperatures — the temperature at which you remove the steak from the grill. Carryover cooking will raise it another 3–7°F during the rest period.
Cool, bright red center. Soft texture. Pull at 118°F.
Warm pink center. Maximum juiciness. Pull at 128°F.
Pink shrinking. Still juicy. Pull at 138°F.
Slight pink. Firmer. Pull at 148°F.
No pink. Firm. High quality cut recommended.
The medium-rare range (130–135°F at rest) is widely considered the sweet spot for most grillable cuts because it’s the temperature at which the fat has rendered most of its flavor without the muscle fibers having contracted enough to squeeze out the juices aggressively. Ribeyes and NY strips are absolutely magnificent at medium-rare. Filet mignon, with less inherent fat for flavor, is best at the rare end of medium-rare (128–130°F). Skirt and flank steaks tolerate medium without suffering too much — the texture is already chewy, so a bit more firmness isn’t catastrophic.
Timing Guide by Thickness and Method
| Thickness | Method | Direct Sear Time | Indirect Finish | Total Cook | Target (M-Rare) |
|---|---|---|---|---|---|
| 0.75″ | Direct only | 2 min/side | None needed | 4–5 min | Pull at 128°F |
| 1″ | Direct only | 2.5 min/side | 1–2 min | 6–8 min | Pull at 128°F |
| 1.25″ | Direct + indirect | 2 min/side | 3–4 min | 8–10 min | Pull at 128°F |
| 1.5″ | Direct + indirect | 2.5 min/side | 4–6 min | 10–14 min | Pull at 128°F |
| 2″ (Reverse Sear) | Indirect first | 90 sec/side | 25–35 min @ 225°F | 30–40 min | Smoke to 115°F, sear |

Amazon Pick — Temperature Control
Lavatools Javelin Pro Duo Instant Read Thermometer
Reads in under 2 seconds with ±0.9°F accuracy. Ambidextrous design, backlit display, and magnetic mount make this the easiest thermometer to use at the grill.
🛒 Check Price on AmazonStep 8: Advanced Techniques — Reverse Sear, Caveman, and Cast Iron Finish
Once you’ve mastered the fundamental sear-then-finish method, three advanced techniques can elevate specific cuts to entirely new levels. Each solves a specific problem that the basic method doesn’t address perfectly.
The Reverse Sear — Best for Thick Cuts (1.5″+)
The reverse sear works by inverting the traditional sequence. Instead of searing first and finishing over indirect heat, you gently bring the steak to temperature in the cooler zone first, then blast it with direct heat at the very end. The result is a steak with an absolutely even cook from edge to edge — no gray band, no overcooked ring beneath the crust — and a crust that forms in 60–90 seconds because the surface is already bone dry from the gentle heat phase.
This technique is particularly transformative for filet mignon (which has minimal fat and can go from perfect to dry very quickly) and for extremely thick cowboy ribeyes and tomahawks where traditional timing becomes unreliable. Many serious grill enthusiasts consider it the superior method for any cut above 1.5 inches.
The Caveman Method — Steak Directly on Coals
For the most intense char and a slightly smoky, mineral-complexity crust, the caveman method involves placing the steak directly on glowing hardwood lump coals — no grate at all. The coals must be white-hot and relatively ash-free so they don’t coat the meat. You’ll get a stunning crust in about 45–60 seconds per side, plus a smokiness that no overhead grill can match. Brush off any ash before serving. This method is best for ribeyes and strips and works spectacularly on a bed of lump charcoal.
Cast Iron Skillet Finish on the Grill
Place a heavy cast-iron skillet on the grill’s direct heat zone and preheat it for 5–8 minutes until smoking. Sear the steak in the pan — the steel conducts heat more consistently than grates, producing a flat, wall-to-wall sear rather than grill marks. This is the steakhouse method. Add butter, garlic, and fresh thyme to the pan while searing for constant basting. The high pan sides also protect against flare-ups. Looking for the best cast iron skillets for this method? Our best barbecue tools guide includes our top picks.

Amazon Pick — Searing Upgrade
Lodge 12″ Cast Iron Skillet
Pre-seasoned, virtually indestructible, and capable of holding 700°F+ for wall-to-wall steak searing. Use it on the grill, over coals, or on any stovetop.
🛒 Check Price on AmazonStep 9: Basting, Compound Butter, and the Finishing Touch
The final stage before resting is where you can layer in extraordinary additional flavor. Professional steakhouse kitchens rarely skip this step — and once you experience a properly basted steak, you won’t either.
The Butter Baste
In a cast-iron skillet on the hot side of the grill (or moved to the stovetop if you prefer), melt 2–3 tablespoons of unsalted butter over high heat until foaming. Add 3 crushed garlic cloves and 3–4 fresh thyme sprigs. Tilt the pan to pool the butter, and using a long-handled spoon, continuously baste the steak for 60–90 seconds. The milk solids in the butter add nutty, caramelized flavor compounds; the aromatics infuse the fat and transfer into the crust.
Compound Butters — Make Ahead, Use Every Time
Compound butters are softened butter mixed with flavorings, rolled into a log in plastic wrap, and chilled. A 1/4-inch round placed on a resting steak melts slowly into the meat as it rests, adding a final layer of flavor. Some classic combinations:
- Steakhouse Herb Butter: Softened butter + minced shallot + fresh parsley + thyme + a tiny squeeze of lemon + flaky salt
- Blue Cheese Butter: Softened butter + crumbled blue cheese + freshly cracked black pepper + chives
- Garlic-Truffle Butter: Softened butter + roasted garlic paste + a few drops truffle oil + sea salt
- Chimichurri Butter: Softened butter + fresh parsley + oregano + garlic + red pepper flakes + red wine vinegar
Don’t underestimate the role of great barbecue sauces as a finishing element either — a brushed-on reduction of your favorite sauce in the last 30 seconds of grill time caramelizes into an extraordinary glaze. Apply it late or it burns.

Amazon Pick — Finishing Tools
OXO Good Grips Basting Brush + Silicone Tongs Set
Heat-safe silicone basting brush that won’t shed bristles into your food. Combined with locking tongs for total steak handling control during the butter baste.
🛒 Check Price on AmazonStep 10: Resting and Slicing — The Final 10 Minutes That Make or Break Everything
The rest is not optional. It is not a suggestion. It is the final, non-negotiable step in proper steak cookery — and yet it’s the one most commonly skipped by impatient home cooks who paid good money for a great steak and are now standing over it with a knife 30 seconds after it left the grill.
Why Resting Works — The Juice Redistribution Science
When a steak comes off the grill, the muscle fibers near the surface have contracted hard from the intense heat, squeezing the interior juices toward the center of the steak. If you cut it immediately, that pressurized juice gushes out onto your cutting board — not into your mouth. Given 5–10 minutes to rest, those contracted fibers relax, the temperature gradient between the edge and center equalizes, and the moisture redistributes throughout the steak. Studies measuring juice loss show that an unrested steak can lose 40% more juice when cut than one rested properly.
Resting Best Practices
- Rest on a wire rack — not directly on a plate. Resting on a flat surface traps steam underneath and softens the crust you worked hard to build. A wire rack lets air circulate and the crust stay crisp.
- Tent loosely with foil, but don’t seal. A loose tent reflects some heat back and slows temperature loss slightly. A sealed tent traps steam and ruins the crust.
- Rest time by thickness: 0.75″ = 4–5 min | 1″ = 5–6 min | 1.25–1.5″ = 7–10 min | 2″+ = 10–15 min
- Use this time productively — make your compound butter, warm your plates, pour the wine, assemble the sides. The steak is resting; you shouldn’t be.
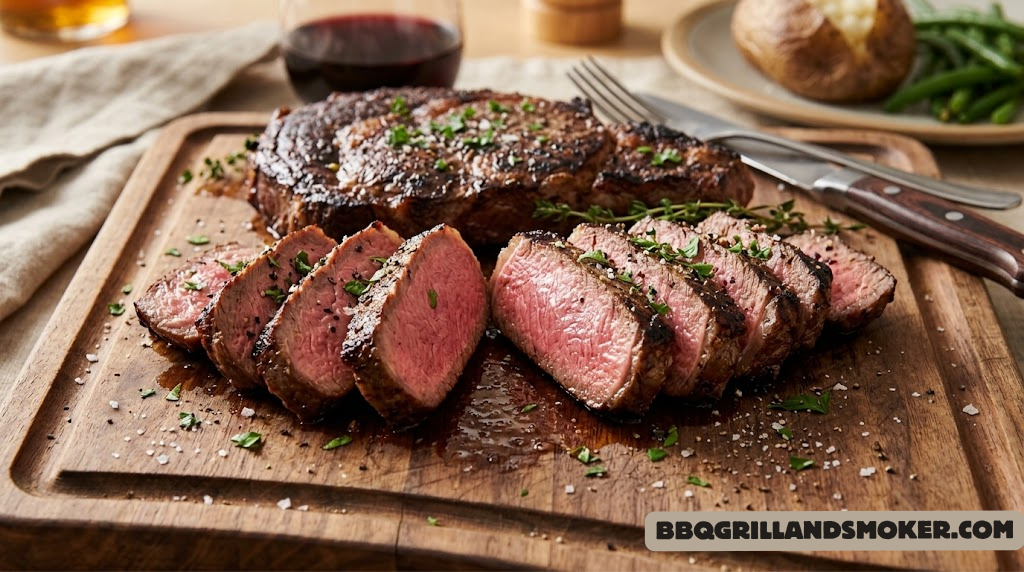
Slicing Technique — Against the Grain Always
Muscle fibers run in one direction through any cut of steak. If you slice parallel to those fibers (with the grain), every bite requires your jaw to tear through long, intact fibers — chewy, tough, disappointing. If you slice perpendicular to the grain (against it), you cut those fibers into short segments, dramatically reducing chew resistance.
For a ribeye or strip, the grain runs lengthwise — slicing crosswise is naturally against the grain. For skirt, flank, and hanger steaks, slicing against the grain is the difference between tender and practically unchewable — the grain runs along the short axis, so slice at a 45° angle across the width.
Step 11: Sides, Sauces, and the Complete Steak Experience
A perfectly grilled steak deserves equally considered accompaniments. The best steak sides have one primary job: complement without competing. Clean, fresh flavors cut through the richness; starchy sides absorb the meat juices; acidic elements brighten the entire plate.
Fresh & Acidic
Arugula salad with shaved parmesan and lemon vinaigrette. The peppery bite and acid cut through the fat.
Caramelized Onions
Slow-cooked onions develop a sweetness that complements the savory sear magnificently. 45 minutes minimum.
Grilled Vegetables
Asparagus, broccolini, or green beans with garlic and olive oil. Charred on the same grill for cohesion.
Crispy Potatoes
Smashed and roasted potatoes or a classic gratin dauphinois. Starch that soaks up every drop of steak juice.
Sautéed Mushrooms
Cremini or porcini mushrooms with shallots and thyme. Deep umami that mirrors the steak’s savory depth.
Grilled Corn
Sweet, charred corn on the cob with chile-lime butter. Our recipe guide covers the full method.
Classic Steak Sauces
| Sauce | Best Pairing | Key Flavors | Make-Ahead |
|---|---|---|---|
| Béarnaise | Filet, strip | Tarragon, egg yolk, butter | 30 min ahead max |
| Chimichurri | Skirt, flank, sirloin | Parsley, garlic, vinegar, chili | Yes (1–3 days) |
| Peppercorn cream | Any cut | Cracked pepper, cream, cognac | Yes (reheat gently) |
| Red wine reduction | Ribeye, T-bone | Red wine, shallot, beef fond | Yes (1–2 days) |
| Classic A1-style | Sirloin, flank | Tomato, raisin, vinegar, orange | Store-bought fine |
| Salsa verde | Thin cuts, hanger | Parsley, capers, anchovy, lemon | Yes (2–3 days) |
If wine pairing matters to you, the classic matches are simple: full-bodied reds with high tannins — Cabernet Sauvignon, Malbec, Syrah — stand up to and complement the fat and protein structure of a seared steak. A well-marbled ribeye and a good Napa Cab is one of food’s great pairings. For leaner cuts or those with chimichurri, an Argentinian Malbec or a Côtes du Rhône works beautifully.
Step 12: Troubleshooting — Why Your Steak Isn’t Turning Out Right
Even experienced grillers encounter problems. Most steak grilling failures have specific, fixable causes. Here’s a diagnostic guide to the most common issues and their solutions.
Common Steak Problems and Their Root Causes
Detailed Troubleshooting Guide
| Problem | Most Likely Cause | Fix |
|---|---|---|
| No sear crust forming | Grill not hot enough or wet surface | Preheat 15+ min; dry brine 45+ min; pat dry before grilling |
| Gray band of overcooking at edges | Too long on direct heat or steak too thin | Use reverse sear; cut at minimum 1.25″ thick; move to indirect sooner |
| Dry, tough steak | Overcooked, or didn’t rest | Use thermometer; pull 5°F below target; rest minimum 7 minutes |
| Steak sticks to grates | Crust not yet formed | Don’t force it — wait another 30–60 seconds; it will release |
| Uneven cooking | Steak too cold going on; no two-zone | Rest at room temp 30–45 min; use two-zone setup |
| Charring without browning | Flame hitting steak directly | Move to indirect; manage fire; reduce oil |
| Bland flavor despite seasoning | Salt applied too close to cooking | Dry brine 24–48 hours ahead; use higher quality salt |
| Steak falling apart | Wrong cut or cut with grain | Always slice against the grain; use whole-muscle cuts |
If your grill itself is the issue — not heating evenly, running too hot or too cold — our guide on why your grill isn’t heating properly covers fuel, airflow, and burner diagnostics in detail. For charcoal temperature control specifically, the charcoal grill temperature control guide is essential reading. And if your grill grates are past their best, the ultimate grate cleaning guide can restore them to peak performance.

Amazon Pick — Grill Maintenance
Grill Art Bristle-Free Grill Cleaning Brush
No loose wire bristles — a genuine food safety upgrade. Spring-coil design reaches between grate bars to scrub off carbonized residue before it affects your steak flavor.
🛒 Check Price on AmazonBonus: Complete Steak Grilling Reference by Grill Type
Every grill has its own personality, and knowing how to adapt the perfect steak method to your specific setup is what separates a good cook from a great one. Here’s a complete cross-reference that lets you dial in your approach for whatever grill is in your backyard.
Charcoal Grills — The Purist’s Choice
For a classic kettle grill like the Weber 22″ charcoal grill, the two-zone charcoal method is your blueprint. Light a full chimney of lump charcoal, let it ash over completely, bank it all to one side, and you’re set. Sear over the coals for 60–90 seconds per side, then finish over the empty side with the lid down. If you’re interested in comparing charcoal setups for steak performance, our charcoal grill features comparison is a valuable resource.
Gas Grills — The Convenient Choice
Whether you’re working with a Weber Spirit, Genesis, or another platform, gas grills deliver consistency and convenience. The Weber Spirit vs. Genesis comparison shows that the Genesis’s three-burner design gives you better two-zone control, which matters a lot for steak. Preheat all burners on max for 15 minutes, then turn one off for your indirect zone. Consider adding a cast-iron grate insert to boost your sear temperature.
Pellet Grills — The Smoky Choice
A Traeger Pro 575 or similar pellet grill transforms steak through the reverse sear method. Set it to 225°F with a hickory or oak pellet blend, smoke the steak to 115°F, then crank it as high as it goes for the sear. If your pellet grill has a “direct flame” mode (like some Camp Chef models), that’s your sear tool. See our flavor comparison between gas, charcoal, and pellet for a scientific breakdown.
Kamado Grills — The Versatile Choice
The Kamado Joe Classic II and Big Green Egg are capable of genuinely extreme searing temperatures — up to 900°F+ with the vents wide open. For steak, open both vents fully, preheat for 20–25 minutes, and sear with the lid open for intense, direct heat. The ceramic walls retain heat brilliantly and resist temperature spikes, making them ideal for the reverse sear method as well.
Frequently Asked Questions
These are the questions that come up most consistently from backyard grillers — the kinds of things that aren’t quite covered in a standard recipe but make all the difference between a good steak and a great one.
Conclusion: The Perfect Steak Is Entirely Within Your Reach
Everything in this guide points to one central truth: grilling the perfect steak is a learnable skill, not an innate talent. The ribeye resting on your cutting board right now doesn’t care whether you’ve been grilling for thirty years or thirty days — it cares about grill temperature, surface dryness, internal temperature, rest time, and slicing direction. Those are knowable, repeatable variables.
The single greatest upgrade most home grillers can make is also the cheapest: a $25 instant-read thermometer. After that, the 24-hour dry brine changes everything. Then the two-zone fire setup eliminates almost every overcooked steak. Build these fundamentals into muscle memory and you’ll hit medium-rare reliably every time, on any grill, with any thick cut.
Explore more recipes that pair beautifully with your newly mastered steaks — from our grilled corn recipe to perfectly grilled vegetables. And when it’s time to invest in better equipment, our best barbecue grills guide and best barbecue tools roundup will point you to the exact right tools for your budget and cooking style.
Now go season a steak. The grill is waiting.

Amazon Pick — Complete Starter Kit
BBQ Grilling Essentials Bundle: Thermometer + Tongs + Brush
Everything you need to execute every technique in this guide: instant-read thermometer, heavy-duty tongs, basting brush, and more. The complete grill master toolkit.
🛒 Shop on Amazon