Smoked Pork Belly Burnt Ends:
Meat Candy You’ll Make on Repeat
The complete process for cubed, glazed, caramelized pork belly burnt ends — from slab selection through the sauce braise to the perfect lacquered finish.
What Are Pork Belly Burnt Ends — and Why Is Everyone Obsessed?
Burnt ends have a fascinating and distinctly American origin story. The original burnt ends weren’t a planned dish at all — they were the trimmed, over-smoked point end trimmings of brisket that Kansas City BBQ joints used to give away free to waiting customers. The charred, intensely flavored pieces were considered the pitmaster’s scraps. What happened next was inevitable: people fell madly in love with those “scraps,” and burnt ends evolved from throwaway trimmings into one of the most coveted items on any serious BBQ menu.
The pork belly version is a more recent innovation — and in many ways, an improvement on the original. Pork belly is extraordinarily rich: layers of fat interspersed with meat create a self-basting system during the smoke that brisket point simply can’t match. When you cube a smoked pork belly, braise those cubes in butter, brown sugar, and BBQ sauce, then let them caramelize into glossy, sticky individual pieces in the open smoker heat — what emerges is something best described as meat candy. Sweet, smoky, porky, and profoundly satisfying in a way that’s hard to articulate until you’ve experienced it.
This guide covers the complete process in exhaustive detail: how to select and prep your pork belly slab, how to build a rub that creates genuine bark, which wood produces the best smoke for this cut, the critical three-phase cooking method (initial smoke, sauce braise, open glaze), and how to troubleshoot every common failure point. If you’re new to smoking in general, our beginner’s smoker guide is worth reading first — but this recipe is approachable even for intermediate pitmasters who haven’t done burnt ends before.
Why You’ll Love These
- One of the most crowd-pleasing BBQ items you can make
- Pork belly is affordable and widely available
- The fat content makes them forgiving and self-basting
- Deeply impressive for guests — looks like restaurant BBQ
- Leftovers are arguably even better the next day
- Works on any smoker: pellet, offset, kettle, electric
What to Expect
- Long cook — 7 to 8 hours total commitment
- Rich and indulgent — not a daily protein
- Requires multiple phases of attention
- Pork belly can be hard to find at some stores (call ahead)
- Significant fat render — use a foil pan, not the bare grate
Pork belly burnt ends exist in a category alongside smoked pulled pork and 3-2-1 smoked ribs as the high-water mark of backyard smoking. They require patience, but every minute is justified when you taste the result.
Know Your Cut
Pork Belly vs Brisket Point Burnt Ends: Understanding Both
The burnt ends conversation always comes back to one question: which is better — brisket point or pork belly? The honest answer is that they’re different experiences, and understanding those differences helps you know what you’re aiming for before you start.
| Factor | Pork Belly Burnt Ends | Brisket Point Burnt Ends |
|---|---|---|
| Fat Content | Extremely high — ideal for self-basting | High but less than belly |
| Price per lb | $3–$7/lb — very affordable | $8–$18/lb — significantly more expensive |
| Availability | Most grocery stores; call ahead | Specialty butchers or whole brisket purchase |
| Cook Time | 7–8 hours total | 12–16 hours (brisket must cook first) |
| Smoke Penetration | Good — fat slows deep penetration | Excellent — denser meat absorbs more smoke |
| Sweetness Affinity | Excellent — fat loves sweet sauce | Good — bold beef flavor competes slightly |
| Tenderness Consistency | Very consistent — fat keeps cubes moist | Variable — lean sections can dry out |
| Best Descriptor | Meat candy — sweet, porky, incredibly rich | Smoke bomb — intensely beefy, complex, bold |
For most home pitmasters cooking pork belly burnt ends for the first time, the verdict is clear: pork belly wins on every practical dimension — cost, accessibility, forgiveness, and that candy-like sweetness that makes the dish so memorable. If you eventually want to compare the classic brisket point experience, our guide on smoker selection for low and slow brisket cooks is the place to start.
Selecting the Perfect Pork Belly Slab
At the grocery store or butcher, you’re looking for a skin-on or skin-off slab with specific characteristics that determine your final result:
- Size: 5 to 6 pounds is the sweet spot. This gives you enough mass for significant smoke exposure without taking forever. Larger slabs (8+ lbs) produce excellent results but extend your cook time considerably.
- Fat-to-meat ratio: Look for a slab with roughly equal layers of fat and meat — not predominantly fat. A slab that’s 70% fat will render into something that’s nearly all bark with very little actual meat per cube.
- Thickness: Aim for 2 to 2.5 inches of thickness. Thinner slabs cook faster but produce smaller cubes that can dry out in the braise phase. Thicker slabs are preferred.
- Skin on or off: Either works. Skin-on produces a different texture — the skin becomes extremely chewy and gelatinous. Most burnt ends recipes use skin-off belly for a more uniform bite. If your slab comes skin-on, score it deeply or remove it entirely before cooking.
- Color: Fresh pork belly should be pale pink to deep pink with creamy white fat. Avoid any grayish tones or excessive moisture on the surface.
Asian grocery stores almost always stock full pork belly slabs — often at better prices than mainstream grocery stores, and frequently with better fat-to-meat ratios. Call ahead to your local butcher for the freshest options. For a larger cook, you can use two slabs side by side.

Find the Right Smoker for Burnt Ends
Pork belly burnt ends work on any smoker — but a pellet grill makes the multi-phase cook almost effortless. See our top-rated picks across all budgets.
Shop Smokers on Amazon →What You Need
Complete Ingredient List & Equipment Checklist
The Pork
- 5–6 lb skin-off pork belly slab
- Yellow mustard (binder) — 2 tbsp
- 4 tbsp dry rub (recipe below)
Dry Rub
- 3 tbsp brown sugar
- 2 tbsp smoked paprika
- 1.5 tbsp kosher salt
- 1 tbsp black pepper (coarse)
- 1 tbsp garlic powder
- 1 tsp onion powder
- 1 tsp chili powder
- ½ tsp cayenne pepper
The Braise & Glaze
- ½ cup BBQ sauce (your favorite)
- ½ cup honey or maple syrup
- 4 tbsp unsalted butter, cubed
- ¼ cup brown sugar
- ¼ cup apple juice or cider
- 2 tbsp apple cider vinegar
- 1 tbsp hot sauce (optional)
Equipment
- Smoker of choice
- 9×13″ aluminum foil pan (deep)
- Instant-read thermometer
- Leave-in probe thermometer
- Sharp boning or chef’s knife
- Apple/cherry wood chunks or chips
- Heat-resistant gloves
- Basting brush
- Wire rack (for initial slab)
Why Yellow Mustard as a Binder?
The yellow mustard binder is one of BBQ’s most reliable tricks. You can’t taste it in the finished product — the mustard flavor completely disappears during the long cook — but it does two important things: it gives the dry rub something to adhere to instead of falling off during handling and the early stages of the cook, and it contains a small amount of moisture that helps the rub form a better initial bark. Olive oil, mayo, or even plain water work as alternatives, but mustard remains the classic choice because it’s neutral in flavor outcome while being maximally effective as an adhesive.
Flavor Architecture
Building the Perfect Pork Belly Burnt Ends Rub
The rub for pork belly burnt ends serves a different purpose than a rub for brisket or even for whole chicken. Here, you’re not primarily trying to season lean meat — you’re building a bark on an extremely fatty cut that will then receive a sweet, sticky sauce during the braise phase. The rub needs to create a flavor foundation that stands up to the sauce without being overwhelmed by it.
The key principle: balance sweet against savory and include real heat. Pork belly’s richness and the sweet BBQ glaze you’ll add later create an enormous amount of sweetness. Your rub needs enough savory and spicy elements to cut through that and create complexity. A rub that’s only sweet and paprika will disappear into the finished dish. A rub with genuine black pepper, garlic, and cayenne will be detectable in the final burnt end even through all that glaze.
| Rub Component | Function | % of Rub by Volume | Can You Adjust? |
|---|---|---|---|
| Brown Sugar | Bark caramelization, sweetness base, color | 25–30% | Reduce for less sweet; don’t eliminate |
| Smoked Paprika | Color, mild smoke flavor, body | 20–25% | Swap for regular paprika if needed |
| Kosher Salt | Primary seasoning, moisture interaction | 15–18% | Reduce if using salty sauce |
| Black Pepper (coarse) | Heat, complexity, bark texture | 10–12% | Keep this — it’s essential for complexity |
| Garlic Powder | Savory depth, umami foundation | 10–12% | Don’t reduce — critical anchor |
| Chili Powder + Cayenne | Heat, complexity, counterbalance to sweet | 8–10% | Adjust cayenne to taste tolerance |
Application: Getting the Rub Right
Apply your mustard binder to all surfaces of the pork belly slab first — top, bottom, and all four sides. Then apply the dry rub generously on all surfaces except the very bottom (which will sit on the rack and won’t form bark). Don’t be shy: a 5 lb slab can take 3 to 4 tablespoons of rub. Press the rub in lightly rather than rubbing it back and forth — pressing ensures adhesion without dislodging what you’ve applied.
After applying the rub, let the slab rest uncovered at room temperature for 30–45 minutes before smoking. This allows the rub to begin bonding to the surface through the mustard and the natural moisture of the meat. If you have more time, refrigerate the rubbed slab uncovered overnight — this dries the surface and produces a more pronounced bark.
For an expanded look at rub composition and commercial alternatives, our best BBQ rubs guide and homemade BBQ rub recipe cover every style from sweet to spicy to herb-forward.
Top BBQ Rubs for Pork Belly Burnt Ends
When you want a proven shortcut without sacrificing flavor — these commercially available rubs are pitmaster-tested and crowd-approved.
Shop BBQ Rubs on Amazon →Smoke Selection
The Best Wood for Smoked Pork Belly Burnt Ends
Pork belly sits in an interesting middle ground for wood selection. It’s fattier than pork shoulder (which can handle heavier hickory), but it’s going to receive a sweet sauce and glaze (which means fruit woods’ sweetness won’t clash). The ideal wood for pork belly burnt ends is mild enough to let the pork’s natural flavor shine but substantial enough to leave a meaningful smoke signature.
Apple Best
Sweet, mild, complements the honey-BBQ glaze beautifully. Classic pork pairing.
Cherry Best
Produces stunning deep red color and a fruity, slightly tart smoke note. Blend with apple for perfection.
Pecan
Nutty, slightly sweet, a step more intense than fruit woods. Excellent as a secondary wood in blends.
Hickory
Bold, classic BBQ smoke. Works but use sparingly — can overpower pork belly’s delicate fat if over-applied.
Maple
Subtle sweetness, light and clean. Excellent for those who want minimal smoke intrusion.
Avoid
Mesquite: too aggressive for pork belly. Softwoods (pine, cedar): toxic and prohibited entirely.
Our recommendation: a 50/50 blend of apple and cherry wood, using chunks for offset smokers and kettle setups, or pellets/chips for electric and pellet grills. This combination produces the iconic deep red-mahogany color on the bark while keeping the smoke flavor squarely in the “sweet and mild” range that complements the glaze.
For a deeper understanding of how wood form factors affect your cook, our guide on wood chips vs chunks and our complete BBQ wood chips guide cover the science and selection in full detail. For specific intense wood comparisons, our piece on hickory vs mesquite explains why you’d want to use hickory sparingly and mesquite not at all for this cook.
Phase 1 of 3
Phase 1: Smoking the Whole Slab — Building Bark and Smoke
The first phase is the longest and in some ways the most important: you’re smoking the entire pork belly slab as a single piece, building bark on the exterior and introducing deep smoke flavor throughout. The cuts you make in Phase 2 will open the interior to the braise, but the smoke needs to penetrate first from the outside in.
Preheat your smoker to 250°F with apple and cherry wood producing thin, blue smoke. Place the rubbed pork belly slab fat-side up directly on the grate (or on a wire rack over a sheet pan). Insert your leave-in probe into the thickest section — you’re targeting an internal temperature of 165–170°F at the end of Phase 1, not time. Don’t open the smoker unnecessarily; every opening disturbs the smoke environment and temperature.
What’s Happening Inside During Phase 1
During the first 2 hours, the pork belly surface is drying and the rub is beginning to form bark. The fat layers are starting to render — that’s the sound of slight sizzling you might hear if you listen at the vent. The brown sugar in the rub is caramelizing, and the smoked paprika is deepening into a mahogany color.
Between hours 2 and 3, the internal temperature will typically stall — just like brisket, pork belly goes through a “stall” as the evaporative cooling from the rendering fat matches the rate of temperature increase. This is completely normal and requires patience, not panic. Don’t increase the temperature. Don’t wrap it (yet). Let it push through naturally at 250°F.
By hour 3 to 3.5, the bark should be a deep mahogany-red, set to the touch (not gummy), and the internal temperature should be approaching 165°F. Verify with an instant-read thermometer in multiple spots — the slab is irregular, so temperatures will vary by 5–10°F across the surface.
Phase 1 Pull TemperatureYou’re not cooking to final temperature in Phase 1 — you’re building bark and smoke. Pull the slab at 165–170°F internal. The cubes will cook to their final temperature (195–205°F for probe-tender texture) during the braise and glaze phases. Starting Phase 2 too early (under 160°F) means the bark isn’t set enough and will become soggy in the braise. Too late (over 175°F) and the fat will render too far in Phase 2 before the cubes have time to braise properly.
For understanding what’s happening to the fat and collagen during Phase 1, our article on keeping smoked meat moist through temperature and moisture control explains the chemistry in accessible detail. And for a look at the smoke ring that should be forming inside your slab, our piece on smoke ring formation and meat color changes is highly relevant.

Instant-Read & Leave-In Thermometers
Multi-phase cooks like burnt ends demand precise temperature monitoring throughout. Never guess — always measure.
Shop Thermometers on Amazon →Phase 2 of 3
Phase 2: Cube, Sauce & Braise — The Transformation
Phase 2 is where pork belly becomes burnt ends. The cubing, saucing, and foil-pan braise is the single most transformative step in the entire cook — this is where the cubes tenderize to probe-tender, absorb the sweet braise liquid, and develop the glossy exterior that’s become synonymous with great burnt ends.
Remove the slab from the smoker and transfer to a cutting board. Using a sharp knife, slice the slab into 1.5 to 2-inch cubes — uniform sizing ensures even cooking during the braise. Place the cubes into your deep foil pan. Add the braise mixture (BBQ sauce, honey, butter, apple juice, brown sugar, ACV), toss gently to coat all surfaces, and distribute butter cubes throughout. Cover tightly with foil and return to the smoker at 250°F for 2 to 2.5 hours until the cubes reach 195–205°F and are probe-tender.
The Cubing Process: Size Matters
Uniform cube size is one of the less-discussed but highly important aspects of the technique. When cubes are different sizes, smaller pieces will become overcooked and dry while larger pieces are still reaching proper tenderness. Aim for 1.5 to 2 inches in all dimensions — picture a cube roughly the size of a large marshmallow.
Don’t be alarmed by how much the slab has shrunk since raw. A 5 lb slab will lose 30–40% of its weight to fat render and moisture loss during Phase 1 — you’ll get roughly 3 to 3.5 lbs of cubed belly to work with. From a 5 lb slab, expect approximately 25 to 35 cubes depending on size.
The Braise Mixture: Breakdown
The braise mixture is equal parts flavor builder and braising liquid. The components work together:
- BBQ sauce: The flavor backbone. Use a sauce you love — this will define the final taste character. See our best BBQ sauces guide for top picks across every style.
- Honey or maple syrup: Adds floral sweetness and promotes the caramelized lacquer on the surface.
- Butter: Emulsifies the liquid, creates richness, and adds a glossy sheen to the finished cubes.
- Apple juice or cider: The braising liquid that keeps the cubes from drying out while the pan is covered. Also adds subtle sweetness.
- Brown sugar: Additional caramelization source for the exterior and glaze thickening.
- Apple cider vinegar: The critical acidic counterbalance. Without it, the richness and sweetness become cloying. The ACV cuts through and brightens every bite.
Butter Distribution TipRather than melting the butter before adding to the pan, cube cold butter and distribute the cubes throughout the pan on top of and between the burnt end cubes. As the smoker heat melts the butter, it coats each cube individually and pools in the liquid, creating a more even glaze than pre-melted butter would produce.
What “Probe Tender” Actually Means
You’ll hear “probe tender” repeatedly in smoking contexts, and it’s especially critical for burnt ends. Probe tender means a thermometer probe, skewer, or toothpick slides into the meat with zero resistance — like pushing through softened butter. The probe should go in and out without pulling or dragging.
At this point, the collagen in the meat (the tough connective tissue) has fully converted to gelatin, and the fat has rendered to a silky consistency. The internal temperature will typically be between 195 and 205°F, but the probe test overrides the thermometer reading — if it’s probe tender at 192°F, you’re done. If it still has some resistance at 205°F, give it another 20–30 minutes.
Phase 3 of 3
Phase 3: The Open Glaze — Building the Candy Shell
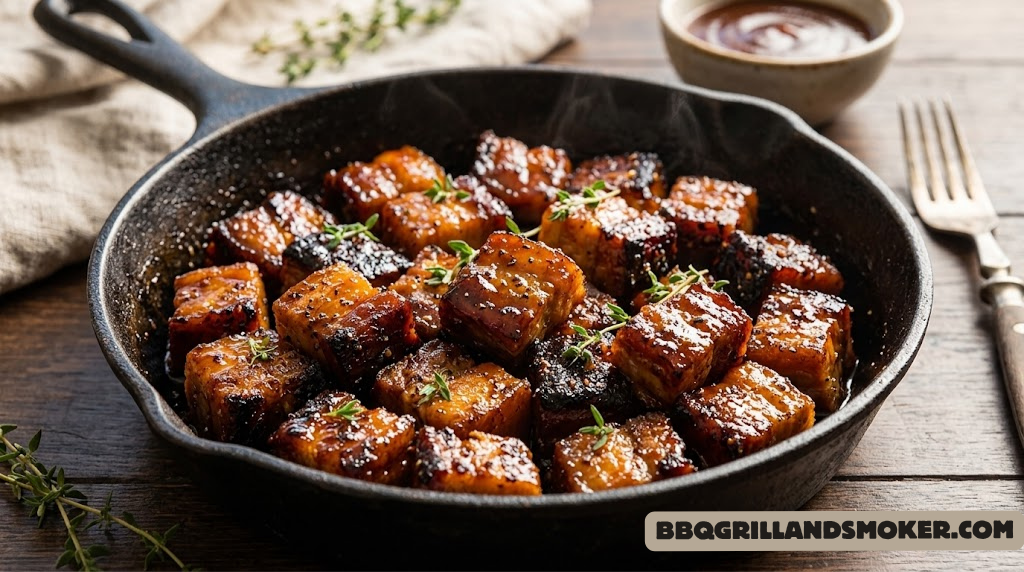
Phase 3 is brief in time but enormous in impact. This is where you transform braised pork cubes into what everyone describes as “meat candy” — the lacquered, caramelized, sticky exterior that’s the defining characteristic of great pork belly burnt ends.
Once the cubes are probe tender, remove the foil cover from the pan and increase your smoker to 275°F. Leave the cubes in the pan — don’t move them to the bare grate. The braising liquid in the pan will begin reducing and coating the cubes as it thickens. At the 20-minute mark, gently toss the cubes in the pan to redistribute the sauce. Continue for another 25–45 minutes until the liquid has reduced to a syrupy glaze that coats each cube and the exterior has developed a deep, caramelized bark.
Reading the Glaze: What to Look For
The visual cues for a finished Phase 3 glaze are specific and unmistakable once you know them:
- The pan liquid: Transitions from a thin, sauce-consistency liquid to a thick, glossy syrup. When you tilt the pan, the liquid should coat the sides slowly rather than running freely.
- The cube exterior: Deep mahogany-to-black caramelized surface with a visible sheen. The bark should look slightly sticky when the light catches it.
- The snap test: Pick up a cube and it should hold its shape and feel tacky to the touch. If it falls apart, the braise liquid has broken down the structure too far — usually from over-braising in Phase 2.
- The jiggle: Each cube should have a slight wobble — the gelatin-rich interior is still liquid-ish. This is a sign of maximum tenderness and collagen conversion.
At the very end of Phase 3 — the final 10 minutes — you can brush each cube individually with a thin coat of pure honey and let it caramelize for the last few minutes at 275°F. This extra step creates an almost lacquer-like finish on the exterior that’s visually stunning and adds another layer of sweetness. It’s optional but absolutely worth doing when you have time.

BBQ Tools That Make This Cook Easier
Heavy-duty foil pans, basting brushes, heat-resistant gloves, and quality tongs — the right tools make multi-phase cooks smoother from start to finish.
Shop BBQ Tools on Amazon →Temperature Mastery
Pork Belly Burnt Ends Temperature Guide — Every Stage
Temperature is your most reliable guide throughout all three phases of this cook. Here’s every critical temperature checkpoint and what it means for your finished result.
Smoker — Phase 1 & 2
Low and slow for bark building and braising. Stable temp essential for even cooking throughout the slab.
Internal — Phase 1 End
Pull the slab for cubing when breast reaches this temp. Bark is set; ready for the braise.
Internal — Phase 2 End
Probe tender range. Collagen fully converted, fat silky. Test with probe — zero resistance = done.
Smoker — Phase 3
Increased temp to reduce the braising liquid into a glaze without over-cooking the cubes.
| Time | Phase | Smoker Temp | Internal Temp Target | Action |
|---|---|---|---|---|
| 0 hr | Start Phase 1 | 250°F | Ambient (40°F) | Place slab fat-side up on grate |
| ~1 hr | Phase 1 | 250°F | ~110–125°F | Bark forming. Don’t open smoker. |
| ~2 hrs | Phase 1 — Stall | 250°F | ~140–150°F | The stall. Patience. Don’t adjust temp. |
| ~3–3.5 hrs | Phase 1 End | 250°F | 165–170°F | PULL SLAB. Begin cubing immediately. |
| ~3.5–4 hrs | Phase 2 Start | 250°F | Cubes in braising liquid | Cover foil pan tightly. Return to smoker. |
| ~5.5–6 hrs | Phase 2 End | 250°F | 195–205°F + probe tender | Remove foil cover. Increase to 275°F. Start Phase 3. |
| ~6–7.5 hrs | Phase 3 Glaze | 275°F | Above 195°F | Toss at 20 min. Watch glaze reduce. Final honey brush optional. |
| ~7–8 hrs | DONE | Off | — | Rest 10 min uncovered. Serve immediately for maximum impact. |
The Sauce Chapter
Sauce Science: Building the Perfect Burnt Ends Glaze
The sauce is not an afterthought in this recipe — it’s co-equal with the smoke in determining the final flavor profile. Understanding what your sauce selection does during the braise and glaze phases lets you make intentional choices rather than just grabbing whatever bottle is nearest.
BBQ Sauce Styles and Their Impact
| Sauce Style | Flavor Profile | Caramelization | Best For |
|---|---|---|---|
| Kansas City (thick, sweet, tomato-based) | Sweet, smoky, tangy | Excellent — thick base caramelizes beautifully | Classic burnt ends — the traditional choice |
| Sweet Baby Ray’s or similar commercial sweet sauce | Very sweet, mild | Excellent caramelization | Maximum candy-like sweetness, crowd-pleasing |
| Carolina Mustard Sauce | Tangy, mustardy, mild heat | Moderate — doesn’t caramelize as dramatically | Tangy counterpoint to the rich pork fat |
| Spicy BBQ Sauce (chili-forward) | Bold heat, complex spice | Good caramelization | Adult palate version with real heat |
| Vinegar-Based (Eastern Carolina style) | Bright, acidic, thin | Poor — too thin for significant caramelization | Not ideal for burnt ends — better for pulled pork |
The Homemade Burnt Ends Glaze
If you want complete control over the flavor profile, making your own braise-and-glaze sauce takes 5 minutes and produces a result no bottled sauce can match. Here’s a base recipe that you can adapt:
- 1 cup ketchup
- ¼ cup honey
- ¼ cup brown sugar
- 3 tbsp apple cider vinegar
- 2 tbsp Worcestershire sauce
- 1 tbsp smoked paprika
- 1 tbsp garlic powder
- 1 tsp black pepper
- ½ tsp cayenne (adjust to taste)
- Pinch of kosher salt
Whisk all ingredients together and use in place of the bottled BBQ sauce in the braise mixture. The result is a cleaner, more balanced sauce that’s specifically tuned to complement the smoke and fat of the pork belly rather than compete with it.
For more on BBQ sauce selection and storage, our guides on when BBQ sauce goes bad and whether BBQ sauce is gluten-free cover common questions that come up when serving a crowd.
Fix It
Troubleshooting Pork Belly Burnt Ends: 7 Common Problems Solved
1. Cubes Are Falling Apart Completely
Cause: Over-braised in Phase 2 — the collagen over-converted and the fat fully rendered, leaving nothing to hold the cube structure together.
Fix: Check probes more frequently during Phase 2. Pull from the covered braise as soon as you hit probe tender, even if that’s earlier than expected. For future cooks, try cubing into slightly larger (2–2.5 inch) cubes to maintain more structural integrity.
2. Cubes Have No Bark — Soft, Gummy Exterior
Cause: Phase 1 pulled too early (under 160°F), or Phase 3 glaze phase not long enough.
Fix: Extend Phase 3 by 20–30 additional minutes at 275°F uncovered. The bark can still develop even at the glaze stage if given enough time. For future cooks, ensure Phase 1 bark is fully set (firm, mahogany, not tacky) before cubing.
3. Bitter or Harsh Smoke Flavor
Cause: Dirty, thick white smoke from incomplete combustion; too much wood; wrong wood type.
Fix: Ensure thin blue smoke before placing pork belly in smoker. Use fruit woods (apple/cherry) rather than heavy hardwoods. For pellet grill users, ensure pellet quality is high — old, compressed, or damp pellets produce poor smoke. Our pellet grill maintenance guide covers pellet quality management.
4. Sauce Didn’t Caramelize — Stays Liquid in Phase 3
Cause: Too much braising liquid in Phase 2, or temperature too low in Phase 3.
Fix: Increase smoker to 300°F for Phase 3 (reduce to 275°F once reduction begins). If there’s significantly more liquid than needed after Phase 2, pour off about half before starting Phase 3. The reduced liquid should coat the back of a spoon by the end of Phase 3.
5. Unevenly Sized Cubes — Some Overcooked, Some Underdone
Cause: Inconsistent cubing during the Phase 2 prep step.
Fix: Use a ruler or measure against your fingers to keep cubes consistent (1.5–2 inches). For future cooks, score the raw slab before Phase 1 with shallow cuts at 1.5–2 inch intervals — this makes the final cubing faster and more uniform.
6. Not Enough Smoke Flavor After 3 Phases
Cause: Insufficient smoke during Phase 1 (the only meaningful smoke penetration window), or using a very clean-burning pellet grill without supplemental smoke.
Fix: Add a smoke tube filled with apple or cherry pellets to your smoker during Phase 1. Ensure your smoker is producing good smoke — not just hot air — from the first 30 minutes of Phase 1. The braising and glaze phases don’t add significant smoke because the liquid environment limits smoke absorption.
7. Too Rich/Fatty — Overwhelming
Cause: Pork belly with an extremely high fat-to-meat ratio, or the braise liquid too butter-heavy.
Fix: Use a leaner slab (higher meat content) for future cooks. In the braise, reduce butter by half and add more apple juice to compensate. Serving with acidic sides (pickled vegetables, vinegar coleslaw, citrus-dressed salads) dramatically cuts through the richness and makes the burnt ends more approachable as a full meal component.
Beyond the Classic
5 Pork Belly Burnt Ends Variations to Explore Next
1. Korean-Inspired Pork Belly Burnt Ends
Replace the standard dry rub with a blend of Korean chili flakes (gochugaru), sesame seeds, garlic, ginger, and brown sugar. For the braise liquid, use a combination of gochujang (Korean chili paste), soy sauce, honey, rice wine vinegar, and sesame oil instead of traditional BBQ sauce. Finish with a sesame oil brush and sesame seed garnish. Serve with quick-pickled daikon and cucumber. The result is fiery, complex, and completely unlike the traditional American burnt end — but equally addictive.
2. Maple-Bourbon Burnt Ends
Add 3 tablespoons of your favorite bourbon to the braise liquid alongside real maple syrup in place of honey. The bourbon cooks off but leaves behind a complex, vanilla-and-oak note that pairs magnificently with the smoke. Finish the glaze with a final brush of warmed maple syrup. This variation is particularly impressive for fall gatherings and pairs beautifully with a whiskey cocktail.
3. Asian 5-Spice Burnt Ends
Incorporate Chinese 5-spice powder (star anise, cinnamon, cloves, fennel seed, Szechuan pepper) into your dry rub at about 1 teaspoon per recipe batch. The 5-spice creates a warm, aromatic complexity that complements pork’s natural sweetness beautifully. Use hoisin sauce as part of the braise liquid in place of some of the BBQ sauce. This is an elegant variation for more adventurous eaters.
4. Pineapple Teriyaki Burnt Ends
Build your braise liquid from a teriyaki sauce base (soy sauce, mirin, sake, sugar) with fresh pineapple juice and diced fresh pineapple added to the pan during Phase 2. The pineapple’s natural enzymes help tenderize the meat further while adding a bright tropical sweetness that plays against the smoke. This variation is remarkably food-friendly and works at summer parties where you might otherwise serve Hawaiian-themed BBQ.
5. Ghost Pepper Honey Burnt Ends (For Heat Seekers)
Not for the faint of heart. Add ghost pepper powder or extract to your dry rub in small amounts (start at ¼ tsp per batch — it’s extremely potent). For the braise, use a ghost pepper BBQ sauce or add ghost pepper hot sauce to a standard sauce. Balance the heat with extra honey and brown sugar in the braise. The result is a roller-coaster of sweet-then-scorching-then-sweet again that’s genuinely addictive for people who love extreme heat.
All of these variations follow exactly the same three-phase process as the classic recipe. Only the rub and braise liquid change. Once you’ve mastered the technique, the flavor variations are limitless.

Stock Up on BBQ Sauces for Every Variation
From Kansas City sweet to Korean gochujang — our guide covers the best BBQ sauces for every style of burnt ends you want to make.
Shop BBQ Sauces on Amazon →The Finale
Serving, Storing, and Repurposing Leftover Burnt Ends
How to Serve Pork Belly Burnt Ends
Pork belly burnt ends are at their absolute peak the moment they come off the smoker, still warm and lacquered. Serving them directly from the foil pan with tongs onto a platter is both the easiest and most impressive presentation. Here’s what works best alongside them:
- Pickled red onions or jalapeños: The acidity cuts directly through the richness and resets the palate between bites
- Dill pickles: A classic Kansas City accompaniment for exactly the same acidity reason
- Vinegar-dressed coleslaw: Cool, crisp, and acidic — the perfect textural and flavor contrast
- Baked beans: The traditional pairing — the beans’ sweetness harmonizes rather than competes
- Cornbread or white bread: For soaking up the extraordinary sauce that pools in the serving pan
- Smoked mac and cheese: For an indulgent pairing — see our smoked mac and cheese recipe
- Grilled corn: Our BBQ grilled corn recipe is a natural summer companion
For calculating quantities when cooking for a crowd, our guide on how many pounds of BBQ per person provides the math for planning larger events.
Storing and Reheating Leftovers
Leftover pork belly burnt ends are one of the great BBQ leftover stories. The overnight refrigerator rest actually deepens and melds the flavors. Store in an airtight container with any remaining sauce for up to 4 days in the refrigerator.
To reheat: place burnt ends in a covered pan in an oven (or covered on the smoker) at 325°F for 20–25 minutes until warmed through. Adding a splash of apple juice or beef broth before covering prevents them from drying out during reheating. Avoid the microwave — it softens the bark and doesn’t reheat evenly.
For freezing, pack cooled burnt ends in airtight freezer bags for up to 3 months. Reheat from thawed (not frozen) as described above. Similar guidance to freezing pulled pork applies here.
Creative Ways to Use Leftover Burnt Ends
- Burnt Ends Tacos: Roughly chop and serve in warm corn tortillas with pickled onions and cilantro — outstanding
- Burnt Ends Baked Potato: Split a baked potato, fill with sour cream, and pile burnt ends on top with chives
- Burnt Ends Fried Rice: Dice small, fry in the wok with day-old rice, egg, scallions, and soy sauce
- Burnt Ends Grilled Cheese: Layer into sourdough with sharp white cheddar and caramelized onions
- Burnt Ends Pizza: BBQ sauce base, mozzarella, burnt ends pieces, pickled jalapeños, red onion — a masterpiece
Questions Answered
Pork Belly Burnt Ends FAQs
The complete process takes 7 to 8 hours from placing the slab on the smoker to serving. Phase 1 (whole slab smoke) takes 3 to 3.5 hours at 250°F until the internal temperature reaches 165–170°F. Phase 2 (cube and braise covered) takes 2 to 2.5 hours at 250°F until the cubes are probe tender at 195–205°F. Phase 3 (open glaze) takes 45 to 75 minutes at 275°F for the sauce to reduce and caramelize. Always plan for the full 8 hours to avoid time pressure — burnt ends don’t respond well to being rushed.
You use fresh pork belly — the same cut that’s cured and smoked to become bacon. It’s a whole slab from the underside of the pig, with alternating layers of fat and meat. You want a skin-off slab (or score/remove the skin before cooking) weighing 5 to 6 pounds with a good fat-to-meat ratio — roughly equal parts. Pork belly is distinct from pork shoulder, pork butt, and brisket point (the original burnt ends cut). The high fat content of pork belly makes it ideal for this preparation because the fat self-bastes the meat throughout the long cook.
Phase 1 (whole slab smoke): 250°F until internal temperature reaches 165–170°F. Phase 2 (covered braise in foil pan): 250°F until the cubes reach 195–205°F internal temperature and are probe tender. Phase 3 (open glaze): increase to 275°F for 45–75 minutes until the sauce reduces to a glossy glaze. Never try to rush by significantly increasing temperature — high heat during Phase 1 prevents proper smoke ring and bark formation, and high heat during Phase 2 can cause the cubes to fall apart before the braising liquid caramelizes properly in Phase 3.
Absolutely — pellet grills are actually one of the best platforms for pork belly burnt ends because their precise temperature control makes managing all three phases straightforward. Set to 250°F for Phases 1 and 2, then increase to 275°F for Phase 3. If your pellet grill has a “supersmoke” or high smoke setting, use it during Phase 1 to maximize smoke output at low temperature. If you want more smoke than your pellet grill typically produces, add a smoke tube filled with apple or cherry pellets alongside the pork belly during Phase 1. Popular pellet grills like the Traeger Pro 575, Camp Chef Woodwind, and Pit Boss models all work excellently for this cook.
You don’t wrap the pork belly during Phase 1 — the whole slab smokes unwrapped on the grate. Phase 2 uses a foil pan (not a foil wrap) covered tightly with aluminum foil, which creates a covered braising environment rather than traditional Texas crutch-style wrapping. The foil pan is critical — it holds the braising liquid around the cubes and prevents the significant fat render from dripping into your smoker. Phase 3 removes the foil cover to allow the sauce to reduce and the glaze to form. There’s no point in this recipe where you’d wrap the meat directly in foil; the foil pan cover is a different application.
Cut the cubes to 1.5 to 2 inches in all dimensions — think a cube roughly the size of a large marshmallow. Uniform size is more important than hitting any specific measurement exactly. If cubes are too small (under 1 inch), they’ll fall apart completely during the braise and glaze phases. If they’re too large (over 2.5 inches), the interior may not fully tenderize and you’ll have cubes that are tough in the middle while the outside is caramelized. A sharp knife makes this step much easier — don’t try to cube with a serrated knife; it tears rather than cuts cleanly.
Kansas City-style thick, sweet, tomato-based BBQ sauces are the traditional and most effective choice for pork belly burnt ends. Their thick consistency caramelizes beautifully during the glaze phase, creating that lacquered finish. Sweet Baby Ray’s Original, Blues Hog Original, and Stubb’s Original are all excellent commercial options. For a spicier result, use your sauce of choice and add hot sauce or cayenne to taste. Avoid very thin, vinegar-forward sauces (like Eastern Carolina style) — they don’t have enough body to form the thick, sticky glaze that makes burnt ends visually stunning and texturally exceptional.
No — the original burnt ends used beef brisket point, the fattier, more marbled section of the brisket. Kansas City BBQ joints created them from the charred, over-smoked trimmings of brisket that were given away free. Pork belly burnt ends are a modern adaptation (popularized in the 2010s) using fresh pork belly instead of brisket point. The technique (cube, braise in sauce, open glaze) is similar, but the flavor profile is very different: pork belly burnt ends are sweeter and more tender with a more candy-like quality; brisket point burnt ends are more intensely smoky and beefier. Both are exceptional — they’re different experiences rather than one being “better.”
Technically yes, though the result will be different. You can braise and glaze pork belly in the oven following the same Phase 2 and Phase 3 approach (covered in foil pan at 275°F, then uncovered at 325°F). The braised result will be tender and saucy, but you won’t have the smoke ring, smoke flavor, or initial bark from Phase 1. For the best compromise without a dedicated smoker, use a kettle grill (Weber 22″ or similar) with indirect heat and wood chunks — you can replicate the three phases reasonably well. See our direct vs indirect grilling guide for kettle setup instructions.
Over-sweetness in burnt ends is a balancing issue, and it has several common causes: too much brown sugar in the rub, a very sweet commercial BBQ sauce without enough acid, insufficient vinegar in the braise mixture, or pork belly with an extremely high fat ratio (fat amplifies sweetness perception). The fix: increase apple cider vinegar in the braise to 3–4 tablespoons, use a less-sweet BBQ sauce base, reduce brown sugar in the rub by half, and add hot sauce or cayenne for heat that counterbalances sweetness. Serving with very acidic sides (pickled red onions, vinegar coleslaw) also dramatically resets the palate and makes even sweet burnt ends more approachable.
The Verdict
Conclusion: Why You’ll Make These Again and Again
Pork belly burnt ends occupy a very specific place in the BBQ universe: they’re achievable enough for a competent home pitmaster, yet impressive enough to stop conversation when you set the pan on the table. The three-phase process — smoke, braise, glaze — is more involved than a simple smoked chicken or ribs cook, but each phase serves a clear purpose and the results justify every hour of commitment.
What makes this recipe genuinely special is how the components work together: the smoke penetrates during Phase 1 when the pork belly is at its most permeable; the braise during Phase 2 breaks down the collagen and infuses the cubes with sauce flavor from the inside out; and the open glaze in Phase 3 reduces all that braising liquid into a concentrated, caramelized coating that makes each cube a self-contained flavor bomb.
Once you’ve made this recipe twice, the three-phase process becomes second nature. You’ll develop intuition for when the Phase 1 bark looks right, when the Phase 2 cubes are probe-tender, and when the Phase 3 glaze has reduced to the perfect consistency. That intuition is the definition of pitmaster progress — and pork belly burnt ends are one of the best cooks for developing it.
If this was your introduction to smoking, your natural progression from here leads to smoked pulled pork, smoked beef short ribs, and eventually a full smoked turkey breast for the holidays. The skills compound. The results get better. And the compliments from anyone you feed them to never get old.
Ready to Make the Best Thing You’ve Ever Pulled Off a Smoker?
Get your slab, build your rub, and fire up the smoker. In 7 hours, you’ll understand exactly why everyone is obsessed with pork belly burnt ends.
Shop Smokers on Amazon Bookmark This Recipe