The Ultimate Smoked Mac and Cheese Recipe Every Pitmaster Needs to Master
If you’ve spent any time around a backyard smoker, you already know that the magic of slow smoke transforms everything it touches — brisket, ribs, chicken, salmon. But there’s one dish that most pitmasters either overlook or underestimate, and it’s consistently the one that disappears fastest at every cookout: smoked mac and cheese.
This isn’t the blue-box stuff from your childhood. We’re talking about a deeply creamy, ultra-cheesy, smoke-kissed masterpiece with a golden crust that crackles when you dig in, ribbons of melted cheese pulling away from the spoon, and a depth of flavor that no stovetop version can touch. Once you nail this recipe, it will become the dish everyone asks for at every BBQ — and probably the thing they remember more than the brisket.
This guide walks you through everything: the exact cheese blend that gives you maximum stretch and flavor, the wood varieties that complement rather than overpower, the precise temperatures and timing that prevent the dish from drying out, and every variation worth exploring. Whether you’re running a pellet smoker, offset, or electric unit, this recipe scales beautifully across all platforms.
Let’s get into it.
Why Smoked Mac and Cheese Is the Ultimate BBQ Side Dish
Before we even touch the recipe, it’s worth understanding why smoking mac and cheese is fundamentally different from baking it in an oven — and why that difference translates into something extraordinary.
The Science of Smoke and Dairy
When wood combusts at the right temperature, it releases hundreds of aromatic compounds — phenols, guaiacol, syringol — that attach themselves to proteins and fats in food. Cheese, being rich in both milk fat and casein protein, is an exceptional receptor for smoke. The result isn’t a harsh smokiness but a subtle, complex backdrop that plays off the lactic tang of the cheese and the richness of the cream sauce.
You’ll notice the effect most in the first few minutes after it comes off the smoker: a delicate mahogany bark on top, a perfume that stops people mid-conversation, and a flavor that evolves as you eat it — first creamy, then cheesy, then smoky, then back to creamy again.
Oven vs Smoker: A Real Comparison
| Attribute | Oven-Baked | Smoker-Made |
|---|---|---|
| Crust development | Even, predictable | Layered, rustic, aromatic |
| Flavor depth | Cheesy and rich | Cheesy, rich + smoky complexity |
| Moisture retention | Can dry quickly at high heat | Gentle heat preserves creaminess |
| Cook time | 25–35 min at 375°F | 90–120 min at 225–250°F |
| Equipment | Standard oven | Any smoker or grill with lid |
| WOW factor | High | Extremely high |
| Hands-on effort | Moderate | Low (passive smoke time) |
Why It Works as a Side Dish
From a practical standpoint, smoked mac and cheese is a pitmaster’s dream side. While your brisket or ribs are resting after a long low-and-slow session, the mac and cheese can be finishing its smoke run at the same temperature — meaning one fire, multiple dishes, no extra fuel wasted. If you’re already operating a quality barbecue smoker, you’re leaving flavor on the table every time you cook a side in the oven instead.
It’s also scalable to a degree that few side dishes match. A single large skillet or half-pan feeds ten people generously. Double the recipe in a full-size aluminum pan and you’re feeding a party of twenty without breaking a sweat.
✅ Why You’ll Love It
- Cooks alongside main proteins on the same fire
- Feeds large groups without effort
- Smoky crust adds a dimension no oven can replicate
- Highly customizable with mix-ins
- Works on any smoker or grill with a lid
- Leftovers reheat beautifully
⚠️ Things to Consider
- Takes 2+ hours total start to finish
- Requires monitoring smoke temperature
- Strong wood can overpower the cheese
- Must be made fresh — doesn’t travel well once cooked
Weber Original Kettle 22″ Charcoal Grill
A backyard classic that handles smoking and grilling with equal mastery. Perfect for smoked mac and cheese sessions.
Check Price on Amazon →Smoked Mac and Cheese Ingredients: The Complete List
Every great recipe starts with ingredient quality — and smoked mac and cheese is no exception. The smoke is a flavor enhancer, not a flavor mask. If your cheese blend is mediocre, the smoke won’t fix it. Here’s the complete ingredients list, built around feeding 10–12 people.
Classic Smoked Mac and Cheese
🧀 Pasta & Cheese
- 1 lb (450g) elbow macaroni or cavatappi
- 2 cups sharp cheddar, shredded
- 1½ cups Gruyère, shredded
- 1 cup smoked Gouda, shredded
- ½ cup cream cheese, cubed
- ½ cup Parmesan, freshly grated
🧈 The Béchamel Base
- 4 tbsp unsalted butter
- 3 tbsp all-purpose flour
- 2½ cups whole milk
- 1 cup heavy cream
- 1 tsp Dijon mustard
- ½ tsp garlic powder
- ¼ tsp cayenne pepper
- Salt and black pepper to taste
🥖 Topping
- 1 cup panko breadcrumbs
- 2 tbsp butter, melted
- ¼ cup Parmesan, grated
- 1 tsp smoked paprika
- Optional: crumbled bacon, jalapeños
Ingredient Notes & Substitutions
Pasta Shape Matters More Than You Think
Elbow macaroni is the classic for good reason — the hollow tubes collect pools of cheese sauce inside. But cavatappi (corkscrew pasta) is arguably even better for smoked versions because its ridged surface grips sauce aggressively, and it holds up to extended low-heat cooking without turning to mush. Avoid spaghetti, penne, or any thin pasta that can’t hold a heavy sauce.
The Milk-to-Cream Ratio
The combination of whole milk and heavy cream is deliberate. Whole milk alone can produce a sauce that’s slightly thin; heavy cream alone can make it so rich it becomes cloying. The 2.5:1 ratio of milk to cream hits the sweet spot — a sauce that coats every noodle generously without feeling heavy.
Don’t Buy Pre-Shredded Cheese
This is one of those kitchen rules that genuinely makes a material difference. Pre-shredded cheese is coated in cellulose (an anti-caking agent) that prevents the shreds from clumping in the bag — but also prevents them from melting smoothly into your sauce. Block cheese, shredded fresh at home, melts into a glossy, cohesive sauce rather than a grainy one.
Pro Tip: Pop your cheese blocks in the freezer for 15 minutes before shredding. Cold cheese shreds cleaner and doesn’t clump on the grater. Use the large holes of a box grater for the best sauce integration.
Equipment Setup: What You Need to Smoke Mac and Cheese Like a Pro
One of the most appealing aspects of smoked mac and cheese is its flexibility. You don’t need a dedicated competition smoker — the recipe works on a pellet grill, a charcoal kettle with a two-zone setup, a dedicated offset, or an electric smoker. Here’s what you’ll need and how to configure each.
The Cooking Vessel
Your choice of cooking vessel directly impacts crust development and ease of serving. These are the three best options:
| Vessel | Crust Quality | Portability | Cleanup | Best For |
|---|---|---|---|---|
| 12″ Cast Iron Skillet | ⭐⭐⭐⭐⭐ Exceptional | Heavy | Moderate | Small groups (6–8) |
| Half-size Aluminum Pan | ⭐⭐⭐⭐ Very Good | Excellent | Disposable | Parties (10–14) |
| 9×13 Ceramic Casserole | ⭐⭐⭐ Good | Moderate | Easy | Family dinners (8–10) |
Cast iron is the gold standard for smoked mac and cheese. It distributes heat evenly, conducts radiant heat from the smoker chamber perfectly, and produces that sought-after caramelized bottom crust that you simply can’t replicate in a thin aluminum pan. If you’ve been looking for a reason to invest in cast iron cookware, this recipe is it.
Smoker Type Configurations
Pellet Smoker
The easiest platform for this recipe. Set your temperature to 225–250°F, place the skillet on the main grate, and let it run. Pellet smokers like those reviewed in our best BBQ smokers guide produce a consistent, mild smoke that complements dairy beautifully without overwhelming it. Use apple, cherry, or pecan pellets for best results.
Offset Smoker
Build a small fire in the firebox — you want to maintain 225–240°F in the cooking chamber. The offset smoker produces the most traditional smoke flavor and the best bark. If you’re comparing different smoker styles, our offset vs pellet smoker guide covers the heat and flavor differences in depth. Place the mac and cheese at the far end from the firebox to avoid direct heat.
Charcoal Kettle Grill
Set up for indirect heat — pile coals on one side, place the skillet on the opposite side. Add wood chunks (not chips) directly onto the coals for smoke. A 22-inch kettle comfortably accommodates a large cast iron skillet. You’ll need to add a few coals every 45 minutes to maintain temperature.
Electric Smoker
Set to 225°F and use one or two wood chip loads — electric smokers like the ones covered in our best electric smokers review can produce great results with minimal oversight. The smoke output is lighter than wood-fired methods, so you may want to add one extra wood chip load compared to other recipes you’ve tried.
Must-Have Tools: A reliable instant-read meat thermometer for checking internal temperature, long-handled tongs, silicone oven mitts rated for high heat, and a sturdy grill spatula. These BBQ accessories make the difference between a smooth cook and a frustrating one.

Lodge 12″ Cast Iron Skillet
The perfect vessel for smoked mac and cheese — unmatched heat retention, incredible crust development, and a lifetime of use.
Check Price on Amazon →The Best Wood for Smoking Mac and Cheese
Wood selection is the single most important variable when smoking dairy-based dishes. Unlike brisket or pork shoulder — which can handle bold, assertive smoke from hickory or mesquite — cheese-based dishes need something softer and more refined. The wrong wood turns a creamy, delicious dish into something that tastes like licking a campfire.
| Wood Type | Smoke Intensity | Flavor Profile | Recommended? |
|---|---|---|---|
| Apple | Mild | Sweet, fruity, clean | ✔ Best Choice |
| Cherry | Mild | Sweet, slight tartness | ✔ Excellent |
| Pecan | Mild–Medium | Nutty, rich, slightly sweet | ✔ Very Good |
| Maple | Mild | Subtle sweetness | ✔ Good |
| Alder | Very Mild | Neutral, slightly earthy | ✔ Safe Choice |
| Hickory | Strong | Bacon-like, earthy | ⚠️ Use sparingly (½ chunk max) |
| Mesquite | Very Strong | Earthy, slightly bitter | ✗ Avoid |
| Oak | Medium–Strong | Bold, dry, slightly acrid | ⚠️ Not recommended for dairy |
If you’re curious about the deeper mechanics of how different wood varieties behave at various temperatures, our complete BBQ wood chips guide is worth reading before your next smoke session. And if you’re debating between chips and chunks for this recipe, this wood chips vs chunks comparison breaks down which format works better for long, steady smoke cooks.
Step-by-Step: How to Make Smoked Mac and Cheese
This recipe is broken into four clean phases: pasta prep, cheese sauce, assembly, and the smoke. Each phase takes about 20–30 minutes except the smoke itself. Read through the whole process once before starting so you’re not caught off guard at any stage.
Before you touch a pot or a noodle, get your smoker going. For pellet grills, set to 225°F and allow 15 minutes for the grates to reach temperature. For charcoal setups, light your chimney starter and wait until coals are glowing and covered with gray ash before arranging for indirect heat. Add your chosen wood — 2 medium apple or cherry chunks for a charcoal setup, or select the wood type on your pellet hopper.
You want a stable, consistent temperature of 225–250°F and thin blue smoke — not billowing white smoke, which will give the mac and cheese an acrid, bitter flavor. Thin blue smoke is the goal for every proper smoking session.
Bring a large pot of generously salted water to a rolling boil. Cook your macaroni or cavatappi to exactly 2 minutes less than the package’s al dente instruction. If the box says “cook 8 minutes for al dente,” you cook it for 6 minutes.
This is the most important rule of smoked mac and cheese. The pasta continues to absorb sauce and cook during the 90–120 minutes on the smoker. If you start with properly cooked pasta, you’ll end up with mushy, over-cooked noodles. Under-cooked pasta that still has significant bite is exactly what you want going into the smoker.
Once cooked, drain thoroughly and toss with 1 tablespoon of olive oil or butter to prevent sticking while you make the sauce.
In a large, heavy-bottomed saucepan over medium heat, melt the butter until it’s foamy but not browning. Add the flour all at once and whisk vigorously for 90 seconds — this cooks out the raw flour taste and creates the roux that will thicken your sauce.
Slowly pour in the whole milk while whisking constantly, about ¼ cup at a time. Don’t rush this step — adding milk too quickly creates lumps that are difficult to remove. Once all the milk is incorporated, add the heavy cream and continue whisking over medium heat for 5–7 minutes until the sauce is thick enough to coat the back of a spoon.
Remove from heat and stir in the Dijon mustard, garlic powder, and cayenne. Then add your cheeses gradually — sharp cheddar first, then Gruyère, then Gouda, then cream cheese cubes — stirring between each addition until fully melted. Season assertively with salt and black pepper. The sauce should be intensely flavorful, because the smoke and pasta will dilute it slightly.
Sauce consistency check: Dip a spoon and draw a line through the coating. If the line holds clean without the sauce flowing back over it, you’ve hit the right thickness. Too thin = soupy mac and cheese after smoking. Too thick = clumpy, dry final product.
In your largest bowl, combine the drained pasta with the cheese sauce. Stir until every noodle is thoroughly coated — take your time here. Taste and adjust salt if needed. Remember, the pasta will absorb significant seasoning during the smoke, so the mixture should taste slightly over-seasoned at this point.
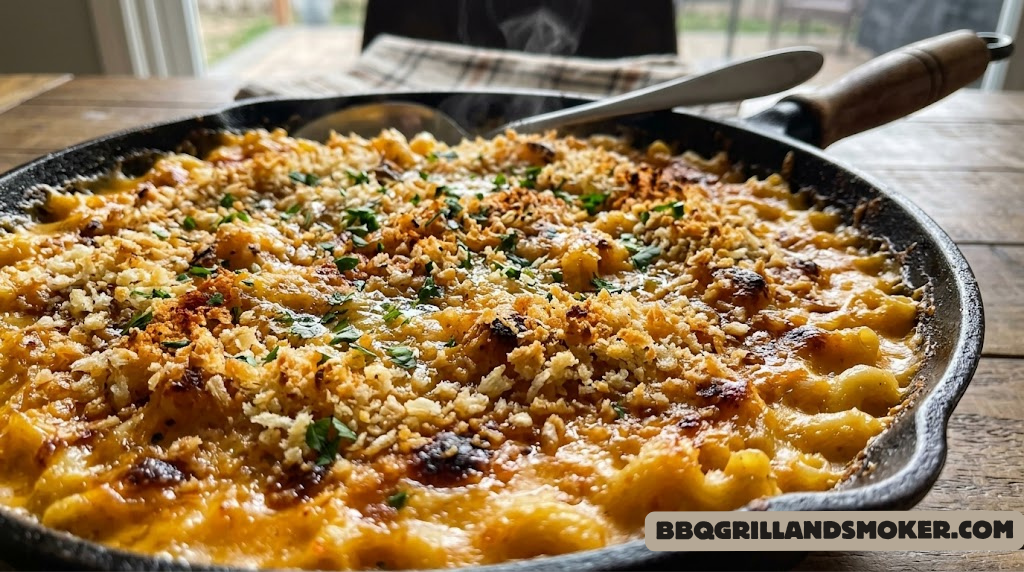
Pour the mixture into your cast iron skillet or cooking vessel. Use the back of a spoon or a spatula to level the top. In a separate small bowl, mix the panko breadcrumbs with melted butter, Parmesan, and smoked paprika until the crumbs are evenly coated and slightly clumped. Scatter this mixture evenly over the top of the mac and cheese.
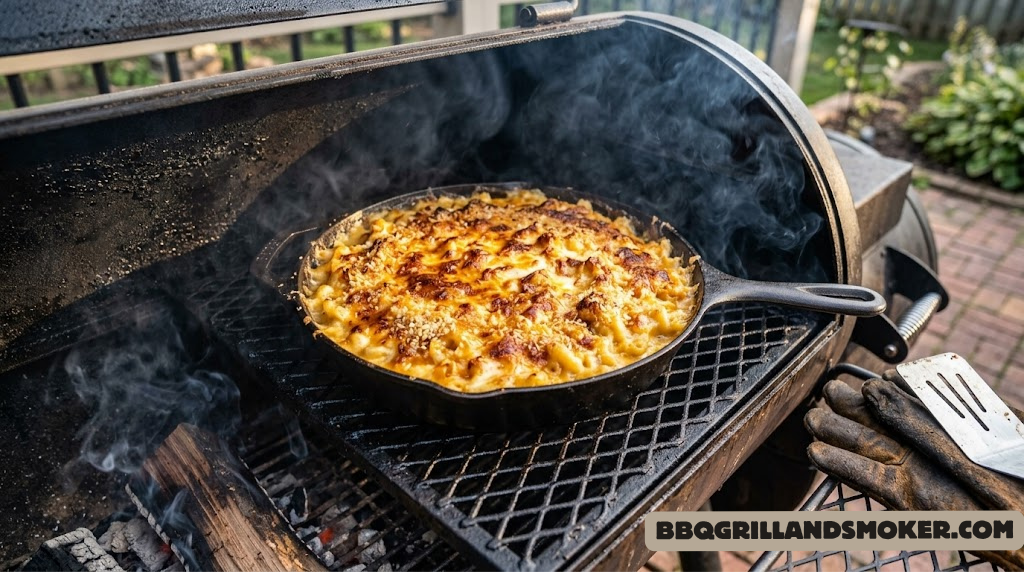
Place the assembled skillet directly on the smoker grates. No foil cover — you want the smoke to penetrate the surface and the top crust to develop color and texture. Close the lid and walk away.
Smoke at 225–250°F for 90 minutes. At the 60-minute mark, check the color of the topping — it should be turning golden. At 90 minutes, the dish is ready when the topping is deeply golden-brown, the edges are bubbling, and the internal temperature of the mac and cheese is around 165–170°F. This is a remarkable parallel to how we control moisture in smoked meat — the same principles of low heat and time apply here.
If you want a deeper smoke flavor, extend to 2 hours. If you’re pressed for time or the crust is getting too dark, bump the temperature to 275°F for the final 20 minutes.
Remove the skillet from the smoker and let it rest for 10 minutes before serving. This rest period is crucial — it allows the cheese sauce to re-solidify slightly so you get clean, scoopable portions rather than a liquid flood when you dig in. The internal temperature will continue to rise slightly during rest, finishing around 170–175°F.
Serve directly from the skillet for a stunning presentation. A large serving spoon works well, and silicon-handled tongs can help portion sections cleanly. Garnish with fresh chives or parsley if desired.
The Ultimate Cheese Blending Guide for Smoked Mac and Cheese
The cheese selection is where good smoked mac and cheese diverges from transcendent smoked mac and cheese. Using a single cheese — even a great one — produces a one-dimensional result. Strategic blending creates layers of flavor, optimal melt characteristics, and a texture that stretches beautifully without becoming either greasy or grainy.
Understanding Cheese Roles in a Blend
Every cheese in the blend should serve a purpose. There are four roles to fill:
| Role | What It Does | Best Cheese Picks | % of Blend |
|---|---|---|---|
| Base | Primary flavor, melts smoothly, familiar taste | Sharp Cheddar, Colby Jack | 35–40% |
| Complexity | Adds nuttiness, depth, European character | Gruyère, Comté, Emmental | 25–30% |
| Smoke Bridge | Connects cheese flavor with wood smoke | Smoked Gouda, Smoked Cheddar | 15–20% |
| Cream Binder | Prevents sauce from breaking, adds richness | Cream Cheese, Velveeta (small amount), American | 10–15% |
Pre-Approved Cheese Combinations
🏆 The Classic All-Star
Sharp Cheddar + Gruyère + Smoked Gouda + Cream Cheese
The gold standard. Balanced, accessible, crowd-pleasing. Stretchy, rich, with a perfect smoke bridge. This is the recipe as written above.
🔥 The Spicy Showstopper
Pepper Jack + Sharp Cheddar + Smoked Gouda + Cream Cheese
Replace Gruyère with Pepper Jack for a version that builds heat as you eat. Add a full teaspoon of cayenne and fold in diced jalapeños for extra fire.
🧑🍳 The Gourmet Edition
Aged White Cheddar + Comté + Smoked Fontina + Mascarpone
Restaurant-grade complexity. The Comté brings incredible depth; the Fontina melts silkier than anything; the Mascarpone adds a luscious richness.
💰 The Budget Winner
Colby Jack + Mild Cheddar + Velveeta + Smoked Paprika
If budget is a constraint, Velveeta’s sodium citrate content actually prevents sauce breakage, making it a legitimate tool in your arsenal. Compensate for its mildness with heavy seasoning and good paprika.
Cheeses to Avoid and Why
Not every cheese belongs in a smoked mac and cheese. Fresh mozzarella goes rubbery under extended heat. Feta and blue cheese are too assertive and acrid when heated. Brie melts but introduces a barnyard funk that clashes with smoke. Parmesan is excellent as a topping or in small amounts, but as a primary cheese it can make the sauce grainy and salty. Provolone is acceptable but contributes minimal flavor complexity — use it only if it’s all you have on hand.
Temperature & Timing: The Science of Getting It Right Every Time
Temperature management is where experienced pitmasters separate themselves from beginners. Most failed smoked mac and cheese comes down to one of three temperature problems: too hot (sauce breaks and pasta dries), too cold (no crust development), or inconsistent (uneven cooking). Here’s how to avoid all three.
The Ideal Temperature Window
The sweet spot for smoked mac and cheese is 225–250°F. Here’s why this range is magic:
- At 225°F: Smoke absorption is maximized, crust develops slowly and evenly, cheese sauce stays creamy throughout the cook. Best choice for pellet grills and electric smokers.
- At 250°F: Slightly faster cook time, better crust browning, still gentle enough to prevent sauce separation. Best for charcoal and offset setups where temperature precision is harder.
- Above 275°F: Crust browns too quickly, internal sauce can break (fats separate from solids), noodles can overcook at the edges.
- Below 200°F: Mac and cheese barely heats through, no crust, minimal smoke absorption. Not recommended.
| Temperature | Smoke Time | Crust | Sauce | Verdict |
|---|---|---|---|---|
| 200°F | 150+ min | Barely colors | Stays loose | ⚠️ Too low |
| 225°F | 90–120 min | Golden, even | Perfectly creamy | ✔ Ideal |
| 250°F | 75–90 min | Golden-brown | Creamy, slightly set | ✔ Excellent |
| 275°F | 60–70 min | Dark, rustic | May begin to separate | ⚠️ Monitor closely |
| 300°F+ | 45–55 min | Risks burning | Likely breaks | ✗ Avoid |
How Different Smokers Behave
If you’re using a pellet grill, temperature holds steady automatically — this is one area where pellet units like those compared in our Pit Boss vs Traeger and Green Mountain vs Traeger guides genuinely earn their premium. For charcoal, use your vents to manage temperature — more airflow means higher temp, less airflow reduces it. If you’re having temperature control trouble, our charcoal grill temperature control guide walks through every technique.
The Final Temperature Trick: At the 90-minute mark, if your crust is perfectly golden but the internal temperature hasn’t quite reached 165°F, cover the skillet loosely with foil for the last 15 minutes. This traps heat and finishes the internal cook without burning the topping.

Traeger Pro 575 WiFi Pellet Grill
Set-it-and-forget temperature control. Perfect for long smoke sessions including smoked mac and cheese alongside your main protein.
Check Price on Amazon →Toppings & Crust Options That Elevate the Entire Dish
The topping on smoked mac and cheese isn’t decorative — it’s structural. A well-built topping provides textural contrast to the creamy interior, creates a visual cue that signals “done,” and adds another layer of flavor complexity. Here are the best topping approaches, from traditional to creative.
Classic Panko Crust
The recipe above uses panko breadcrumbs for good reason: panko is larger and coarser than standard breadcrumbs, which means it creates a loftier, crispier crust with more surface area to brown and absorb smoke. Toss 1 cup of panko with 2 tablespoons of melted butter, ¼ cup of grated Parmesan, 1 teaspoon of smoked paprika, and a pinch of salt. This mixture, scattered evenly over the top, bakes into a crunchy, mahogany-colored crust that shatters slightly when you press a spoon into it.
Topping Variations Worth Trying
| Topping | Texture | Flavor Added | Best Paired With |
|---|---|---|---|
| Panko + Parm + Paprika | Crispy, light | Savory, slightly smoky | Classic cheese blends |
| Crushed Ritz Crackers + Butter | Buttery, dense | Rich, slightly sweet | Mild cheese versions |
| Bacon + Panko | Crispy, chunky | Smoky, salty, meaty | Spicy variations |
| Shredded Extra Cheese | Melted, pull-apart | Pure cheese hit | All variations |
| Fried Onion Strings | Crunchy, airy | Sweet onion, savory | Gourmet editions |
| Crushed Pork Rinds | Very crunchy | Salty, porky | Spicy, BBQ-heavy menus |
The Double-Cheese Lid Technique
For maximum cheese pull moments, try the double-cheese lid: before adding the panko topping, scatter a thin layer of shredded cheddar directly over the pasta mixture. Then add the panko on top. During smoking, the cheese layer melts and bubbles up through the panko crust in places, creating an irresistible combination of crunchy top and molten cheese pockets.
Bacon Topping Tip: Pre-cook your bacon to about 70% doneness (still slightly underdone) before crumbling it over the top. It finishes cooking during the smoke and stays crispy rather than becoming chewy or soggy in the steam from the mac and cheese.
Creative Variations: 8 Smoked Mac and Cheese Recipes Worth Making
The base recipe is a starting point, not a ceiling. Once you’ve nailed the classic version, these variations take the dish in completely different directions — from spicy to luxurious to loaded BBQ-style. Each is built on the same foundational technique but diverges in exciting ways.
🌶️ Jalapeño Bacon Mac
Add 4 slices of crumbled cooked bacon and ½ cup of diced pickled jalapeños to the pasta mixture before assembly. Top with additional jalapeño slices and pepper jack shreds. Pairs beautifully with smoked pulled pork — see our smoked pulled pork recipe for the full combo.
🦞 Smoked Lobster Mac
Fold in 1½ cups of roughly chopped cooked lobster meat (or langostino for a budget-friendly version) just before assembly. Use a Gruyère-heavy blend with a touch of tarragon in the béchamel. Finish with a squeeze of lemon zest over the topping.
🧅 French Onion Mac
Stir in 1 cup of deeply caramelized onions to the cheese sauce. Use Swiss and Gruyère as the primary cheeses. Top with beef broth-soaked croutons and extra Gruyère. Smoke at 225°F for 90 minutes.
🍖 BBQ Pulled Pork Mac
Layer 1 cup of shredded smoked pulled pork over the pasta mixture before adding the panko topping. Drizzle with your favorite BBQ sauce and smoke as directed. This combination is the ultimate BBQ platter — a side dish and main course in one pan.
🥬 Truffle & Spinach Mac
Wilt 2 cups of baby spinach in butter and fold into the pasta mixture. Add 1 tablespoon of truffle oil to the cheese sauce. Use a blend of white cheddar, Gruyère, and fontina. Finish with a drizzle of truffle oil over the golden crust.
🧀 Triple Smoked Mac
Use all smoked cheese varieties — smoked Gouda, smoked cheddar, smoked mozzarella — plus a small amount of liquid smoke in the béchamel. Smoke with apple and cherry wood blend. The most intensely smoky version possible without being overwhelming.
🌮 Tex-Mex Mac
Add 1 can of drained rotel tomatoes and green chiles, ½ cup of black beans, and 1 tablespoon of cumin to the sauce. Use Pepper Jack and Colby as the primary cheeses. Top with crushed tortilla chips instead of panko. Serve with sour cream and pico de gallo.
🥦 “Healthier” Cauliflower Mac
Replace half the pasta with roasted cauliflower florets. The cauliflower absorbs smoke beautifully and creates a version that’s lower in carbs without sacrificing the overall experience. Gruyère and sharp cheddar work best with cauliflower’s neutral flavor.
Troubleshooting: Fixing the 7 Most Common Smoked Mac and Cheese Problems
Even experienced cooks run into issues with smoked mac and cheese. The good news: every common problem has a clear fix. Here’s a complete troubleshooting guide.
Problem 1: Sauce Is Grainy or Broken
Why it happens: Cheese was added when the sauce was too hot, pre-shredded cheese was used, or the temperature on the smoker got too high and the fats separated.
Fix it: Remove from heat before adding cheese. Use block cheese, freshly shredded. Add 1–2 tablespoons of cream cheese (sodium phosphate acts as an emulsifier) to rescue a sauce that’s beginning to break — stir vigorously over very low heat.
Problem 2: Mac and Cheese Is Dry After Smoking
Why it happens: Pasta was fully cooked before going in the smoker, absorbed all the sauce during the 90-minute cook, leaving nothing creamy behind.
Fix it: Always under-cook pasta. Additionally, make 10–15% more sauce than you think you need — this buffer accounts for absorption. If you pull it off the smoker and it’s already looking dry, stir in ½ cup of warm heavy cream immediately and let it rest covered for 5 minutes.
Problem 3: Topping Burns Before Mac Is Done
Why it happens: Smoker temperature spiked, too much butter in the panko, or the topping was added too thick.
Fix it: Tent loosely with foil as soon as the topping reaches your desired color. The foil prevents further browning while the interior continues to cook.
Problem 4: No Smoke Flavor
Why it happens: Too little wood, wood not producing smoke, or electric smoker wood chips exhausted too quickly.
Fix it: For pellet grills, add a smoke tube filled with apple pellets on the grate beside the skillet — this significantly increases smoke output at lower temperatures. For charcoal, add one more wood chunk at the 45-minute mark. For electric smokers, add a second tray of chips at 60 minutes. For more guidance on maximizing smoke, our smoke assessment guide covers the mechanics in detail.
Problem 5: Mac Sticks to the Pan
Why it happens: Insufficient fat in the bottom of the pan, cheese sauce dried out at the edges.
Fix it: Before adding the pasta mixture, butter the interior of your cast iron skillet generously. Sides and bottom. This creates a barrier that both prevents sticking and develops an additional crust layer on the bottom and sides.
Problem 6: Overwhelmingly Smoky Flavor
Why it happens: Too much wood, wrong wood type (hickory or mesquite), or white/black smoke rather than thin blue smoke.
Fix it: For future cooks, use milder woods (apple, cherry, alder) and use less volume — for a 90-minute mac and cheese cook, you need far less wood than you’d use for a 10-hour brisket. If the finished dish is too smoky, serve it with something acidic like a simple green salad dressed with lemon vinaigrette — the acidity cuts through the heaviness.
Problem 7: Sauce Doesn’t Bubble or Doesn’t Set Properly
Why it happens: Internal temperature never reached the threshold, or béchamel was too thin going in.
Fix it: Use an instant-read thermometer to verify internal temp reaches at least 160°F. If the sauce was too thin from the start, whisk 1 additional tablespoon of flour into an equal amount of melted butter, cook for 60 seconds, then stir into the sauce before assembly.
For persistent temperature issues with your smoker — whether it’s running too hot, too cold, or inconsistently — check out our guides on why your grill isn’t heating properly and Camp Chef temperature fixes for actionable solutions.
Serving, Storing & Reheating Smoked Mac and Cheese
A perfectly smoked mac and cheese is a dish that rewards planning — both in how you serve it and how you handle leftovers, because yes, there will be leftovers (occasionally).
Serving for a Party
For events, transport the smoked mac and cheese in the cast iron skillet or foil pan with foil tightly sealed over the top. It holds temperature remarkably well — up to 45 minutes in a sealed cooler or insulated bag. At the serving area, remove foil and let people spoon from the skillet directly. Having a small ladle or large serving spoon on hand helps maintain portion control when the line is long.
If you’re feeding a large crowd alongside your main protein, plan for about ¾ to 1 cup per person as a side. A 9×13 pan feeds approximately 12 as a side, or 6–8 as a main course. Need to calculate amounts for a bigger party? Our guide on how much BBQ per person helps with overall party food math.
Storing Leftovers
Smoked mac and cheese stores beautifully in the refrigerator for up to 4 days in an airtight container. The smoke flavor actually intensifies slightly overnight, which many people prefer. The sauce will firm up in the refrigerator — this is normal and expected.
Reheating Without Losing Creaminess
The biggest mistake people make with leftover mac and cheese is reheating it at too high a temperature, which drives off moisture and turns creamy into dry. Here are the three best methods:
- Stovetop (Best Method): Place portion in a small saucepan over medium-low heat. Add 2–3 tablespoons of whole milk or cream. Stir gently every minute until heated through and creamy again. Takes about 5–6 minutes.
- Oven: Place in an oven-safe dish, add a splash of milk, cover tightly with foil. Reheat at 325°F for 15–20 minutes. Remove foil for last 5 minutes to re-crisp the top.
- Smoker Reheat (Best for Groups): Place leftovers in a foil pan with ¼ cup of cream stirred in, cover with foil, and reheat at 250°F for 20–25 minutes. The smoke flavor deepens further.
Can You Freeze Smoked Mac and Cheese?
Technically yes, but the result is noticeably inferior. Dairy-based sauces can separate and become grainy after freezing and thawing. If you must freeze, add extra cream when reheating and stir vigorously. Pasta texture also degrades slightly in the freezer. Better to make smaller batches more frequently than to freeze large quantities. Similar considerations apply when freezing other smoked proteins — the principles are the same.
What to Serve Alongside Smoked Mac and Cheese
Smoked mac and cheese is a rich, hearty side dish — which means the rest of your spread should balance it with contrast. Lean into lighter, acidic, or fresh elements rather than stacking rich on rich.
Main Proteins That Pair Perfectly
| Protein | Why It Works | Wood Recommendation |
|---|---|---|
| Smoked Beef Brisket | Classic BBQ pairing, contrasting textures | Oak or hickory for brisket, apple for mac |
| Smoked Pulled Pork | Sweet pork fat complements rich cheese | Apple or cherry for both |
| Baby Back Ribs (3-2-1) | Ribs bring acid and char, mac brings creaminess | Cherry for ribs, pecan for mac |
| Grilled Chicken Thighs | Lighter protein prevents plate from feeling too heavy | Any mild wood |
| Smoked Beef Short Ribs | Bold beef flavor balanced by creamy mac | Oak for ribs, cherry for mac |
| BBQ Baby Back Ribs | Finger food + fork food creates enjoyable contrast | Apple for both |
Side Dishes That Work With Smoked Mac
Balance the richness of smoked mac and cheese with these lighter accompaniments:
- Tangy coleslaw — the vinegar and crunch cut right through the cheese richness
- Grilled corn on the cob — natural sweetness complements smoked dairy
- Pickles or pickled onions — acidity provides contrast
- Fresh garden salad with lemon vinaigrette — lightens the plate
- Grilled vegetables — charred asparagus, peppers, or zucchini add color and texture
- Texas toast or cornbread — for soaking up the cheese sauce
Sauce Pairings
While smoked mac and cheese doesn’t traditionally need a sauce, some people enjoy drizzling a small amount over the top. Our collection of the best BBQ sauces includes options ranging from vinegar-forward Carolina styles to molasses-based Kansas City sauces — any of these work as a finishing drizzle, but use a light hand.

Oklahoma Joe’s Longhorn Reverse Flow Smoker
Massive cooking surface, legendary smoke quality. Cook your brisket AND your smoked mac and cheese in the same session — the way BBQ was meant to be done.
Check Price on Amazon →Frequently Asked Questions: Smoked Mac and Cheese
The ideal smoking temperature for mac and cheese is between 225°F and 250°F. This low-and-slow range allows smoke to penetrate the dish gradually without overheating the cheese sauce, which can cause it to break or separate. At 225°F, plan for 90–120 minutes. At 250°F, 75–90 minutes is usually sufficient. Avoid temperatures above 275°F, as these risk burning the crust before the interior is properly heated through.
Apple wood is the top recommendation for smoked mac and cheese — its mild, fruity sweetness complements dairy without overpowering it. Cherry wood is a close second, adding a subtle tartness and beautiful color to the crust. Pecan and maple are excellent alternatives. Avoid mesquite and use hickory very sparingly (half a chunk at most), as both are too assertive for delicate dairy-based dishes.
Yes, with some adjustments. You can prepare the cheese sauce and par-cook the pasta up to 24 hours in advance — store them separately in the refrigerator. Assemble and add the topping right before smoking. Fully smoked mac and cheese can be reheated successfully (see the reheating section above), but the dish is always best freshly pulled from the smoker. If making for a party, plan to smoke it the same day and hold it warm in a covered skillet.
A 12-inch cast iron skillet produces the best results: exceptional heat retention, a phenomenal bottom and side crust, and a presentation that impresses at any cookout. For larger quantities, a standard half-size aluminum foil pan (approximately 12″×10″) holds more and is easy to transport. Ceramic casserole dishes also work but produce a slightly softer crust. Never use glass bakeware on a smoker — thermal shock from the grill environment can crack it.
The three most important rules: (1) Always add cheese to the sauce off the heat or over very low heat. (2) Use freshly shredded block cheese, never pre-shredded bags — the cellulose coating prevents smooth melting. (3) Add cheese gradually, stirring between additions. If your sauce does begin to break, stir in 1–2 tablespoons of room-temperature cream cheese, which acts as an emulsifier and can rescue a separated sauce. Keeping smoker temperature under 250°F also prevents the sauce from breaking during the cook.
Total time from prep to table is typically 2–2.5 hours. Prep (cooking pasta and making sauce) takes 25–30 minutes. Assembly takes 5–10 minutes. Smoking at 225–250°F takes 90–120 minutes depending on your target crust color and the depth of smoke flavor you want. Add a 10-minute rest after pulling from the smoker. If you’re running a pellet grill simultaneously with a main protein, the mac and cheese can occupy a second rack without any conflict.
Yes, with the right setup. Set your gas grill up for indirect heat by lighting only one or two burners and placing the mac and cheese on the unlit side. Use a smoker box (our smoke box comparison guide can help you choose the right one) filled with apple or cherry wood chips, placed directly over a lit burner. Close the lid and maintain 225–250°F using the lit burner controls. The result will have slightly less smoke penetration than a dedicated smoker, but the technique works very well.
The most reliable high-performance blend is sharp cheddar (for base flavor) + Gruyère (for nutty depth) + smoked Gouda (as a smoke bridge) + cream cheese (as a binder that prevents sauce separation). This combination delivers maximum stretch, flavor complexity, and stability under extended heat. See the Cheese Blending Guide section above for alternative combinations based on flavor goals and budget.
Generally, no — leaving the dish uncovered allows smoke to penetrate the surface and the topping to develop color. However, if the crust reaches your desired color before the interior is fully cooked (typically after 60–75 minutes at 225°F), tent loosely with foil for the remaining time. This locks in heat and moisture without completely stopping smoke absorption through the foil’s edges. Never seal foil tightly — you’ll steam rather than smoke the dish.
Elbow macaroni is the classic choice because its hollow center collects pools of cheese sauce. Cavatappi (corkscrew) is arguably superior for smoked versions due to its ridged exterior that grips sauce and its thicker walls that withstand the extended heat of smoking without turning mushy. Shells are also excellent for the same sauce-trapping reason. Avoid thin pastas (spaghetti, linguine), as they can’t hold a heavy sauce, and avoid very large pasta shapes that don’t distribute through the dish evenly.
If you don’t have a smoker, you can achieve a partial smoke effect by: (1) using smoked cheeses (smoked Gouda, smoked cheddar) in the blend, (2) adding smoked paprika generously to both the sauce and the topping, (3) using a small amount of liquid smoke (½ teaspoon maximum — it’s potent), and (4) baking in an oven at 375°F for 25–30 minutes. The result won’t have the same depth as the real thing, but it’s still far better than standard baked mac and cheese. When you’re ready to invest in proper smoking equipment, our smoker guide for beginners is the right place to start.
Three factors determine crust crispiness: (1) using panko rather than standard breadcrumbs — panko’s larger, coarser texture produces a loftier, crunchier crust; (2) coating the crumbs thoroughly in melted butter before applying — dry panko doesn’t brown or crisp properly; (3) finishing at slightly higher heat (bump to 275°F for the final 15–20 minutes) if the crust isn’t developing color quickly enough. You can also use the smoker’s broiler function if available, or briefly transfer to an oven broiler set to low for 2–3 minutes at the very end — watch it closely, it can go from perfect to burnt in under a minute.
More Recipes & Guides You’ll Love
- Smoked Pulled Pork — The Complete Pitmaster’s Guide
- Smoke Ribs Using the 3-2-1 Method
- Smoked Beef Short Ribs Recipe
- Smoked Whole Chicken — Tips for Perfect Results
- How to Cold Smoke Cheese at Home
- Smoked Pork Belly Burnt Ends
- The Ultimate Smoker Guide for Beginners
- Best BBQ Rubs for Every Style of Cooking
© BBQ Grill and Smoker · As an Amazon Associate we earn from qualifying purchases made through links on this page.