BBQ Recipe · Complete Technique Guide
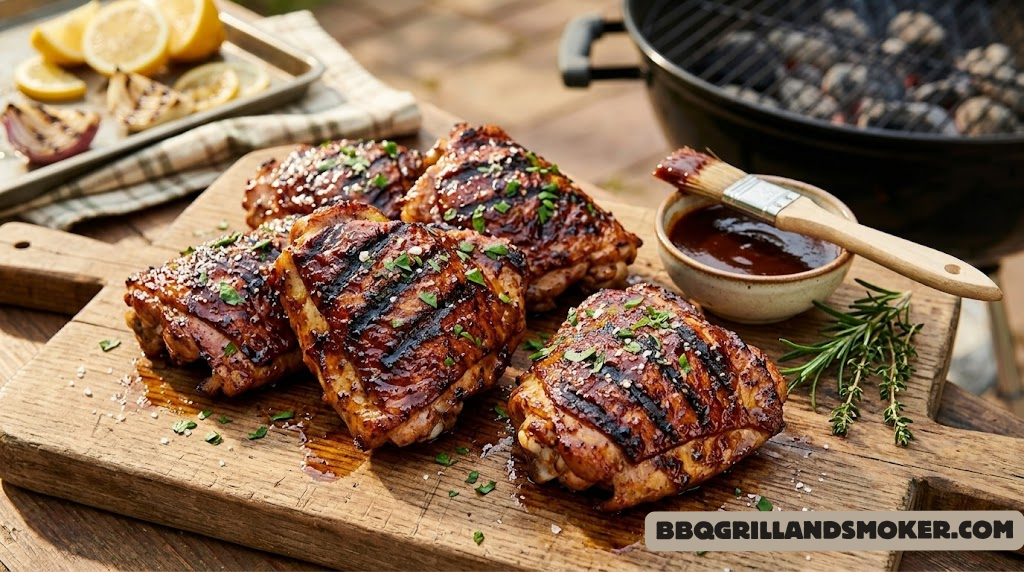
Grilled Chicken Thighs Done Right: Crispy Skin, Smoky Char, and Fall-Off-the-Bone Juicy Every Single Time
Why Chicken Thighs Are the Best Cut for BBQ Grilling
If you’ve ever grilled a chicken breast that came off the grate looking perfect on the outside but tasted like cardboard on the inside, you already understand the argument for thighs. Chicken thighs are simply a more forgiving, more flavorful, and more enjoyable cut to cook over fire — and once you understand why, you’ll wonder why you ever defaulted to the breast in the first place.
The key is fat. Chicken thighs contain roughly three to four times more intramuscular fat than chicken breasts, and that fat does two critical things during a grill cook: it bastes the meat from the inside as it renders, and it reacts with the Maillard reaction on the grate’s surface to create complex, savory browning compounds that lean breast meat can never fully achieve. The result is a richer flavor profile, a deeper sear, and a texture that stays juicy even if you overshoot your target temperature by 10–15 degrees — which is catastrophic for a breast but entirely acceptable for a thigh.
Thighs are also more structurally interesting. The skin, when dried and seasoned properly, renders into a crackling, deeply flavored crust that acts as both a flavor delivery system and a moisture barrier. It’s the kind of crispy that makes people reach for seconds without even registering the decision. We’ll cover exactly how to achieve it in the prep and grilling sections below.
From a practical standpoint, bone-in skin-on thighs are also among the most affordable cuts of chicken in any market — typically 30–50% less per pound than boneless breasts, yet substantially more rewarding to eat when cooked properly. For a straightforward crowd feed or a backyard gathering, six thighs cost less than four breasts and will generate considerably more enthusiasm at the table.
Thighs on Different Grill Types
One of the great advantages of chicken thighs as a grilling protein is that they perform well across every heat source. Charcoal grills deliver the most flavor complexity, with the Maillard reaction amplified by smoke from dripping fat hitting the coals. Gas grills offer more temperature precision and convenience for weeknight cooks. Pellet grills provide a gentle background smoke that complements the chicken’s natural sweetness without overwhelming it. Even a kamado grill at 400°F with a small chunk of apple wood is one of the best environments you can create for chicken thighs.
For an overview of which grill type suits your cooking style best, our comparisons between pellet grill vs. charcoal grill and kamado vs. gas grill break down the flavor and usability differences in detail. If you’re in the market for a new grill that handles chicken exceptionally, our best barbecue grills guide has current recommendations at every price point.
Bone-In vs. Boneless Chicken Thighs: Which Is Better for BBQ?
Both bone-in and boneless thighs have their place on a BBQ grill, and understanding the differences helps you choose the right one for your cook.
| Attribute | Bone-In, Skin-On | Boneless, Skinless | Boneless, Skin-On |
|---|---|---|---|
| Flavor | ★★★★★ Best | ★★★☆☆ Good | ★★★★☆ Very Good |
| Juiciness | ★★★★★ Most forgiving | ★★★☆☆ Can dry out | ★★★★☆ Very good |
| Cook Time | 40–45 min total | 18–22 min total | 25–30 min total |
| Crispy Skin | ✓ Yes | ✗ No skin | ✓ Yes |
| Best For | Weekend BBQ, showpiece | Sandwiches, wraps, weeknight | Best of both worlds |
| Price | $ Least expensive | $$ Mid-range | $$ Mid-range |
| Presentation | ★★★★★ | ★★★☆☆ | ★★★★☆ |
For the purposes of this guide, we’re cooking bone-in, skin-on thighs — the superior choice for BBQ grilling in almost every dimension. If you’re cooking boneless thighs, the technique is identical but the cook time is significantly shorter: skip the extended indirect phase and grill over medium-high direct heat for 5–7 minutes per side, then sauce and rest.
For skin-on cooking to achieve maximum crispiness, the preparation steps below are non-negotiable. Wet skin will never crisp on a grill; understanding why and how to prevent it is fundamental technique. For a comprehensive look at preventing chicken from sticking and maximizing skin quality, our guide to keeping chicken from sticking to the grill covers surface prep, oiling technique, and grate temperature in detail.
The Marinade & Dry Rub: Building Flavor Before the Grill
Great BBQ chicken thighs start 2–8 hours before the grill ever heats up. Flavor development at the marinade and rub stage is not optional — it’s the foundation everything else builds on. Here’s how we approach both methods and when to use each.
The Dry Rub (Our Preferred Method)
For maximum bark development and the crispiest possible skin, a dry rub is the better choice over a wet marinade. Dry rubs draw out surface moisture (which then gets reabsorbed as a seasoned brine), create a drier surface that crisps faster on the grill, and produce better Maillard browning because there are no liquid sugars blocking the surface-to-grate contact.
🔥 BBQ Chicken Thigh Dry Rub
- 2 tbsp smoked paprika
- 1 tbsp brown sugar
- 1 tsp garlic powder
- 1 tsp onion powder
- 1 tsp kosher salt
- ½ tsp black pepper
- ½ tsp cayenne pepper
- ½ tsp dried oregano
- ¼ tsp baking powder (skin secret)
The baking powder in this rub isn’t a typo — it’s the single biggest secret to crispy grilled chicken skin outside of a restaurant. Baking powder raises the skin’s pH slightly, which accelerates browning reactions and promotes moisture evaporation from the skin’s surface during cooking. Use a small amount (1/4 teaspoon per tablespoon of salt is the standard ratio). Too much baking powder creates a detectable slightly metallic taste, so don’t be tempted to add more than called for.
For more rub ideas and ingredient combinations, our best barbecue rubs guide includes commercial picks and our homemade BBQ rub recipe gives you a fully tested base template. For the right BBQ sauce to finish your thighs, our best BBQ sauces roundup covers regional styles from Kansas City sweet to Carolina vinegar to Texas bold.
The Wet Marinade (When to Use It)
Wet marinades are excellent for boneless, skinless thighs or when you want a more deeply flavored interior (rather than a crispy exterior). The trade-off is that acid in the marinade begins breaking down surface proteins after 4–6 hours, eventually producing a slightly mushy exterior texture that impedes crisping. For bone-in skin-on thighs where crispiness is the goal, use dry rub. For boneless thighs heading into tacos or a sandwich situation, a wet marinade produces excellent results.
🍋 Classic BBQ Chicken Marinade
- 3 tbsp olive oil
- 2 tbsp apple cider vinegar
- 2 tbsp soy sauce
- 1 tbsp Worcestershire sauce
- 1 tbsp honey
- 3 garlic cloves, minced
- 1 tsp smoked paprika
- ½ tsp black pepper

Never Guess Doneness Again
An accurate instant-read thermometer is the single best upgrade for grilled chicken results. Probe to 165°F with confidence.
Shop Thermometers on Amazon →Preparing the Chicken Thighs for the Grill
Fifteen minutes of careful prep is what separates grilled chicken thighs that wow from ones that disappoint. Every action in this step has a specific purpose — and skipping any of them has a predictable cost to the final result.
Pat Dry — The Most Important Step
Remove thighs from the refrigerator and use paper towels to thoroughly dry every surface: skin, underside, and edges. Press and hold the paper towel against the skin for 3–4 seconds to wick as much surface moisture as possible. Do this twice per thigh. This isn’t optional — wet skin cannot crisp on a grill under any circumstances, because evaporating surface water holds the surface temperature at 212°F (the boiling point of water) until all moisture is gone, preventing the 310°F+ surface temperatures needed for Maillard browning. Dry skin = crispy skin.
Trim Excess Skin and Fat
Large overhanging flaps of skin beyond the chicken’s natural outline will curl, burn, and drip onto the grill before the chicken is cooked through, creating flare-ups and uneven cooking. Use kitchen scissors or a sharp knife to trim excess skin to a clean edge around each thigh. Leave the skin that covers the meat — only remove excess that hangs beyond the thigh’s perimeter.
Score the Meat (Optional but Recommended)
Make 2–3 shallow cuts through the skin and into the meat, about 1/4 inch deep, on the thickest part of each thigh. Scoring allows the rub to penetrate deeper into the meat (rather than just coating the surface), helps render fat from the skin more evenly, and produces a more uniform cook by reducing the thickness differential between the thickest and thinnest parts.
Pat skin completely dry, score 2–3 shallow cuts through the thickest skin into meat, and trim excess overhanging skin flaps that would burn.
Apply the Binder and Dry Rub
Coat each thigh with a thin film of neutral oil (avocado oil or refined coconut oil — not olive oil, which burns at grill temperatures) as a binder. Then apply your dry rub generously: skin side, underside, and edges. Press the rub firmly into all surfaces with your palm rather than rubbing, which just moves the seasoning around rather than adhering it to the surface.
Let seasoned thighs rest at room temperature for 30–45 minutes before grilling. This serves two purposes: the salt begins its osmotic work, pulling moisture out and then back into the meat as a seasoned liquid; and bringing the chicken closer to room temperature reduces the thermal shock of hitting a hot grill, producing more even cooking from exterior to bone.
Setting Up Your Grill: The Two-Zone Method
The biggest mistake most home grillers make with chicken thighs is grilling them entirely over direct heat — the same way you’d cook a burger. The result is a charred exterior with raw or rubbery meat near the bone, and flare-ups from dripping fat causing scorched spots. The two-zone setup is the professional solution to all of these problems simultaneously.
What Is Two-Zone Grilling?
Two-zone grilling divides your grill into a hot direct zone (flame or coals directly below the grate) and a cooler indirect zone (no flame below the grate). You cook chicken thighs primarily in the indirect zone, where ambient heat circulates around the meat like a convection oven, cooking it through evenly without charring the outside. Then you move to the direct zone only for the final few minutes to crisp the skin and caramelize the sauce.
This approach is also covered in depth in our direct vs. indirect grilling methods guide, which shows exactly when each technique applies across different proteins and cooking goals.
Two-zone setup: coals/burners only on the left (direct) side. Chicken thighs start on the right (indirect) side for 30–35 min, then move left for final crisping.
Setting Up a Charcoal Grill
Build your charcoal fire on one side of the grill only — push all lit coals to the left half (or one third, if space allows). Leave the right half with no coals. The target grill temperature with the lid on is 375–400°F. On a 22-inch kettle, a full chimney of lit lump charcoal on one side achieves this reliably. For understanding lump vs. briquette performance, our lump charcoal vs. briquettes comparison helps you choose the right fuel. Managing temperature on a charcoal grill requires attention to vent positioning — our charcoal grill temperature control guide covers this in full detail.
Setting Up a Gas Grill
On a two-burner gas grill, run one burner on medium-high and leave the other off. On a three-burner grill, run the left burner on medium-high and leave the center and right off. Your target is 375–400°F ambient temperature with the lid closed, which typically means a medium-high setting on most gas grills. Preheat for 10–15 minutes with the lid closed before placing chicken. If you’re interested in adding smoke flavor to gas-grilled chicken, a smoke box with apple wood chips placed over the lit burner adds a pleasant dimension that gas alone can’t provide — our smoke box comparison covers the best options.
Oiling the Grates
Just before placing chicken, oil the grates using the folded-paper-towel-and-tongs method: fold a paper towel into a small pad, dip it into a small dish of high smoke-point oil (avocado, grapeseed, or refined canola), and use tongs to rub the oil-soaked towel along the grate surface in a single pass. Don’t spray cooking oil onto a hot grill — the spray propellant can flare dangerously. Two or three passes with an oiled towel is all you need.
The Indirect Cook: 30–35 Minutes to Build Flavor
With the grill set up and grates oiled, it’s time for the most important and most patient part of the cook: the indirect phase. This is where the chicken thighs cook through to a safe internal temperature while developing a preliminary level of color and bark that the final direct sear will then finish and amplify.
Placing the Thighs
Place thighs on the indirect (cooler) side of the grill, skin-side up. Not skin-side down — the initial position is skin up. We’re cooking the meat through gently from below; the skin will begin to dry out from above during this phase, which is exactly what we want. Keep a small gap between each piece to allow air circulation. Close the lid.
Skin-side up on the indirect zone. Close the lid. Convective heat cooks the thighs through without charring the skin. Don’t peek for the first 25 minutes.
Temperature and Timing
Close the lid and let the chicken cook undisturbed for 25 minutes. After 25 minutes, check the internal temperature of the thickest thigh using an instant-read thermometer inserted into the thickest part of the meat, angled away from the bone. You’re looking for 155–160°F before moving to the direct heat phase — the sear step will carry the temperature the remaining 5–10 degrees to the safe 165°F minimum.
If the thighs aren’t at 155°F yet, close the lid and check every 5 minutes. Total indirect time will be 30–35 minutes for most bone-in thighs at 375–400°F, but variables like thigh size, starting temperature, and ambient temperature all affect this. The thermometer is your authority — time is only a guideline.
Managing Flare-Ups
Flare-ups during the indirect phase are rare if you’ve properly trimmed excess fat, but they do happen with fattier thighs. If a flare-up occurs on the indirect side, don’t panic: close the lid for 30–60 seconds to starve the oxygen. If the flare persists, move the thigh to a different area of the indirect zone away from the flames. Never use water to douse a grease flare-up — it causes dangerous steam bursts and can spread flaming oil. Our detailed flare-up prevention guide covers this for both gas and charcoal setups.

The Perfect Grill for Chicken Thighs
Two-zone cooking made easy. Gas and charcoal options at every budget level.
Shop Grills on Amazon →The Sear & Sauce: The Final 8 Minutes That Make Everything
This is the moment the whole cook has been building toward. After 30–35 minutes of patient indirect cooking, your thighs are cooked to safe temperature, the skin has been drying out steadily, and the fat beneath the skin is fully rendered. You need only two things now: direct high heat to crisp and char the skin, and a thin coat of BBQ sauce to build the lacquered, caramelized glaze that defines the BBQ chicken thigh aesthetic.
Moving to Direct Heat
Using tongs, transfer each thigh from the indirect zone to the direct heat zone, placing them skin-side down. Now you want to hear a sizzle — that sound is fat rendering against the hot grate, Maillard browning happening on the skin’s surface, and water vapor escaping from the now-dry skin in powerful bursts of steam-driven crisping. This is the payoff for everything you did in the prep stage.
Skin-side down on direct high heat for 3–4 minutes. The fat renders against the grate, building grill marks and crisping the skin. Watch for flare-ups.
The Sear Timing
Sear skin-side down for 3–4 minutes. You should hear continuous sizzling — loud, enthusiastic sizzling is good. Monitor for flare-ups. After 3–4 minutes, flip each thigh skin-side up. The skin should be deeply golden to dark brown with visible grill marks. If it’s still pale, give it another minute before flipping.
Applying the BBQ Sauce
Once flipped to skin-side up on the direct zone, this is the moment to apply BBQ sauce. Using a silicone basting brush, coat the now-exposed bone side and meat with a thin, even layer of sauce. Don’t pour sauce onto the hot grates — pour it onto the meat only. Close the lid for 2 minutes to allow the sauce to heat, bubble, and begin setting on the surface. Open, check — the sauce should be slightly tacky and reduced. Apply a second thin coat if you prefer a saucier finish, then close the lid for another 60–90 seconds.
After flipping skin-side up, brush a thin BBQ sauce coat on the exposed bone/meat side. Close lid 2 minutes. Apply second coat if desired. Don’t sauce the grill — sauce the meat only.
Rest, Verify Temperature, and Serve
After a total of 40–45 minutes on the grill, your chicken thighs should be deeply colored, fragrant, and producing clear juices when pierced. Before you cut into them, verify temperature and give them the rest they need.
The Temperature Check
Insert an instant-read thermometer into the thickest part of the thigh, angling away from the bone (bone conducts heat differently than meat and will give a false reading if probed too close). USDA minimum safe temperature for poultry is 165°F. For chicken thighs specifically, many experienced cooks actually target 175–180°F, which produces a more tender, gelatinous texture because the additional collagen in thigh meat converts to gelatin above 165°F, adding richness to the eating experience. Unlike chicken breasts, which become dry and stringy above 165°F, thighs become more tender and juicy at higher internal temperatures.
Rest Time
Rest thighs on a cutting board tented loosely with foil for 5–8 minutes before serving. This allows the contracted muscle fibers to relax and reabsorb redistributed moisture from the center outward. Cutting immediately into hot chicken releases those moisture-laden juices onto your cutting board rather than into your mouth — the 5–8 minute wait is worth every second. For a deeper look at the science of keeping smoked and grilled meats moist, our article on moisture and temperature control for smoked meats is directly applicable here.
Verify internal temp at the thickest point away from the bone. 165°F is safe; 175°F gives the best texture for thighs. Tent with foil and rest 5–8 minutes before serving.
Serving Suggestions
Grilled chicken thighs are genuinely versatile. Serve them whole for a classic BBQ presentation alongside BBQ corn, grilled vegetables, and coleslaw. Pull the meat off the bone and pile it on brioche buns for a showstopping sandwich. Slice the meat thin against the grain for a grain bowl or salad topping. The leftovers reheat remarkably well — making BBQ chicken thighs one of the best proteins to cook in bulk on a weekend for weeknight meals.
- Internal temperature: 165°F minimum, 175–180°F for best texture
- Skin: deep golden-brown, crispy to the touch, not rubbery
- Juices: run completely clear when thickest point is pierced
- Sauce: set and slightly tacky, not wet or dripping
- Grill marks: visible and deep on skin side

Equip Your Grill Game Properly
Quality tongs, basting brushes, thermometers, and grill brushes — the tools that separate good chicken from great chicken.
Shop BBQ Tools on Amazon →Chicken Thigh Temperature Guide: From Grill Setup to Safe Serving
Temperature is the single most important variable in grilling chicken thighs correctly. Here’s the complete temperature reference for every stage of this cook:
| Stage | Temperature | Why This Temp? | Action |
|---|---|---|---|
| Grill preheat (lid closed) | 375–400°F ambient | High enough for bark; low enough to avoid burning before cooked through | Let stabilize 15 min before adding chicken |
| End of indirect phase | 155–160°F internal | Carryover during sear will complete the final 5–15°F | Move to direct heat zone |
| USDA minimum safe | 165°F internal | Pathogen-kill threshold for all poultry | Do not serve below this temp |
| Optimal for thighs | 175–180°F internal | Collagen converts to gelatin → more tender, richer texture | Best eating experience |
| Overcooking threshold | 185°F+ | Muscle fibers lose moisture faster than collagen compensates | Pull before this temperature |
| Sauce application | After sear crisps skin | High sugar content burns above 275°F if applied early | Last 5–8 min only |
Understanding internal temperature is the foundational skill for all grilled proteins. Our comprehensive guide to grilling chicken perfectly covers temperature targets across all chicken cuts, and the general principles apply equally to a standalone thigh cook like this one. If you’re ever unsure whether your thermometer is reading accurately, testing it in boiling water (should read 212°F at sea level) and in ice water (should read 32°F) takes 30 seconds and gives you instant calibration confidence.
5 Flavor Variations to Master Through the Summer
Once you’ve mastered the base technique, the variation possibilities are genuinely endless. Here are five proven flavor profiles that use the same two-zone technique but bring completely different flavor experiences to the table:
| Variation | Rub/Marinade | Sauce | Wood Smoke | Best Served With |
|---|---|---|---|---|
| Classic Kansas City | Sweet smoked paprika, brown sugar, garlic | KC-style thick sweet sauce | Apple or cherry | Corn, coleslaw, baked beans |
| Spicy Alabama | Black pepper, cayenne, garlic, oregano | White Alabama sauce (mayo-based) | Hickory | Potato salad, white bread |
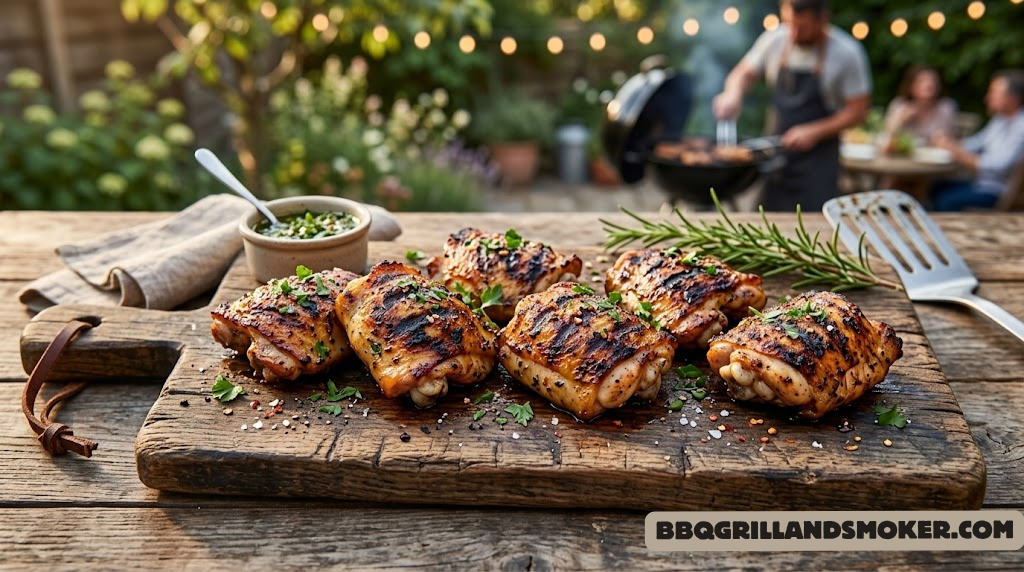
| Lemon Herb Mediterranean | Lemon zest, rosemary, thyme, garlic, olive oil | No sauce / lemon squeeze at end | None / light oak | Tzatziki, grilled pita, tomatoes |
| Korean-BBQ Inspired | Gochujang, soy, sesame oil, ginger, brown sugar | Thinned gochujang glaze | Apple | Steamed rice, kimchi, scallions |
| Texas Pepper Bark | Coarse black pepper + kosher salt (50/50) | No sauce — let bark speak | Post oak or pecan | Pickles, white onion, white bread |
The Korean-BBQ variation is a particular crowd-pleaser for summer gatherings — the gochujang marinade produces a deeply savory, mildly spicy glaze that caramelizes beautifully under direct heat and generates consistent compliments. The Alabama white sauce variation is perhaps the most surprising for uninitiated guests: a tangy, creamy, mayo-horseradish-vinegar sauce that sounds wrong but tastes absolutely right on smoked chicken.
If you want to explore the full flavor landscape that different cooking methods and fuel types create for chicken, our breakdown of flavor outcomes from gas vs. charcoal grills and the broader grilling vs. smoking flavor mechanics guide give you the scientific foundation behind why different methods produce different tastes.
Bone-In vs. Boneless Considerations for Variations
Most of these variations work equally well on boneless thighs. The Korean BBQ variation is particularly excellent on boneless thighs sliced thin after cooking — the cut surface caramelizes during the sear and the sliced presentation is elegant for a dinner plate. For the Texas Pepper Bark variation, bone-in is strongly preferred: the simplicity of the rub demands that the natural flavor of the chicken carry the dish, and bone-in thighs have significantly more complex flavors from the bone and surrounding fat.
Troubleshooting: Why Your Chicken Thighs Aren’t Coming Out Perfect
| Problem | Likely Cause | Fix |
|---|---|---|
| Skin is rubbery, not crispy | Skin was wet when it hit the grill; too short direct sear; insufficient grill temp | Pat skin completely dry; extend direct sear to 5 min; verify grill at 375°F+ |
| Chicken raw at the bone | Indirect phase too short; grill temp too low; thighs were very cold | Extend indirect to 40 min; use thermometer not time; bring chicken to room temp |
| Sauce burns before chicken is done | Sauce applied too early in the cook | Apply sauce only in final 5–8 min on direct heat |
| Chicken sticks to grill | Grates not oiled or not hot enough; moved too early | Oil grates before placing chicken; wait for natural crust release before flipping |
| Dry chicken despite proper temp | Left too long on grill past 180°F; no rest period | Use thermometer; pull at 175°F; always rest 5–8 min |
| Massive flare-ups | Excess overhanging fat not trimmed; grill dirty with old grease | Trim fat before cooking; clean grill before use — see our grill cleaning guide |
| Pale, no color after full cook | Too little sugar in rub; grill temp too low; skin too wet | Add 1 tsp brown sugar to rub; increase direct heat; dry skin thoroughly |
| Uneven cooking piece to piece | Large size variation in thighs; crowded grate | Try to buy uniform-sized thighs; leave space between pieces |
The most common issue we see from new grillers is wet skin that never crisps — addressed completely by the paper towel drying technique and the overnight uncovered refrigerator method described earlier. The second most common is sauce burned black before the chicken finishes — always a timing issue, always fixed by moving sauce application to the final phase only.
If your grill isn’t reaching or maintaining 375°F, our diagnostic article on why grills don’t reach temperature covers fuel, burner, and airflow factors across gas, charcoal, and pellet setups. Maintaining proper grill condition is also critical — a grill with clogged burners, dirty grates, or old grease buildup will never perform consistently. Our barbecue maintenance essentials guide covers the complete maintenance routine to keep your grill performing at its best.
Level Up Your Chicken With the Right Sauce & Rub
From Kansas City sweet to Alabama white — explore the sauces and rubs that define regional BBQ chicken.
Shop Sauces & Rubs on Amazon →Full BBQ Grilled Chicken Thighs Recipe
🔥 BBQ Grilled Chicken Thighs — Master Recipe
Ingredients
- 6 bone-in, skin-on chicken thighs
- 2 tbsp avocado or neutral oil
- 2 tbsp smoked paprika
- 1 tbsp brown sugar
- 1 tsp garlic powder
- 1 tsp onion powder
- 1 tsp kosher salt
- ½ tsp black pepper
- ½ tsp cayenne pepper
- ¼ tsp baking powder (skin)
- ½ cup BBQ sauce (finish)
Instructions
- Prep (Day before or 30 min ahead): Pat thighs completely dry. Trim excess skin. Score thickest skin 2–3 times to 1/4 inch depth. Mix all dry rub ingredients.
- Season: Coat thighs with oil. Press rub onto all surfaces. Rest at room temperature 30–45 min, or refrigerate uncovered overnight for maximum crispiness.
- Set up grill for two-zone cooking at 375–400°F. Oil grates just before adding chicken.
- Indirect cook: Place thighs skin-side up on indirect zone. Close lid. Cook 30–35 min until internal temp reaches 155–160°F.
- Sear skin: Move to direct zone, skin-side down. Sear 3–4 min until skin is deeply golden and crispy. Flip.
- Sauce: Brush thin coat of BBQ sauce on now-exposed side. Close lid 2 min. Apply second coat if desired, 90 seconds more.
- Verify temp: Internal temperature must reach 165°F minimum; 175°F for best texture.
- Rest: Remove from grill. Tent loosely with foil. Rest 5–8 min before serving.
For a complete BBQ feast built around this recipe, pair with our BBQ grilled corn, smoked mac and cheese, and a cold slice from our BBQ shrimp skewers as an appetizer. If you’re also cooking for the red meat lovers in your crowd, our perfect grilled steak guide and grilled burger recipe make excellent companion cooks on the same grill.
Frequently Asked Questions
The most common questions we receive about BBQ grilled chicken thighs, answered from real cook experience.
Conclusion: Your Best Grilled Chicken Thighs Start Tonight
Crispy-skinned, deeply flavored, perfectly juicy BBQ grilled chicken thighs are not a restaurant secret — they’re the result of applying a handful of techniques that, once understood, become second nature. Pat the skin dry. Season generously. Use a two-zone setup. Cook indirect, finish direct. Sauce at the very end. Rest before serving. Six principles that collectively transform an ordinary weeknight protein into the dish your guests talk about on the drive home.
The two-zone technique covered in this guide is applicable far beyond chicken thighs — it’s the foundation of how professionals grill everything from whole chickens to thick pork chops to leg of lamb. Mastering it on something as forgiving and affordable as a chicken thigh is genuinely the best way to develop confidence and intuition with your grill. Start here, and everything else gets easier.
When you’re ready to expand your BBQ repertoire, our baby back ribs recipe, 3-2-1 smoked ribs method, smoked pulled pork, and grilled lamb chops are all natural next adventures. And if this cook has made you think seriously about upgrading your grill, our best barbecue grills guide and Traeger Pro 575 review are excellent starting points.
Now go season some thighs.

Everything You Need for Perfect Grilled Chicken Thighs
Thermometers · tongs · basting brushes · dry rubs · BBQ sauces · grill cleaners — all Prime-eligible.
Shop All BBQ Essentials on Amazon →Disclosure: BBQ Grill & Smoker is reader-supported. Purchases made through our Amazon affiliate links (tag: bbqgrillsmokers-20) earn us a small commission at no extra cost to you. All technique recommendations are based on our own independent testing and real cook experience.