Smoked Whole Chicken:
Bark, Smoke Ring,
Juicy Every Time
The complete guide to smoking a whole chicken — from brine to bark, wood selection to internal temperature, and every critical decision in between.
Why Smoked Whole Chicken Is the Perfect Place to Start
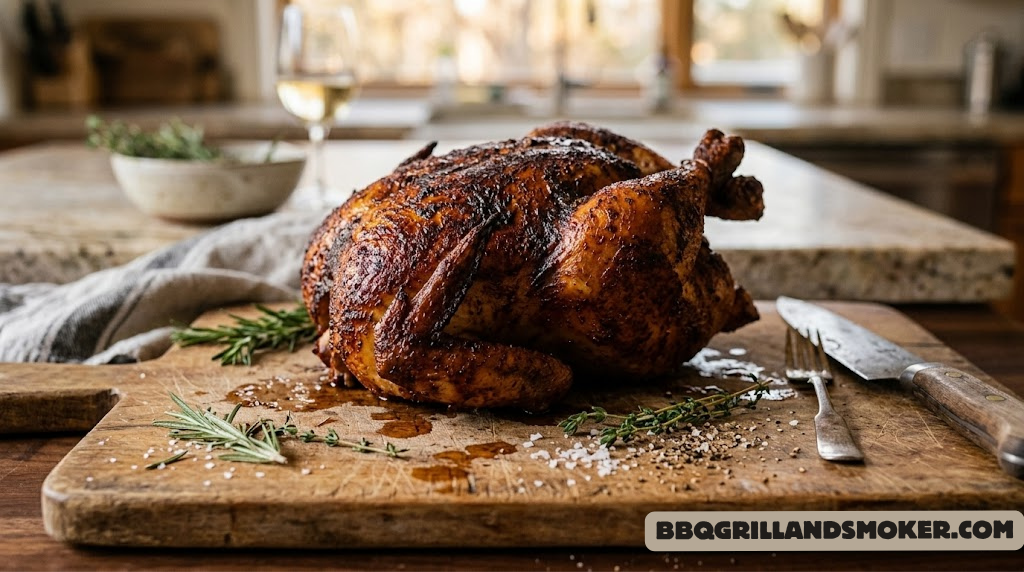
There’s a reason every serious pitmaster has a go-to smoked chicken method. It’s not the longest cook — a whole bird can go from smoker to table in three and a half to four and a half hours. It’s not the most expensive protein — a good 4–5 pound chicken won’t break the bank. What it is, consistently, is a cook that rewards attention to detail and punishes shortcuts. Get it right, and you have mahogany skin that crackles when you bite through it, smoke that penetrates every layer of meat, and breast meat so juicy it practically drips. Get it wrong, and you’re dealing with rubbery skin, dry breast meat, or a bird that smells like a campfire but doesn’t taste like much.
This guide is built to make sure you get it right — every single time. We’re going deep on every variable: brine vs dry brine vs nothing, the science of dry rub composition, wood flavor profiles and how they interact with poultry, smoker temperature management, and the step-by-step process from spatchcocking to resting. We’ll also look at the most common mistakes people make and exactly how to avoid them.
Whether you’re cooking on a pellet grill, an offset smoker, a kettle grill with indirect heat, or a dedicated electric smoker, the principles here apply. If you’re newer to smoking in general, our complete smoker guide for beginners is an excellent companion read before diving in.
Why Whole Chicken Wins
- Relatively fast cook — 3.5 to 4.5 hours
- Budget-friendly protein with high return
- Great platform for practicing smoke and temp control
- Magnificent bark potential on skin
- Feeds 4 comfortably from one bird
- Works on ANY smoker or grill setup
Common Challenges
- Breast and thigh reach safe temp at different rates
- Rubber skin without a proper finishing temp
- Overpowering smoke from too-heavy wood
- Inconsistent results without a brine step
- Uneven cooking without spatchcocking
Smoked whole chicken is also one of the finest food gifts you can bring to any gathering. It transports well — especially if you’ve built real bark on the skin — and holds heat beautifully when wrapped in butcher paper. If you’re looking to expand your smoker repertoire after mastering this, our guides on smoked pulled pork, 3-2-1 smoked ribs, and smoked beef short ribs are natural next steps.
The Build
Ingredients & Equipment: What You Need Before You Start
Good results start long before the smoker ever gets lit. Sourcing the right bird, assembling your brine ingredients, and having the right equipment ready makes the actual cook smoother, less stressful, and more consistent. Here’s everything you need.
Ingredients
- 1 whole chicken (4–5 lbs), patted dry
- 1 gallon cold water (for brine)
- ½ cup kosher salt (brine)
- ¼ cup brown sugar (brine)
- 1 tbsp black peppercorns
- 4 garlic cloves, smashed
- 2 tbsp olive oil or melted butter
- 2 tbsp your dry rub (recipe below)
- 1 tsp smoked paprika
- 1 tsp garlic powder
- 1 tsp onion powder
- ½ tsp cayenne pepper
- ½ tsp black pepper
- ½ tsp dried thyme
- Fresh herbs for cavity (thyme, rosemary)
- Lemon half (for cavity, optional)
Equipment Needed
- Smoker of choice
- Instant-read thermometer
- Leave-in probe thermometer
- Large brining container or bag
- Wire rack + sheet pan
- Butcher’s twine (for trussing)
- Heat-resistant gloves
- Basting brush
- Sharp carving knife
- Wood chunks or chips
Choosing the Right Chicken
Not all chickens are created equal, and what you put in the smoker has a massive impact on what comes out. Here’s what to look for:
Size: The sweet spot for smoked whole chicken is 4 to 5 pounds. Birds smaller than 3.5 lbs cook too quickly for meaningful smoke penetration. Birds over 6 lbs need so long in the smoker that breast meat risks becoming dry before the thighs and legs are fully done. In a 4–5 lb range, you get excellent smoke exposure with manageable cook times.
Fresh vs. Frozen: Fresh chicken is ideal — it takes brine more evenly and often produces better texture. If using frozen, thaw completely in the refrigerator (24–48 hours for a whole bird), and dry thoroughly before brining.
Air-Chilled vs. Water-Chilled: If you can find air-chilled chickens (increasingly common at quality grocery stores and butchers), choose them. Water-chilled chickens absorb water during processing, which dilutes flavor and makes achieving crispy skin harder. Air-chilled birds have drier skin from the start, which means better bark formation and crisper results.
Pat your chicken extremely dry — both outside and inside the cavity — before applying your rub or going into the brine. Moisture on the skin surface is the enemy of bark. Use paper towels and be thorough. This single step dramatically improves skin texture.

Find Your Perfect Smoker
From pellet grills to offset smokers — our complete guide covers every style, size, and budget to help you find the right machine for smoked chicken and beyond.
Shop Smokers on Amazon →The Most Important Step
The Brine: Why You Should Never Skip It for Chicken
If there’s one step that separates amateur smoked chicken from genuinely exceptional smoked chicken, it’s the brine. Whole chickens are prone to two cardinal sins: dry breast meat and bland flavor that doesn’t reach the bone. Brining addresses both with the same simple solution.
Wet Brine vs. Dry Brine: Which Is Better?
| Factor | Wet Brine | Dry Brine |
|---|---|---|
| How It Works | Bird submerged in saltwater solution (+ sugar, aromatics) | Salt and seasoning rubbed directly onto skin and under it |
| Moisture Retention | Excellent — adds moisture AND retains it | Very good — draws then reabsorbs moisture |
| Skin Crispiness | Good — must dry skin thoroughly after brining | Excellent — dry brine draws moisture out, dries skin |
| Flavor Penetration | Excellent — aromatics in brine infuse meat | Good — concentrated at surface and just below |
| Time Required | 4–12 hours (overnight ideal) | 2–24 hours (longer = better) |
| Convenience | Requires container, fridge space | No container needed, less mess |
| Best For Smoking | Wet brine — maximum moisture for long cook | Great alternative for crispiest possible skin |
The Classic Wet Brine Formula
Our go-to wet brine for smoked chicken is built on a ratio that works every time: 1 tablespoon of kosher salt per 1 cup of water. For a full gallon (which comfortably submerges a 4–5 lb bird), that’s ½ cup kosher salt. Add ¼ cup brown sugar to balance and promote caramelization during the smoke, plus aromatics for depth.
Brine Recipe:
- 1 gallon cold water
- ½ cup kosher salt (Diamond Crystal; use less if using Morton’s)
- ¼ cup brown sugar or honey
- 1 tbsp black peppercorns
- 4 garlic cloves, smashed
- 2 bay leaves
- Fresh thyme or rosemary sprigs (optional but excellent)
- Juice of 1 lemon (optional — adds brightness)
Dissolve the salt and sugar in 2 cups of hot water first, then add the remaining cold water. Make sure the brine is fully cooled before adding the chicken — you never want to put raw chicken into warm brine. Submerge the bird completely (place a heavy plate on top if needed), and refrigerate for a minimum of 4 hours. Overnight (8–12 hours) is optimal. Beyond 12–14 hours, the texture can begin to degrade.
After brining: Remove the chicken and rinse under cold water. Then — and this is critical — pat it completely dry, inside and out, with paper towels. If you have time, place the uncovered bird on a wire rack in the refrigerator for 1–2 hours after brining. This air-drying step dramatically improves skin crispiness, which is one of the trickier aspects of smoked whole chicken.
Keeping smoked meat moist throughout the cook is something we cover in depth in our guide on temperature and moisture control for smoked meats — brining is step one of that strategy, but it’s not the last tool you have.
The Flavor Foundation
Dry Rub Mastery: Building Bark and Flavor on Poultry
A good dry rub does three things for smoked chicken: it creates the flavorful bark on the skin during the long, low-temperature cook; it adds a seasoning layer that penetrates into the first few millimeters of meat; and it helps the smoke adhere to the surface more effectively. A great rub balances savory, sweet, and spicy elements in proportions that complement the mild flavor of chicken without overwhelming it.
Anatomy of the Perfect Chicken Rub
Unlike beef rubs — which often lean heavily on salt, pepper, and bold spices — chicken rubs work best with a more balanced, herbaceous approach. Here’s how to build one:
| Component | Role | Best Ingredients | Proportion |
|---|---|---|---|
| Salt base | Seasoning backbone, moisture management | Kosher salt (coarse) | 30–35% |
| Sweet element | Bark formation, caramelization, color | Brown sugar, turbinado, coconut sugar | 20–25% |
| Heat | Depth, complexity, kick | Black pepper, cayenne, chili powder | 15–20% |
| Aromatic alliums | Savory depth | Garlic powder, onion powder | 15–20% |
| Color + smoke flavor | Visual appeal, paprika smoke note | Smoked paprika, regular paprika | 10–15% |
| Herbs | Brightness, complexity | Dried thyme, oregano, rosemary | 5–10% |
The House Smoked Chicken Rub
Here’s our balanced, all-purpose smoked chicken rub that works beautifully with apple or cherry wood:
- 2 tbsp kosher salt
- 2 tbsp smoked paprika
- 1 tbsp brown sugar
- 1 tbsp garlic powder
- 1 tsp onion powder
- 1 tsp black pepper (coarse grind)
- 1 tsp dried thyme
- ½ tsp cayenne pepper (adjust to taste)
- ½ tsp dried oregano
Mix thoroughly and apply generously — both over the skin and, critically, under the skin over the breast meat. Loosening the skin from the breast and applying rub directly to the meat ensures flavoring that penetrates well beyond the surface. Don’t be shy: a whole 4–5 lb chicken can easily take 3–4 tablespoons of rub.
If you enjoy making your own rubs from scratch, our complete homemade BBQ rub recipe guide covers everything from coffee rubs to citrus herb blends. And if you want to explore commercially available options, our best BBQ rubs roundup covers the top products on the market today.
The single best thing you can do for a smoked whole chicken is get your rub — and even some softened butter — under the skin directly onto the breast meat. The skin acts as a barrier; seasoning on top of it will mostly stay there. Seasoning under it flavors the meat directly. Gently work your fingers between the skin and breast, being careful not to tear it, and apply a generous pinch of rub on each side.
Premium BBQ Rubs — Top Picks
When you want the shortcut without sacrificing flavor — our curated list of the best BBQ rubs covers every style from classic to bold.
Shop BBQ Rubs on Amazon →Smoke Science
Wood Selection: The Flavor Variables That Most People Get Wrong
Wood choice for smoked chicken is one of the most misunderstood aspects of the cook. Chicken has a mild, delicate flavor profile compared to beef or pork — which means it’s far more susceptible to smoke overwhelm. A wood that’s perfect for a 14-hour pork shoulder can completely dominate a 4-hour chicken, leaving you with bitter, acrid flavors that no rub or sauce can fix.
The cardinal rule for smoked whole chicken: fruit and mild hardwoods only. Save the hickory and mesquite for your brisket. The chicken deserves something that complements rather than bulldozes.
Apple Wood
Sweet, mild, slightly fruity. The gold standard for poultry. Produces beautiful golden-mahogany color without overpowering flavor.
Cherry Wood
Sweet, slightly tart, produces the most beautiful deep red-mahogany color. Blend with apple for the perfect combination.
Peach Wood
Delicate and sweet. Similar to apple but with a softer, more peachy undertone. Excellent for summer cooks.
Pecan
Mild, nutty, slightly sweet. A step up in intensity from fruit woods. Use sparingly — blending with apple is ideal.
Alder
Extremely delicate. Traditional for fish and poultry in the Pacific Northwest. Minimal color impact, clean flavor.
Avoid for Chicken
Mesquite and heavy hickory are too aggressive for poultry. Always avoid pine and other softwoods — they produce toxic smoke.
For a deeper look at wood flavor science — including moisture content, chunk vs. chip debate, and how different smoker types use wood differently — our dedicated guides on wood chips vs wood chunks and complete BBQ wood chips guide are essential reading. And for the definitive comparison of the two most common bold woods, our hickory vs mesquite guide explains exactly why mesquite should stay away from your poultry.
Getting Ready
Smoker Setup: Getting Your Rig Ready for the Perfect Cook
The smoker you’re using shapes the setup process, but the target is the same regardless of equipment type: a stable temperature in the 250–275°F range with clean, thin blue smoke. That “thin blue smoke” vs. thick white or gray billowing smoke distinction is critical — and it’s something many beginners don’t fully understand until they’ve made the mistake once.
The Thin Blue Smoke Standard
Good smoke is almost invisible. It’s a thin, slightly blue-tinted wisp rising from your exhaust vent — not a dramatic, billowing white cloud. Thick white smoke means your fire is smothering, your wood is too wet or too green, your airflow is restricted, or all three. That thick white smoke is acrid, bitter, and will coat your chicken with unpleasant creosote compounds. If you see it, open your vents, add fresh fuel, and wait until it clears to thin blue before putting the chicken on.
Setup by Smoker Type
Pellet Grill: The easiest setup — just preheat to 250–265°F (about 20–30 minutes), and let the controller handle everything. Use your supersmoke or maximum smoke setting if available. Add a small smoke tube with apple or cherry pellets for extra smoke output at lower temps. For pellet grill comparisons relevant to smoking chicken, see our pellet vs electric smoker comparison and reviews of top models like the Traeger Pro 575 and Camp Chef Woodwind WiFi 24.
Offset Smoker: Build your fire in the firebox and allow 45–60 minutes for the cooking chamber to stabilize at 250–265°F. Maintain heat with splits (pieces 2–4 inches in diameter) added every 45–60 minutes. The bird goes on the cooking grate, as far from the firebox as possible to get indirect heat. An Oklahoma Joe Highland — one of the most popular entry-level offsets — works beautifully for this. See our Oklahoma Joe Highland review for setup specifics.
Kettle Grill: The classic indirect setup — charcoal on one or both sides, bird in the center with no coals beneath it. Use a drip pan filled with a little water under the bird to moderate heat and catch drippings. Add 2–3 wood chunks to your coals. Vent control is everything: bottom vent 50% open, top vent nearly fully open to allow airflow while maintaining 250–265°F. Our charcoal grill temperature control guide covers this in detail.
Electric Smoker: Preheat to 250°F. Load your wood chip tray with apple or cherry chips. Electric smokers have limited smoke output, so consider a supplemental smoke tube placed inside for extended smoke exposure. Check our Masterbuilt 30″ review for a look at one of the most popular electric smoker setups for whole chicken.

Essential BBQ Tools for Smoked Chicken
A quality instant-read thermometer and a leave-in probe are non-negotiable for consistent smoked chicken results. Our top picks across every budget.
Shop BBQ Thermometers →The Method
Step-by-Step: How to Smoke a Whole Chicken
With your bird brined, dried, rubbed, and your smoker preheated and producing clean thin blue smoke, it’s time for the cook itself. Here’s every step, explained with the level of detail that makes the difference between good smoked chicken and unforgettable smoked chicken.
Before the bird touches the smoker, you have a critical choice: spatchcock (butterfly) the chicken or leave it whole with a truss. Both approaches work, but they produce different results and require different timing. We’ll cover spatchcock in detail in the next section — it’s our preferred method. For classic whole bird presentation, truss the legs together with butcher twine and tuck the wing tips under the body to prevent them from burning.
Apply your rub generously over the entire bird, making sure to get it under the breast skin. Insert fresh herb sprigs and a halved lemon into the cavity for additional aromatic depth.
Before putting the chicken in the smoker, insert your leave-in probe thermometer into the thickest part of the breast — not touching bone. This is your primary monitoring point throughout the cook. The breast is the part of the chicken most likely to overcook first (higher surface area to mass ratio), so that’s where you monitor. Many pitmasters also set a second probe in the thigh for reference.
Position the chicken breast-side up on the cooking grate. If your smoker has uneven heat distribution (common in offset smokers), position the bird so the thighs — which can handle higher heat — are closest to the heat source. The breast should be furthest from the firebox. This natural positioning helps compensate for the different cooking rates of breast vs. dark meat.
Set your alarm at 155°F breast temperature as the warning point — you’ll be monitoring closely from there. The goal is a breast temperature of 165°F and a thigh temperature of 175°F when you remove from the smoker. Never rely solely on time; always use temperature.
For the first 2 hours of the cook, maintain your smoker at 250–265°F and make sure you have steady, clean smoke. Resist the urge to open the smoker and check the chicken — every time you open the lid, you lose heat and smoke, extending your cook time and disrupting the stable environment that’s building your bark.
After 2 hours, do your first temperature check. A typical 4.5 lb bird at 250–265°F will be at roughly 130–140°F internal at this point. From here, start checking every 20–30 minutes. Resist opening the smoker just to peek — use a leave-in probe to monitor without disruption.
This step is the secret weapon that separates “good” smoked chicken from “great” smoked chicken. When your breast temperature reaches 150°F, it’s time to blast the heat to crisp the skin. Increase your smoker temperature to 400°F (on a pellet grill, simply turn the dial). If you’re on a charcoal or offset smoker, open all vents fully and add a chimney of hot coals to spike the heat. At 400°F for 10–15 minutes, the fat renders from the skin completely, turning it from rubbery to genuinely crispy.
The two-stage method is the most reliable path to perfectly smoked whole chicken. The low-and-slow phase builds smoke flavor and bark; the high-heat finish solves the skin problem that plagues low-temperature-only smoked chicken. Monitor closely during the finish — you’re removing the bird when breast hits exactly 165°F, no more.
The rest is not optional. After pulling the chicken from the smoker at 165°F breast internal, the bird needs to rest uncovered on a wire rack or cutting board for a minimum of 15–20 minutes. During this time, the internal temperature continues to rise (carryover cooking typically adds 3–5°F), and the muscle fibers relax, redistributing moisture throughout the meat.
Cut into a smoked chicken immediately and you’ll see the juices run freely — but that’s your flavor leaving on the cutting board. Rest it properly and those juices stay in the meat where they belong. Cover the bird loosely with foil only if your environment is cold; if you’re in a warm kitchen, leave it uncovered so the skin stays crisp.
The Spatchcock Method: Why It’s Even Better
Spatchcocking (butterflying) the chicken before smoking solves the single biggest challenge of whole-bird cooking: the uneven race between breast and dark meat reaching their respective ideal temperatures. By removing the backbone and flattening the bird, you expose the entire chicken to heat simultaneously — the breast and thighs are now on the same plane, cooking at essentially the same rate.
The benefits are significant:
- 20–30% faster cook time — the flattened bird cooks more evenly and quicker
- Uniform smoke exposure — every part of the chicken is equidistant from the smoke source
- More skin surface area — the backbone removal creates more skin-down surface, which crisps beautifully
- More consistent internal temperatures — breast and thigh reach their targets much closer together
To spatchcock: place the chicken breast-side down on a cutting board. Using sharp kitchen shears or a sharp knife, cut along both sides of the backbone from tail to neck and remove it completely. Save it for stock. Flip the bird breast-side up, press firmly on the breastbone until it cracks flat. Apply your rub, place skin-side up on the smoker grate, and proceed. Spatchcocked birds at 265°F are typically done in 2.5–3.5 hours.
For more on the difference between direct and indirect grilling methods — both relevant to spatchcock setups — our direct vs indirect grilling comparison is excellent context.

Essential BBQ Tool Sets
The right tools — from poultry shears for spatchcocking to quality basting brushes — make every cook smoother and more enjoyable.
Shop BBQ Tool Sets →Temperature Science
The Smoked Chicken Temperature Guide: Every Stage Explained
Temperature is the language of smoking. Every critical moment in your smoked chicken cook is defined by a temperature reading — not by time, not by color, and not by “it looks done.” Here’s the complete breakdown of every temperature checkpoint and what it means for your chicken.
Smoker Target
Ideal smoking range. Enough heat to cook thoroughly, slow enough for maximum smoke penetration and bark development.
Internal — Phase 1
Roughly 2 hours in for a 4.5 lb bird. You’re in the smoke zone. Don’t open the smoker — stay patient.
Internal — Warning
Time to spike the heat to 400°F for the skin crisping phase. Monitor closely — you have 15–20 minutes to the finish.
Breast — Pull Temp
USDA minimum safe temperature for poultry. Pull the chicken the moment this reads in the thickest breast part.
Thigh — Ideal
Dark meat benefits from slightly higher temps. Collagen conversion at 175°F creates juicy, tender thigh and leg meat.
Breast — Post Rest
Carryover cooking during the 15-min rest will typically raise breast temp 3–5°F. Safe and at peak juiciness.
| Time Checkpoint | Typical Internal Temp (4.5 lb bird at 260°F) | What to Do |
|---|---|---|
| 0 hours — Start | Ambient (40–50°F out of fridge) | Place in smoker, insert probe, start cook |
| 1 hour | ~100–115°F | Check smoke quality — should be thin and blue |
| 2 hours | ~130–145°F | First lid-open check allowed. Add wood if needed. |
| 2.5–3 hours | ~148–155°F | Increase to 400°F for skin crisping — WATCH CLOSELY |
| 3–4 hours | 165°F breast / 175°F thigh | PULL THE CHICKEN. Begin the rest immediately. |
| Post-rest (15–20 min) | ~168–172°F (carryover) | Carve and serve |
If you’re new to understanding the smoke ring and its relationship to internal temperature and color changes, that’s an excellent deep dive into what’s happening chemically inside your chicken as it cooks.
Fix It Before It’s Too Late
Troubleshooting: The 8 Most Common Smoked Chicken Mistakes
1. Rubbery, Soft Skin
Cause: Low-temperature smoking without a finishing blast, or too much moisture on the skin at the start.
Fix: Always dry the chicken thoroughly after brining, and always finish at 400°F when internal breast temp reaches 150°F. The two-stage method is non-negotiable for crispy skin.
2. Bitter, Acrid Smoke Flavor
Cause: Thick white smoke (incomplete combustion), too much wood, or using the wrong wood species.
Fix: Never start cooking until your smoker is producing thin blue smoke. Use fruit woods for chicken, and don’t overload your firebox. Less wood = better smoke for poultry.
3. Dry Breast Meat
Cause: Overcooking past 165°F, no brine, or cooking too hot throughout.
Fix: Brine the bird for at least 4 hours. Use a reliable instant-read thermometer. Pull at exactly 165°F in the thickest breast part — not a degree more. See our complete guide to perfectly cooked chicken for broader context.
4. Uneven Cooking Between Breast and Thigh
Cause: Whole bird anatomy — the thighs and legs take longer, the breast overcooks first.
Fix: Spatchcock the bird, or position thighs toward the heat source. Some pitmasters also shield the breast with foil for the first 90 minutes of the cook.
5. No Visible Smoke Ring
Cause: Starting the cook with cold smoke, using a clean-burning electric smoker with chips that vaporize quickly, or not enough cooking time in the smoke zone.
Fix: Add a smoke tube with pellets for electric smokers. Make sure you have good smoke from the start. A proper smoke ring on chicken develops mostly in the first 2 hours of the cook.
6. Chicken Sticking to the Grate
Cause: Cold grate, insufficient oil on the skin, or moving the chicken before bark has formed.
Fix: Lightly oil the grates before preheating. Don’t move the chicken for the first 90 minutes. For grate sticking issues in general, our guide to preventing chicken from sticking to the grill covers surface prep in detail.
7. Over-Smoked, Heavy Smoke Flavor
Cause: Too much wood, the wrong wood (heavy woods like mesquite), or poorly managed fire producing dirty smoke.
Fix: For chicken on a pellet grill, 2–3 hours of smoke exposure is typically sufficient. On an offset smoker, 2–3 small wood chunks (not the whole pile) is the right quantity. Less is genuinely more with poultry smoke.
8. Inconsistent Temperature in the Smoker
Cause: Inadequate fuel, restricted airflow, poor lid seal, or cooking in extreme ambient cold or wind.
Fix: Preheat longer before loading the bird. On cold days, preheat to 20°F above target to compensate. Our guide to grill heating issues covers fuel and airflow troubleshooting in depth.
Change It Up
5 Smoked Whole Chicken Flavor Variations to Master Next
Once you’ve nailed the classic approach, the smoked whole chicken platform becomes infinitely adaptable. Here are five proven variations that take the same technique in completely different directions.
1. Honey Glazed Smoked Chicken
Use a standard rub with a higher brown sugar component, then brush with a honey-apple cider vinegar glaze (equal parts honey and ACV with a pinch of cayenne) during the final 15-minute high-heat stage. The glaze caramelizes into a beautiful lacquered shell that makes the skin irresistible. Apply the glaze every 5 minutes during the final blast.
2. Cajun Smoked Chicken
Swap the standard rub for an aggressive Cajun blend: 2 tbsp paprika, 1 tbsp cayenne, 1 tbsp garlic powder, 1 tbsp dried thyme, 1 tbsp dried oregano, 1 tsp white pepper, 1 tsp onion powder, salt to taste. Use pecan wood for the smoke. The bold spice profile pairs brilliantly with the mild sweetness of pecan smoke.
3. Beer Can Smoked Chicken
Insert an open, half-full beer can (any lager works, but avoid IPAs — the hop bitterness can penetrate the meat) into the cavity. The beer steams from inside, adding moisture and a subtle malt flavor. The bird “sits” upright over the can on the grate, which promotes extremely even heat distribution. Not ideal for spatchcock, but a showstopper for whole-bird presentation.
4. Citrus Herb Smoked Chicken
Replace the standard rub with a citrus-forward blend: olive oil + lemon zest + orange zest + garlic + fresh rosemary + thyme, blended into a paste. Stuff the cavity with halved citrus fruits. Smoke with alder or apple wood. The result is bright, aromatic, and dramatically different from the standard BBQ profile — perfect for a more refined summer dinner.
5. Buffalo Style Smoked Chicken
Keep your standard rub, smoke to 155°F breast internal, then toss the entire bird in a sauce of melted butter, Frank’s RedHot, garlic powder, and a dash of Worcestershire at the high-heat finish stage. The sauce caramelizes into a spicy, buttery glaze. Serve with blue cheese dressing and celery for a crowd-pleasing presentation. See our best BBQ sauces guide for quality bottled sauce alternatives.

Find the Best BBQ Sauces for Smoked Chicken
From honey glaze to spicy buffalo — our curated picks cover every style of BBQ sauce for glazing, dipping, and finishing your smoked chicken.
Shop BBQ Sauces on Amazon →The Table
Serving, Carving, and What to Do With Leftovers
A perfectly smoked whole chicken deserves a presentation worthy of the work you put in. Here’s how to serve it at its best — and how to make the most of every part of the bird.
Carving a Smoked Whole Chicken
The carving sequence for a smoked whole chicken is the same as any roast bird, but with extra care around the bark — you want to preserve as much of that beautiful, seasoned skin as possible:
- Rest first. We covered this — minimum 15 minutes. Non-negotiable.
- Remove the legs by pulling the thigh away from the body and cutting through the joint where the thighbone meets the carcass. Separate drumsticks from thighs at the knee joint.
- Remove the wings by pulling out and cutting at the shoulder joint.
- Carve the breast meat by making a deep, decisive cut along one side of the breastbone, then following the ribcage down to free the entire breast half. Slice against the grain.
- Save the carcass for stock. Smoked chicken stock is incredible — it has a depth of flavor that no store-bought broth can touch.
What to Serve With Smoked Whole Chicken
Smoked chicken’s bold, smoky flavor pairs best with sides that have some acidity or freshness to balance it:
- Smoked Mac and Cheese — the obvious pairing. Our smoked mac and cheese recipe is designed specifically to complement smoked poultry.
- Coleslaw with apple cider vinegar dressing — acidity cuts through the richness
- Grilled corn on the cob — see our BBQ grilled corn recipe
- Baked beans — the classic combination
- Grilled vegetables — our grill vegetables like a pro guide covers everything from asparagus to zucchini
- Potato salad or smashed potatoes
- Fresh bread or cornbread to soak up drippings
Leftover Smoked Chicken
Leftover smoked whole chicken is one of cooking’s great second-act stories. The smoky flavor actually intensifies in the fridge overnight. Use it in:
- Smoked chicken tacos — shred the meat, heat with chipotle sauce, serve with avocado and lime
- Smoked chicken soup — made with the carcass-based stock and leftover meat, this is exceptional
- Smoked chicken salad — tossed cold with a mustard-tarragon dressing
- Smoked chicken quesadillas — the smoky flavor makes these unforgettable
- Smoked chicken pizza — with barbecue sauce, red onion, and smoked gouda
Leftover smoked chicken keeps refrigerated for 3–4 days and can be frozen for up to 3 months without significant quality loss.
Your Questions, Answered
Smoked Whole Chicken FAQs
At 250–265°F, a whole 4–5 pound chicken takes approximately 3.5 to 4.5 hours. Spatchcocked (butterflied) chickens cook faster — typically 2.5 to 3.5 hours. Variables that affect timing include the starting internal temperature of the bird, ambient outside temperature, smoker efficiency, and whether you’re using the two-stage method (low and slow then a high-heat finish). Always cook to internal temperature — 165°F in the breast, 175°F in the thigh — rather than to a fixed time.
The ideal smoker temperature for whole chicken is 250–275°F for the main cook phase. This is hot enough to cook the bird through in a reasonable timeframe while allowing significant smoke penetration and bark development. When the internal breast temperature reaches 150°F, increase your smoker to 400°F for 10–15 minutes to render the fat from the skin and achieve crispiness. Pull the chicken when the breast reads 165°F. Never smoke a whole chicken below 225°F — the risk of keeping the bird in the food danger zone (40–140°F) for too long increases significantly at very low temperatures.
Strongly recommended, yes. Brining is the single most effective technique for ensuring juicy smoked chicken breast — the part of the bird most prone to drying out during the long, low-temperature cook. A wet brine (1 tablespoon kosher salt per cup of water) for 4–12 hours increases the meat’s moisture-holding capacity significantly. A dry brine (kosher salt applied directly to the skin) for 2–24 hours is an excellent alternative that also improves skin crispiness. If you’re short on time, even a 2-hour wet brine makes a noticeable difference over no brine at all.
Apple wood and cherry wood are the gold standards for smoked whole chicken. Both produce mild, sweet smoke that complements rather than overwhelms the delicate flavor of poultry. Apple gives beautiful golden-mahogany color; cherry produces a deeper red-mahogany hue and slightly more pronounced flavor. A 50/50 blend of apple and cherry is our top recommendation. Pecan and alder are excellent alternatives. Avoid heavy woods like mesquite and straight hickory for chicken — their intensity easily overpowers poultry, resulting in bitter, acrid notes. Never use any softwood (pine, cedar, spruce) — they produce toxic compounds when burned.
Crispy skin on smoked chicken requires three things working together: (1) Extremely dry skin before the cook — pat thoroughly dry after brining, and air-dry on a rack in the refrigerator for 1–2 hours if time permits. (2) No excessive moisture in the smoker — don’t use a water pan for chicken, and avoid basting the skin during the cook. (3) A high-heat finishing blast — when the breast reaches 150°F internal, increase your smoker to 400°F for 10–15 minutes. At 400°F, the fat under the skin renders completely, transforming rubbery skin into genuinely crispy bark. This two-stage method is the most reliable path to crispy smoked chicken skin.
Start breast-side up for the entire cook. The conventional wisdom of starting breast-side down (to let the fat from the back baste the breast) rarely produces meaningful results in a smoker, and starting breast-side up allows the skin to develop bark evenly throughout the cook. Position the bird so the thighs and legs face the heat source (in offset smokers) — dark meat can handle higher ambient heat than breast meat and takes longer to reach temperature. For spatchcocked chickens, skin-side up the entire time is the correct approach.
You should not smoke a frozen whole chicken. Whole birds are too large for the frozen center to safely reach proper temperature while the exterior cooks normally. The exterior will cook while the interior remains in the food danger zone for too long, creating a food safety risk. Always thaw whole chickens completely in the refrigerator (24–48 hours) before smoking. You can, technically, grill smaller pieces from frozen as described in our guide on grilling frozen meat — but for a whole bird in a smoker, a complete thaw is non-negotiable. See our guide on grilling frozen meat safety for broader context.
Smoking uses low indirect heat (225–275°F) over an extended period (3–4+ hours) with wood smoke as a flavor vehicle, resulting in deep smoke penetration, a smoke ring, rich bark on the skin, and a uniquely complex flavor profile. Grilling a whole chicken uses higher indirect heat (325–400°F) for a shorter period (75–90 minutes) with little to no intentional wood smoke, producing a roasted chicken with nice charred skin but minimal smoke flavor. Our complete comparison of grilling vs smoking mechanics covers every dimension of this distinction. Both produce excellent chicken — the choice depends on time available and the flavor profile you’re after.
Bitter, acrid smoked chicken skin is almost always caused by dirty smoke — specifically, thick white or yellow smoke produced by smoldering wood that isn’t burning cleanly. This smoke deposits creosote (a bitter, tar-like compound) on the skin’s surface. The fix: always wait until your smoker is producing thin blue smoke before adding the chicken; use dry, seasoned wood rather than green wood; avoid overloading the firebox with too much wood at once; and ensure adequate airflow through your smoker. Using heavy woods like mesquite for poultry can also cause bitter notes even with clean combustion — switch to apple or cherry wood for chicken.
For smoked whole chicken, skip the water pan. Unlike brisket or pork shoulder — which benefit enormously from the humidity a water pan adds — chicken needs the surface to be as dry as possible to achieve good bark and crispy skin. A water pan adds moisture to the smoker environment, which works against skin crispiness. The brine handles internal moisture; the dry smoker environment handles skin quality. If you’re cooking other meats simultaneously on the same smoker that benefit from a water pan, use it — but position the chicken where it gets the least humid environment (typically highest in the smoker or furthest from the water pan).
You’ve Got This
The Final Word: Your Smoked Chicken Blueprint
Smoked whole chicken is the cook that keeps teaching you. Every session gives you new information — about how your smoker behaves, how different woods interact with poultry, how the two-stage temperature method changes skin texture. And unlike a 16-hour brisket, you get that feedback in an afternoon.
Here’s the blueprint that never fails: brine for 4–12 hours (wet or dry), dry the skin completely, rub generously under and over the skin, use apple or cherry wood for clean, mild smoke, smoke at 250–265°F to 150°F internal, then blast at 400°F to 165°F, and rest for 15–20 minutes before carving. Every great smoked whole chicken follows this arc.
Once you’ve mastered this method, the rest of the smoking world opens up naturally. Move to smoked turkey breast for holiday cooking, smoked pulled pork for the crowd-feeder, or smoked beef short ribs for the showstopper cook. Each builds on what you learned here.
If you’re still dialing in your equipment, our comprehensive best BBQ smokers guide covers every style and price point, and our smoker beginner’s guide covers every setup and first-cook question you might have.
FIRE IT UP. YOUR BEST SMOKED CHICKEN IS NEXT.
Get your smoker dialed in, your brine ready, and your rub mixed. Everything else is just patience and temperature.
Shop Smokers on Amazon Bookmark This Recipe